Burningpixelmedia for Mac
Burningpixelmedia for Mac is designed to act as an online advertising tool. Applications like Burningpixelmedia for Mac generally is suitable with the basis of Pay Per press and connected on the internet industry models. Hence,it contains a vested interest in you pressing in the a lot of popups and banner ads in other words regularly rains on you during your surfing sessions. And to double-check that it might squeeze out as a bunch of clicks from you as feasible, it generally partakes in positive covert ploys that are frequently frowned upon. Like, such as, Burningpixelmedia might be recording surfing details from you so to improve its commercial adverts and merely present you with the ones that you tend to be concerned with. However, what can take place in addition to that details afterwards on and who else may acquire entry to it is something you’ll likely never know – and i.e. unsettling to a majority of people.
Download Removal Toolto remove Burningpixelmedia
What is Burningpixelmedia?
Burningpixelmedia runs relatively intrusively and this results in many people to mix up it with a malicious virus application. However, Burningpixelmedia does not get any malevolent characteristics and can not be classified as infection. What can transpire, though, is that as an outcome of its threatening ad-supported practices, people could be led to unsecured web locations and hence to infections and malignant code e.g Trojans, ransomware, etc. You can erase Burningpixelmedia from your Mac by following the phases explained in our uninstallation guide underneath. And when you have carried out so, the bothersome adware procedures shall quit and you shall be capable of recovering you browser adjustements to their initial say.
The Burningpixelmedia app
The Burningpixelmedia app is usually attached to the installers of other applications in order to get distributed and reach the end user. Hence, you possibly installed the Burningpixelmedia app without knowing it in bundles with some extra program.Furthermore, as an outcome of it’s involve, your browser might beginning to impose website routes on you at unintended points during your surfing sessions, which could even be defined as one of those the biggest part of tormenting bits of this hijacker’s process. Not to be anxious, though, as you aren’t doomed to sustain via all of this until the end of time.
Learn how to remove Burningpixelmedia from your computer
Step 1. Burningpixelmedia Removal from Windows
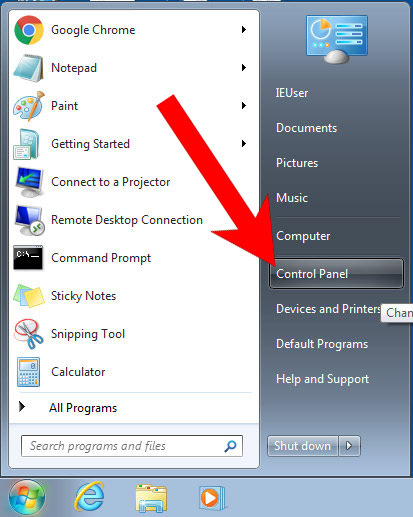
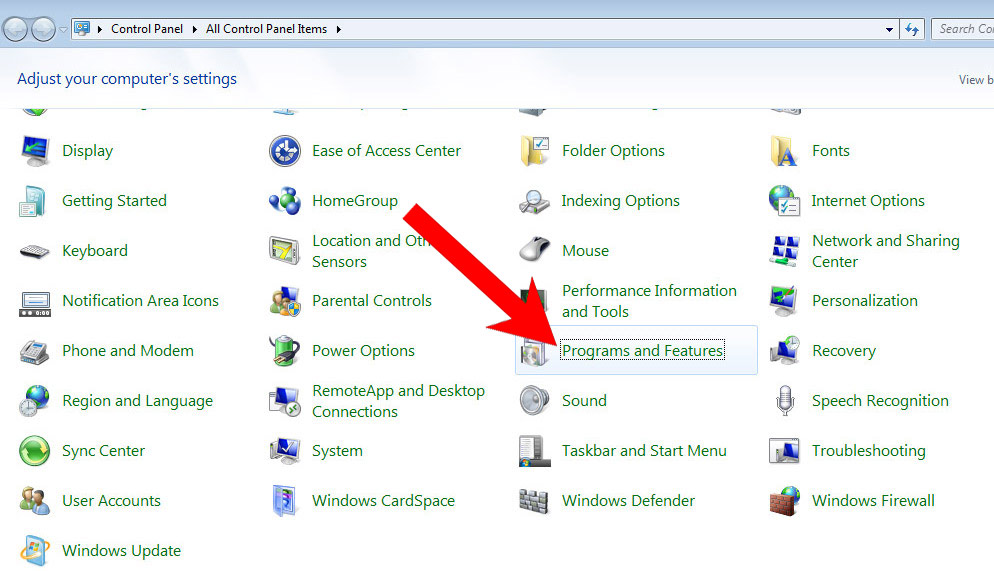
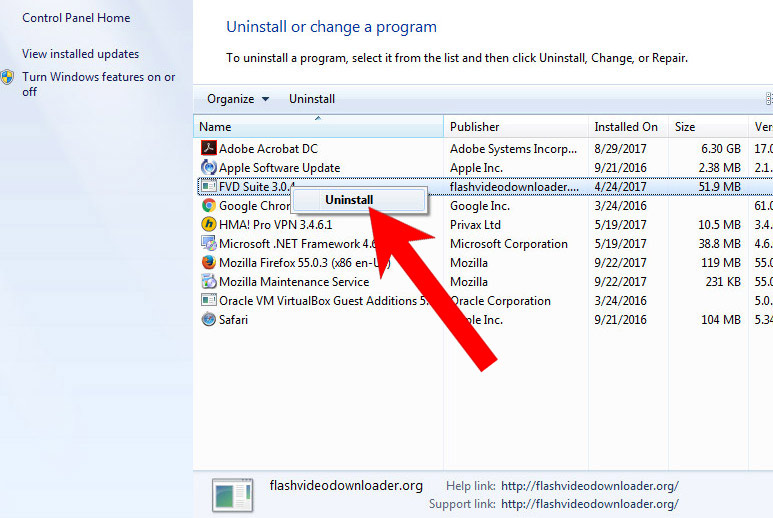
a) Windows 7/XP
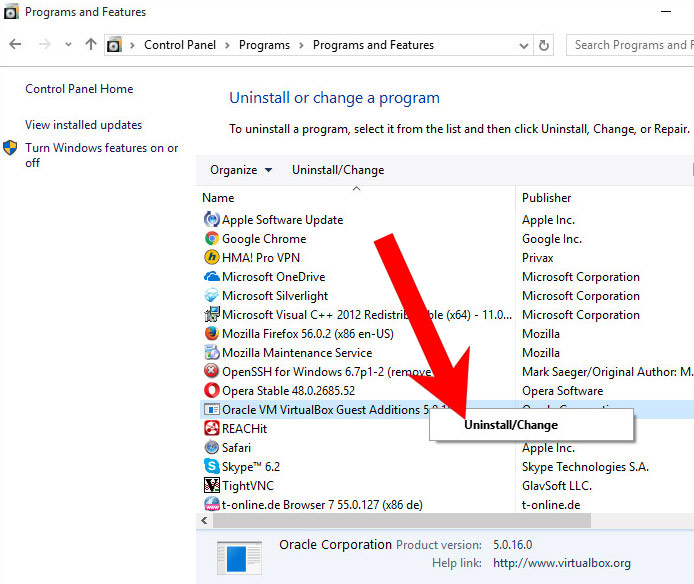
- Press on the Start icon.

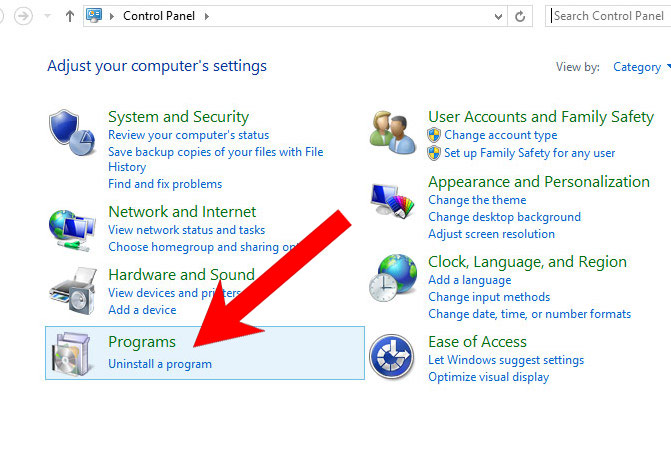
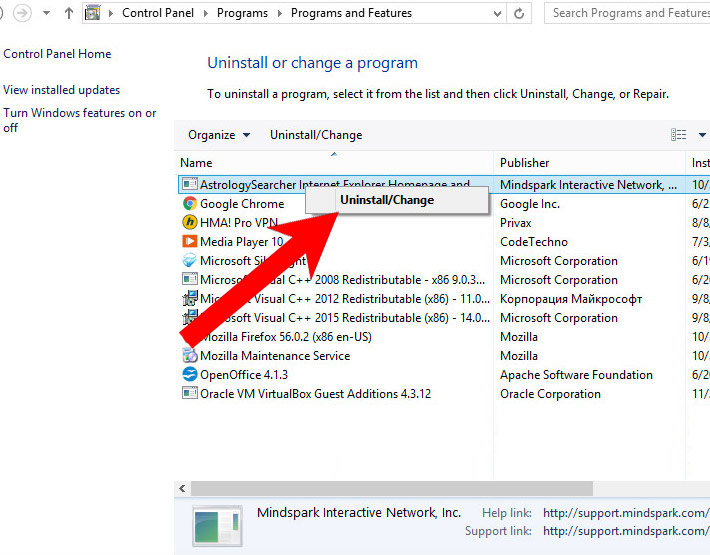
- Control Panel → Programs and Features.
- Find the program you want to delete and press Uninstall.
b) Windows 8
- Right-click on the start icon (lower left corner).
- Select Control Panel.
- Click Programs and Features.
- Find and remove all unwanted programs.
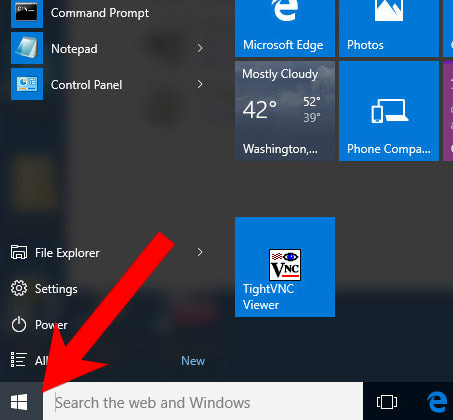

c) Windows 10
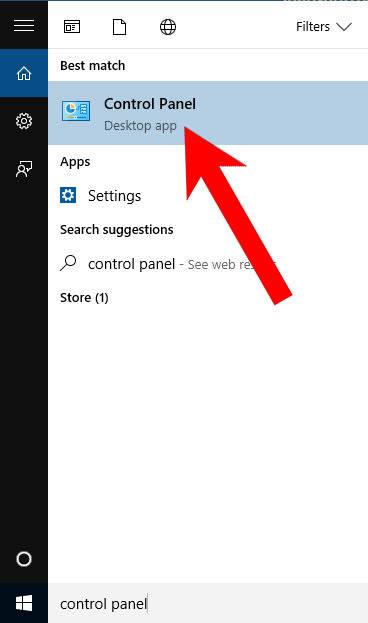
- Open Start menu and click on the magnifying glass (next to the shut down button).
- Type in Control Panel.
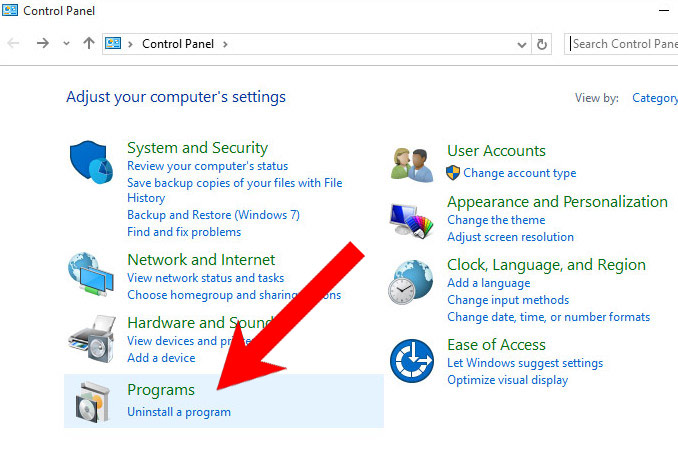
- Control Panel → Programs and Features.
- Find and remove all unwanted programs.
d) Mac OS X
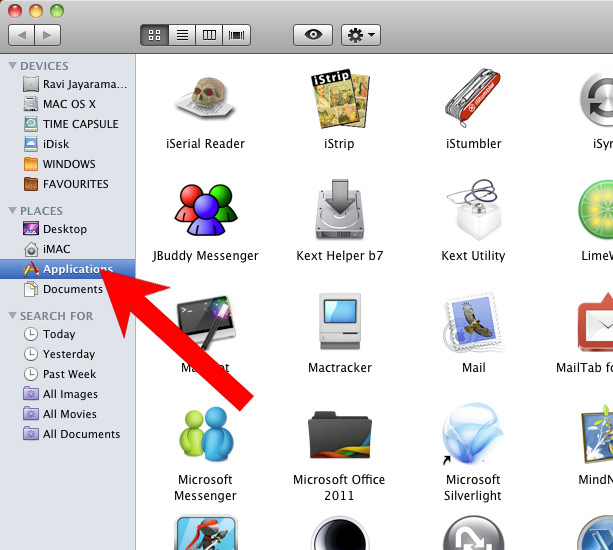
- Open Finder and press Applications.
- Check all suspicious programs you want to get rid of.
- Drag them to the trash icon in your dock (Alternatively, right-click on the program and press Move to Trash).
- After you move all the unwanted programs, right-click on the trash icon and select Empty Trash.

Step 2. Delete Burningpixelmedia from browsers
a) Remove Burningpixelmedia from Microsoft Edge
Reset Microsoft Edge (Method 1)
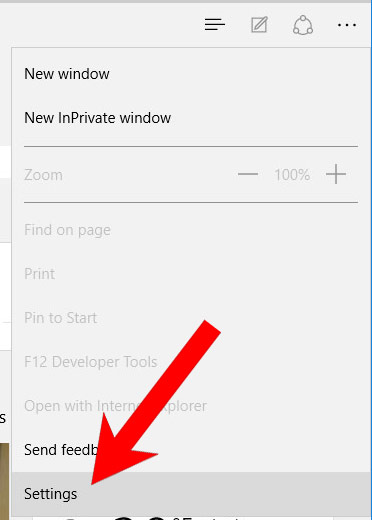
- Open Microsoft Edge.
- Press More located at the top right corner of the screen (the three dots).
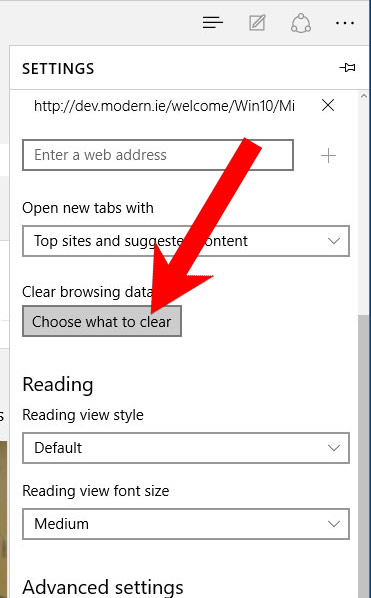
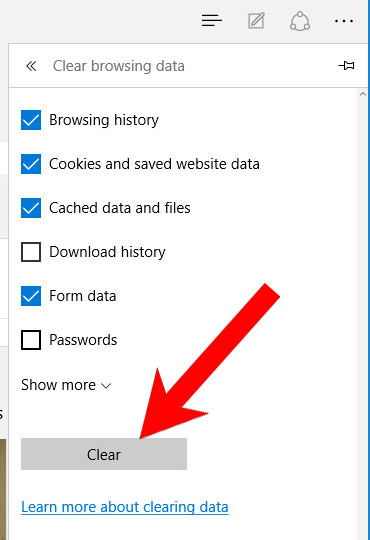
- Settings → Choose what to clear.
- Check the boxes of the items you want removed, and press Clear.
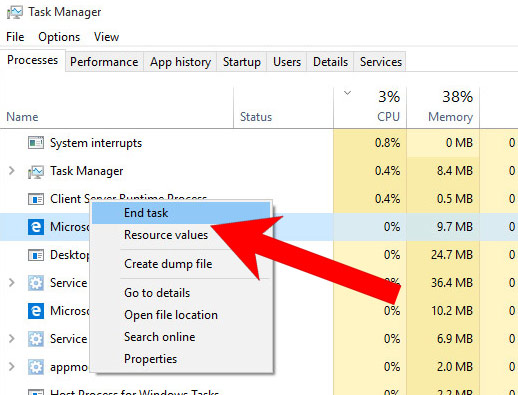
- Press Ctrl + Alt + Delete together.
- Choose Task Manager.
- In the Processes tab, find the Microsoft Edge process, right click on it, and press Go to details (or More details if Go to details is not available).
- Right-click on all Microsoft Edge processes, and choose End task.
(Method 2)
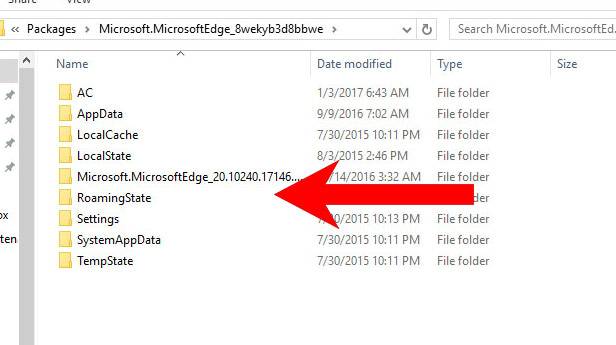
Before you proceed with this method, backup your data.- Go to C:\Users\%username%\AppData\Local\Packages\Microsoft.MicrosoftEdge_xxxxxxxxxx.
- Select all the folders, right-click on them and press Delete.
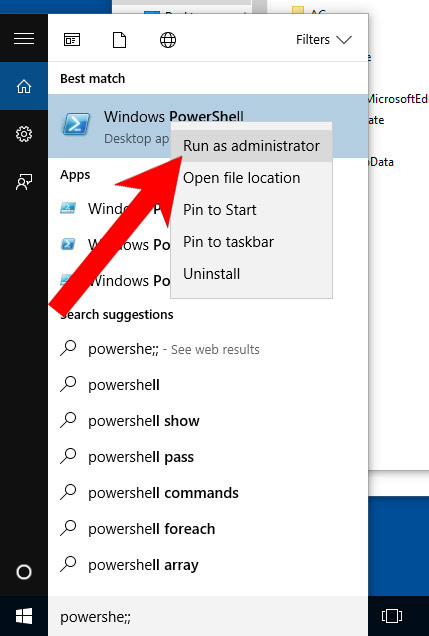
- Press the start button, and type in Windows PowerShell in the search box.
- Right-click on the result, and select Run as administrator.
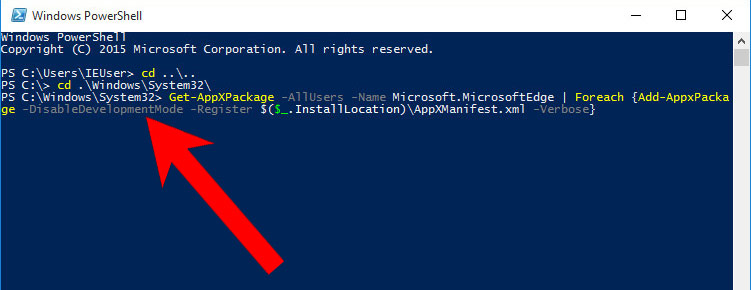
- In Administrator: Windows PowerShell, paste
Get-AppXPackage -AllUsers -Name Microsoft.MicrosoftEdge | Foreach {Add-AppxPackage -DisableDevelopmentMode -Register $($_.InstallLocation)\AppXManifest.xml -Verbose}
under PS C:\WINDOWS\system32> and tap Enter.
- The issue should be gone now.
b) Remove Burningpixelmedia from Internet Explorer
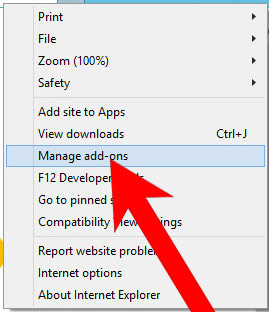
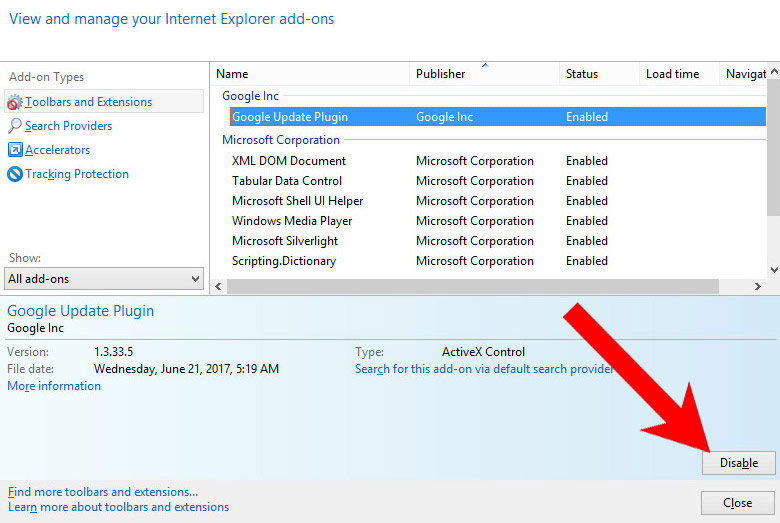
- Open Internet Explorer and press on the Gear icon.
- Select Manage add-ons, and then Toolbars and Extensions.
- Find and disable all suspicious extensions.
- Close the window.
c) Restore your homepage on Internet Explorer
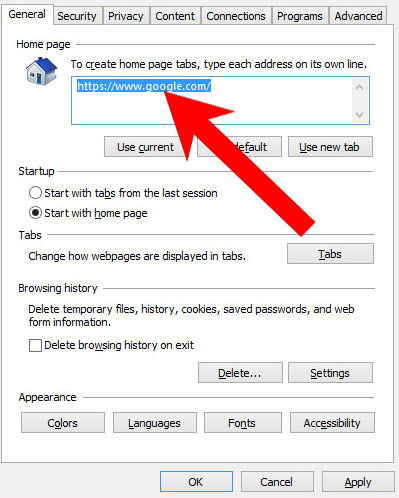
- Open Internet Explorer and press on the Gear icon.
- Internet Options → General tab. Delete the homepage URL and type in your preferred one.
- Press Apply.
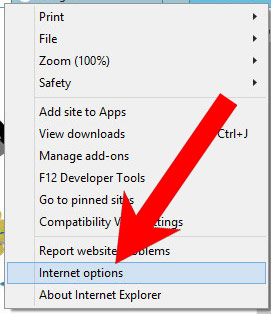
d) Reset Internet Explorer
- Open Internet Explorer and press on the Gear icon.
- Internet Options → Advanced tab.
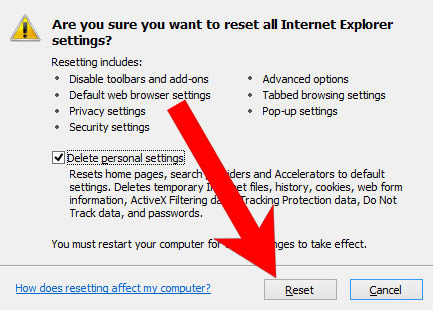
- At the bottom, you will see a Reset button. Press that.
- In the window that appears, check the box that says Delete personal settings.
- Press Reset.
- Click OK to exit the window.
- Restart your browser.

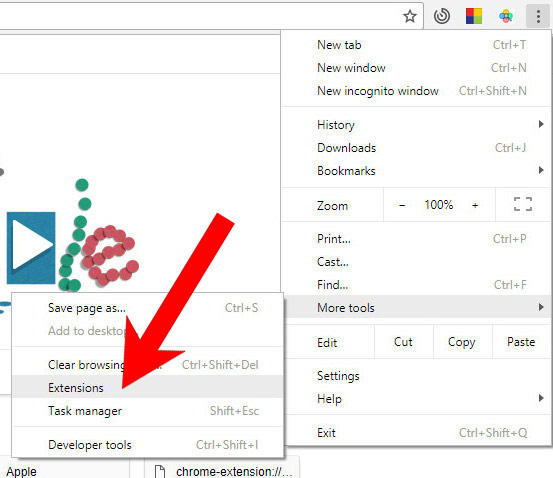
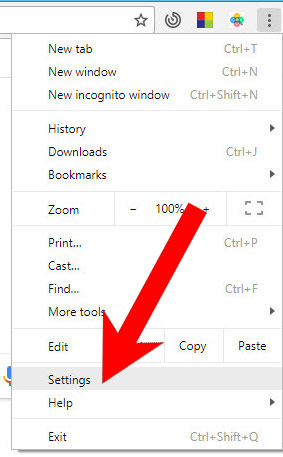
e) Remove Burningpixelmedia from Google Chrome
- Open Google Chrome and press the menu icon on the right, next to the URL field.
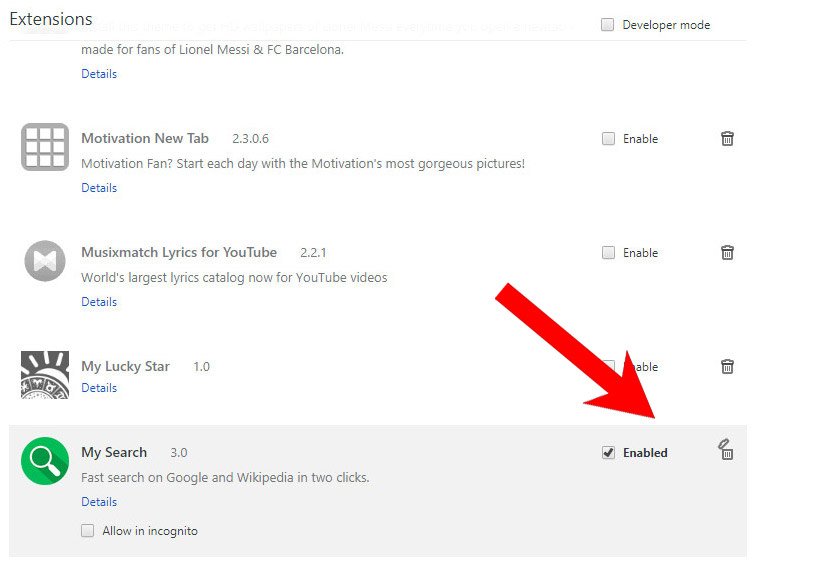
- Choose More tools and Extensions.
- Remove suspicious extensions by clicking the Trash icon next to them.
- If you are not certain about an extension, you can disable it by unchecking the box that says Enabled. If you later decide to keep it, simply check the box again.
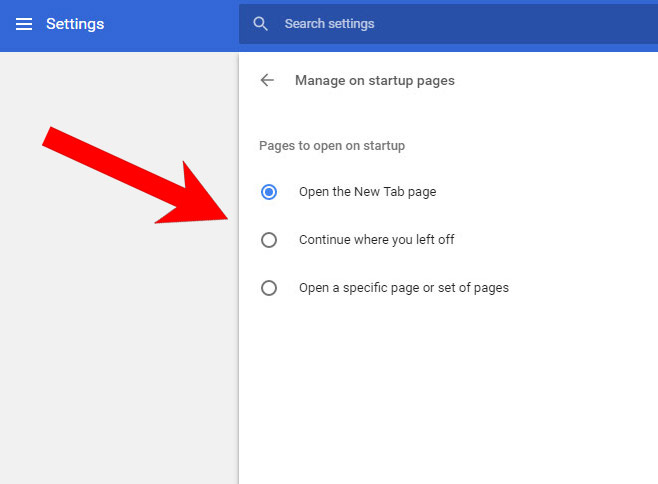
f) Restore your homepage on Google Chrome
- Open Google Chrome and press the menu icon on the right, next to the URL field.
- Choose Settings.
- In the window that appears, under On startup, there will be a Set pages option. Press on that.
- Remove the set website, and type in the one you prefer to be your homepage. Press OK.
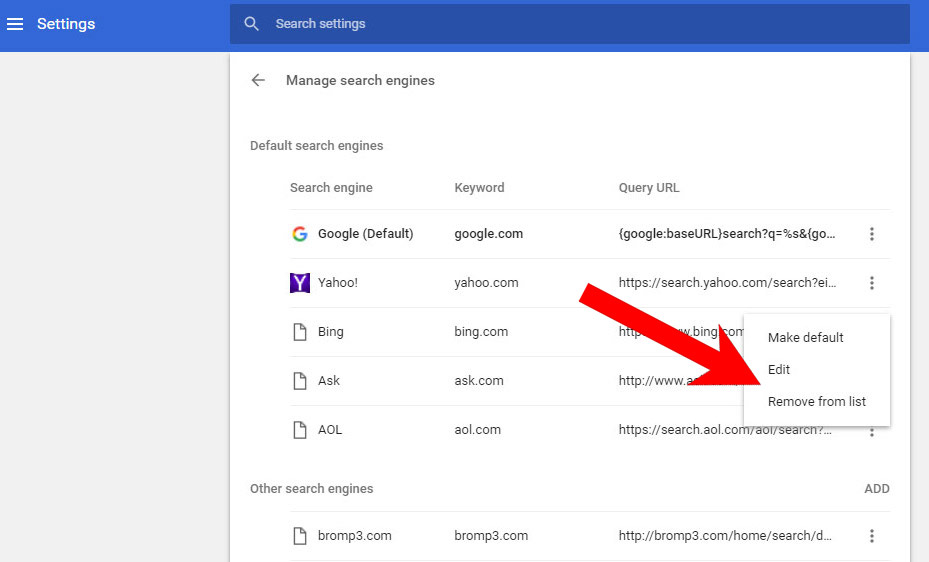
- In Settings, under Search, there is a Manage search engines option. Select that.
- Remove all search engines except the one you want to use. Click Done.
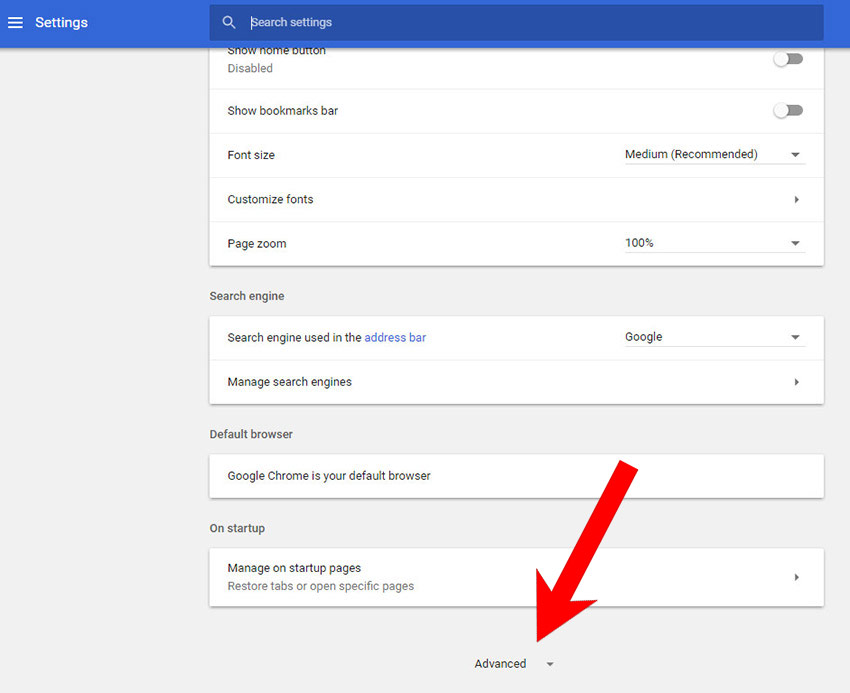
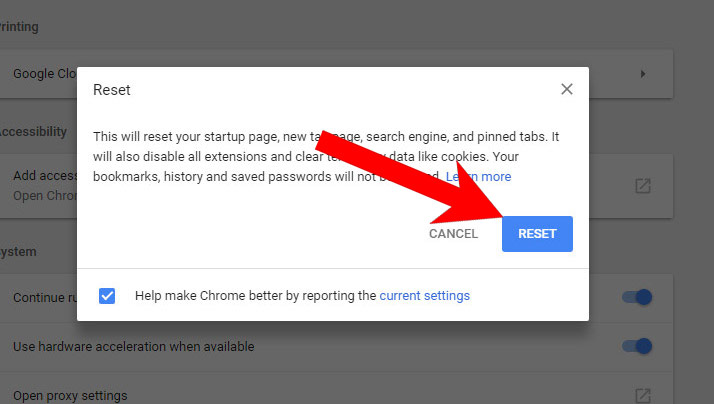
g) Reset Google Chrome
- Open Google Chrome and press the menu icon on the right, next to the URL field.
- Choose Settings.
- Scroll down and press on Show advanced settings.
- Find and press the Reset button.
- In the confirmation window that appears, press Reset.
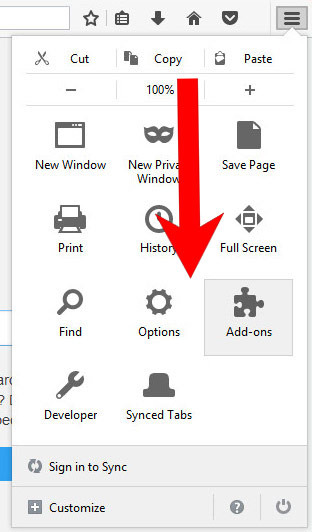
h) Remove Burningpixelmedia from Mozilla Firefox
- Open Mozilla Firefox and access the menu by clicking on the three bars on the right of the screen.
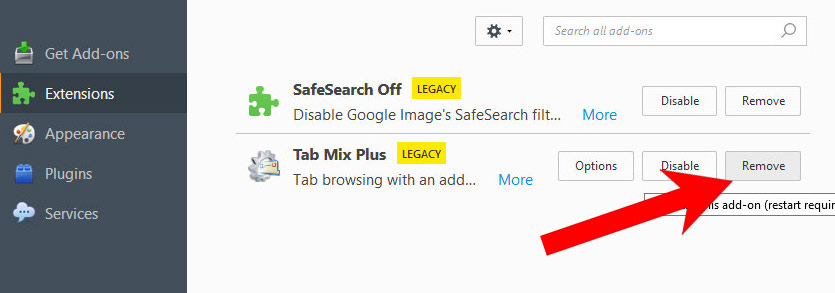
- Select Add-ons.
- Select the Extensions tab, and remove all questionable extensions.
- If you are not certain about an extension, you can disable it by clicking Disable. If you later decide to keep it, simply press Enable.
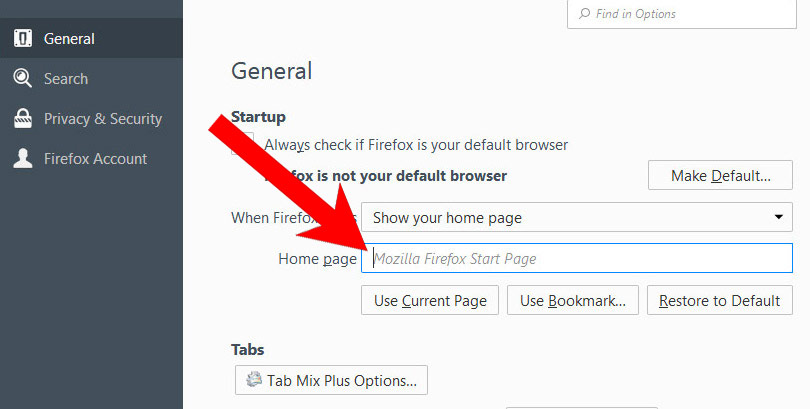
i) Restore your homepage on Mozilla Firefox
- Open Mozilla Firefox and access the menu by clicking on the three bars on the right side of the screen.
- Select Options.
- In General, click Restore to Default below the Home Page field.
j) Reset Mozilla Firefox
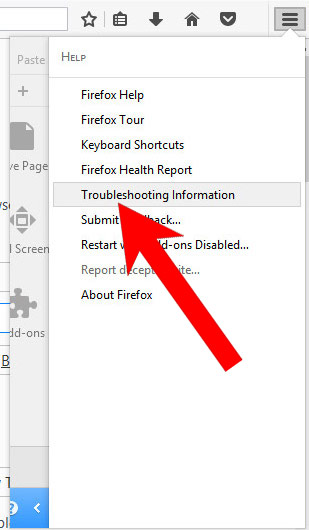
- Open Mozilla Firefox and access the menu by clicking on the three bars on the right of the screen.
- Press the question mark at the bottom of the menu.
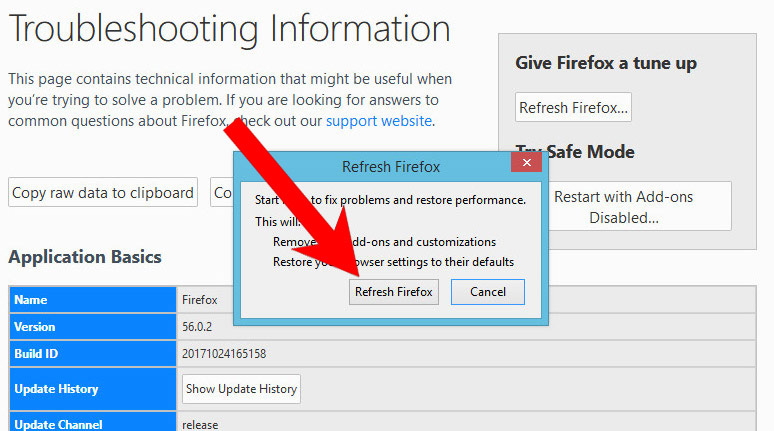
- Select Troubleshooting Information.
- Select the Refresh Firefox option.
k) Remove Burningpixelmedia from Safari (for Mac)
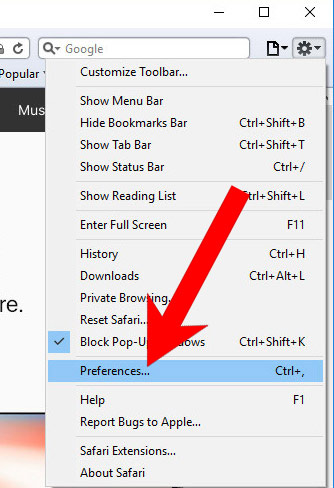
- Open Safari.
- Select Preferences (can be accesses by pressing on Safari at the top of your screen).
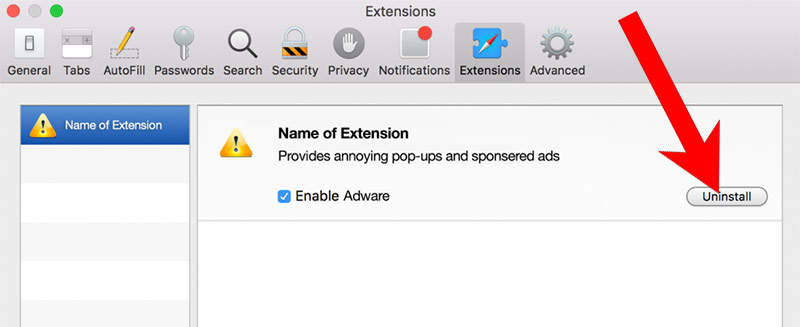
- Choose the Extensions tab.
- Uninstall all questionable extensions.
- If you are not certain about an extension, you can disable it by unchecking the box that says Enabled. If you later decide to keep it, simply check the box again.
l) Reset Safari
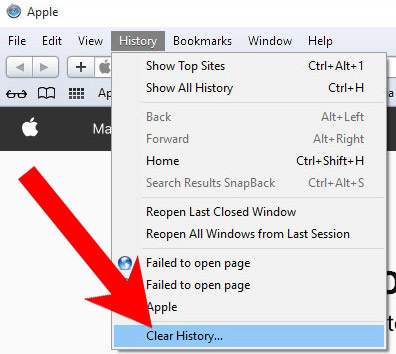
If you are using the Yosemite, El Capitan or the Sierra versions, the option to reset Safari with one click is not available. Thus you will have to clear the history and empty the caches in separate steps.- Open Safari.
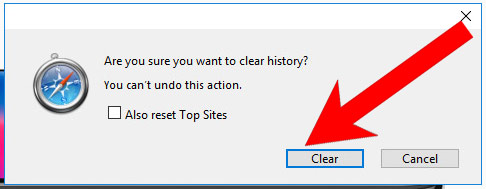
- Select Clear History (can be accesses by pressing on Safari at the top of your screen).
- Choose from what time you want the history deleted, and press Clear History.
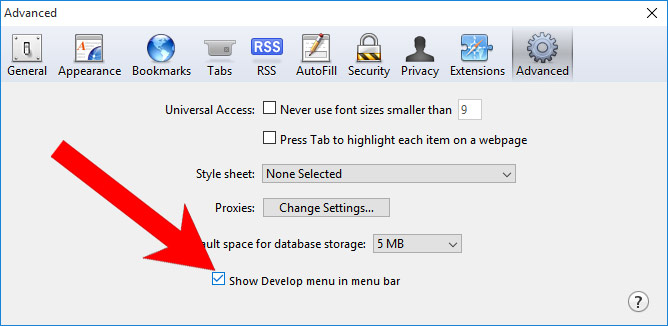
- Press on Safari at the top of the screen and select Preferences.
- Select the Advanced tab and check the box next to Show Develop menu in menu bar.
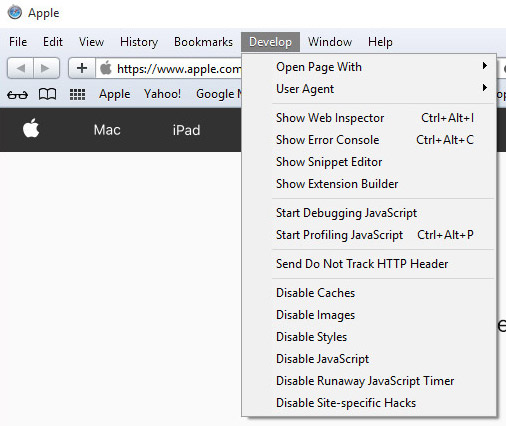
- Select Develop (from the menu bar at the top of the screen).
- Press Empty Caches.