SearchPartyd
SearchPartyd is a browser hijacker designed to hijack Mac web browsers and promote different products and services on their screen. So to carry out its agenda, SearchPartyd generally sets up a new search tool and changes the initial home webpage so that it may direct users’ analyzes to preset sites.
Applications such as SearchPartyd are generally categorized as potentially not wanted because of the redundant number of pop-ups ads, logos and reroute web links they can showcase in a single surfing session. One more thing that may frustrate many people who end up with such applications on their Safari, Chrome or Firefox browser is the point that the browser hijacker might change their default search tool or favored home webpage along with some utterly not known one, and that, alongsideout requesting for their knowledge.
In spite of these kinds of suspicious actions, browser attackers like SearchPartyd generally are categorized as lawful apps and are not located by anti-malicious software application as a parasite to the Mac OS. Nonetheless, there are some users who really wish to uninstall them from their Mac browser and erase their imposed modifies permanently.
Download Removal Toolto remove SearchPartydSearchPartyd for Mac
SearchPartyd for Mac is a potentially undesirable program that doesn’t need your approval to change the settings of the main web browser. The second set up in the pc, SearchPartyd for Mac shall in an automatic way accommodate alongside the default web browser app and change its home webpage or search engine.
This is an initial argument why software such as SearchPartyd and Yahoo Search are classified as unwelcome. If not terminated on time, such application will set up browser pieces that direct you to different sites, majority of which are frequently flooded with invasive box alerts, emblems, pop-ups, and other connected intimidating adware shows.
What is SearchPartyd?
SearchPartyd is a non-malignant program the only goal of which is to endorse several goods, functions, trademarks, and other pages on Mac web browsers. To implement its job thoroughly, SearchPartyd employs some somewhat threatening on the internet schemes, e.g threatening ad generation, browser alters, and automatic web page routing.
In in this way, the applications you makes sure that web people arrive in endorsed adverts and hyperlinks when their web browser is open. At the same time, being in an automatic way taken to a positive web locations may disguise stability dangers. Nowadays, there is a good deal of sites that spread malicious software and bad malware e.g the infamous Ransomware and the known Trojan horses and being led to on a single of them is entirely feasible if you allow such programs as SearchPartyd by chance make you susceptible to multiple hyperlinks.
The SearchPartyd app
The SearchPartyd app is a cost-effective tool that optimizes online advertising costs and automatically redirects web users to certain online offers and promotional pages. The majority of users who bump into the SearchPartyd app are vulnerable to a stream of invasive commercial ads and website-routes that are complex to avoid and even more complex to delete.
Download Removal Toolto remove SearchPartydIf you are searching for an efficient resolution to uninstall the SearchPartyd ads and delete the alterations that have been introduced by this software to your Mac browser, please stay on this site since you’ll discover a researcher SearchPartyd termination tool that might assistance you, as well as a full elimination guidelines along with screenshots and non-automatic commands.
Learn how to remove SearchPartyd from your computer
Step 1. SearchPartyd Removal from Windows
a) Windows 7/XP
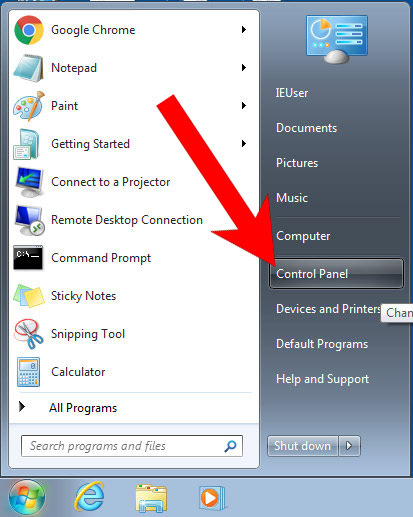
- Press on the Start icon.

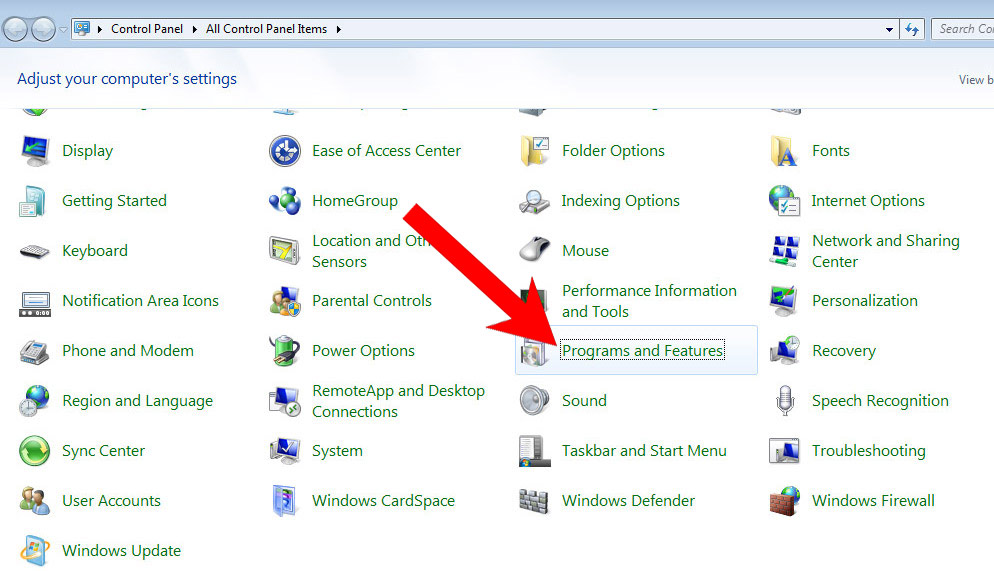
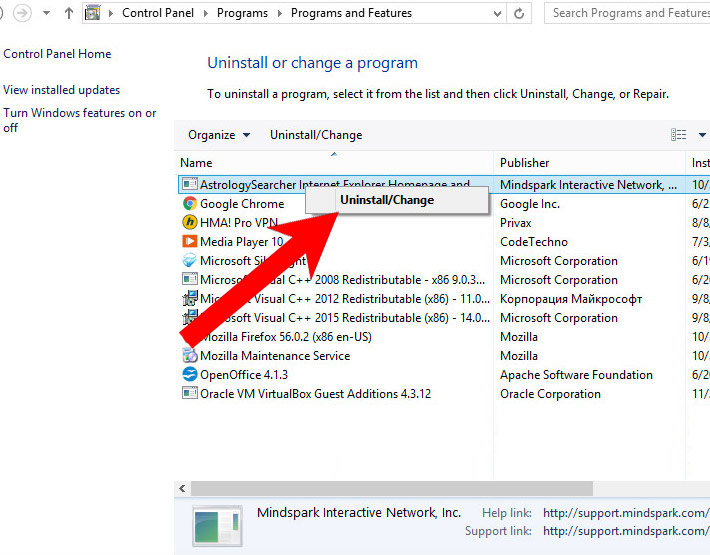
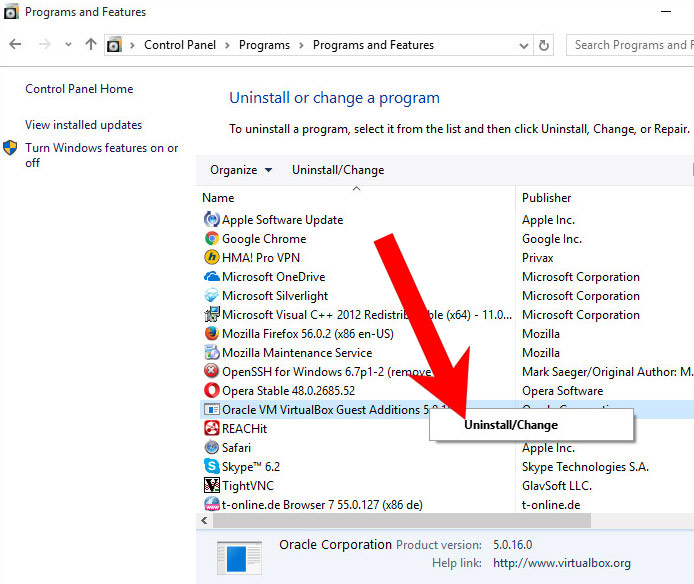
- Control Panel → Programs and Features.
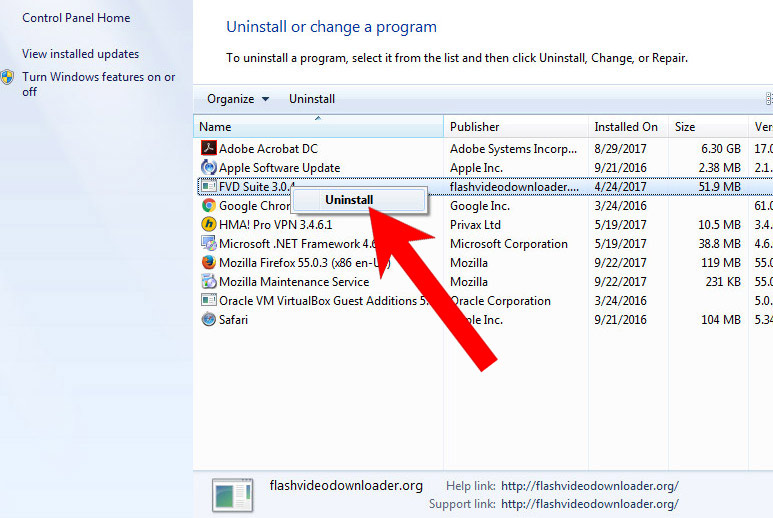
- Find the program you want to delete and press Uninstall.
b) Windows 8
- Right-click on the start icon (lower left corner).
- Select Control Panel.
- Click Programs and Features.
- Find and remove all unwanted programs.

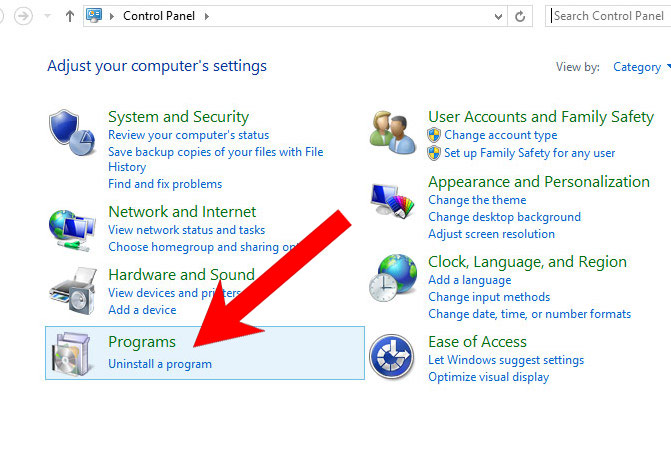
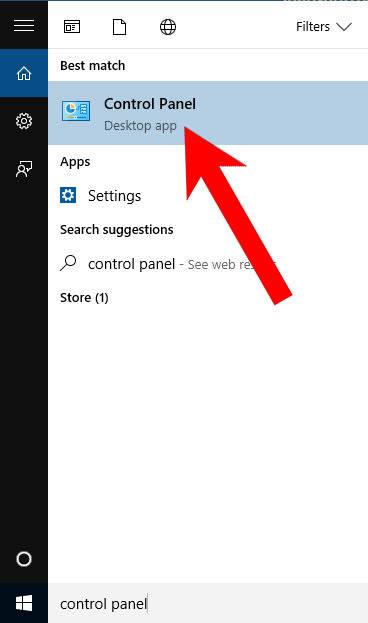
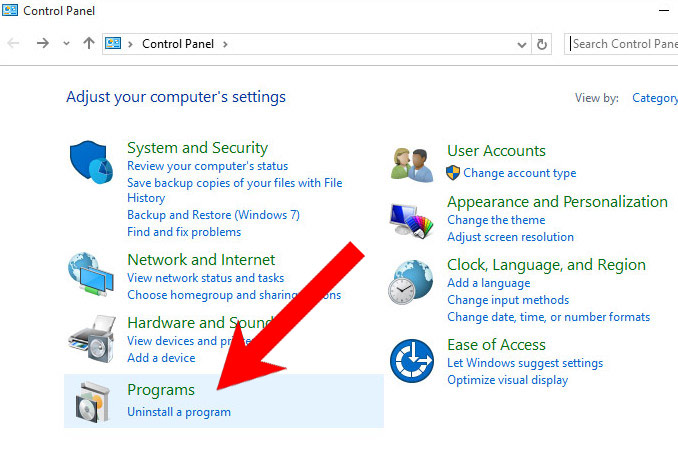
c) Windows 10
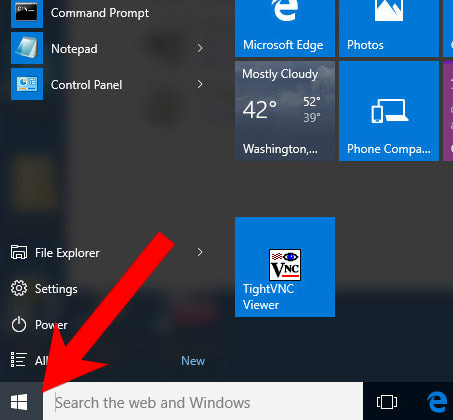
- Open Start menu and click on the magnifying glass (next to the shut down button).
- Type in Control Panel.
- Control Panel → Programs and Features.
- Find and remove all unwanted programs.
d) Mac OS X
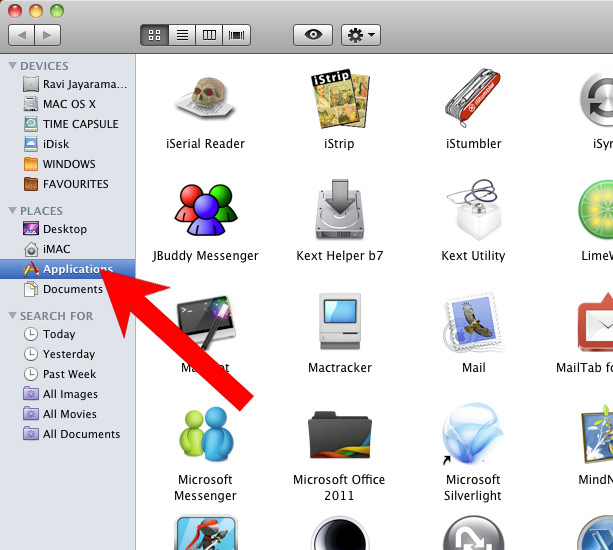
- Open Finder and press Applications.
- Check all suspicious programs you want to get rid of.
- Drag them to the trash icon in your dock (Alternatively, right-click on the program and press Move to Trash).
- After you move all the unwanted programs, right-click on the trash icon and select Empty Trash.

Step 2. Delete SearchPartyd from browsers
a) Remove SearchPartyd from Microsoft Edge
Reset Microsoft Edge (Method 1)
- Open Microsoft Edge.
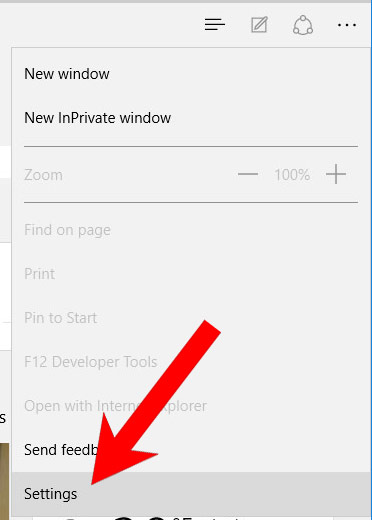
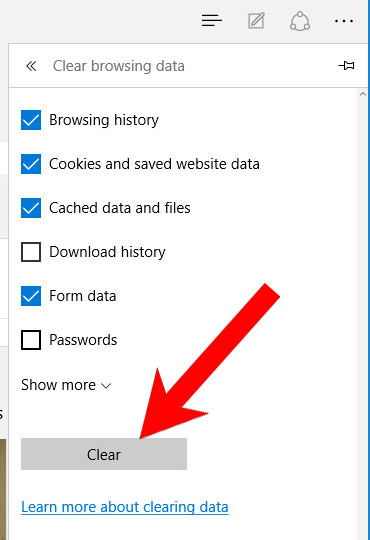
- Press More located at the top right corner of the screen (the three dots).
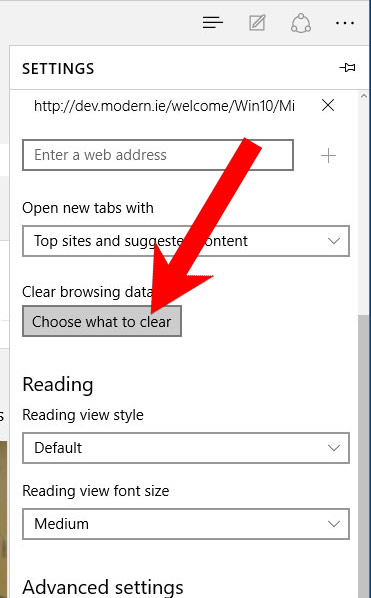
- Settings → Choose what to clear.
- Check the boxes of the items you want removed, and press Clear.
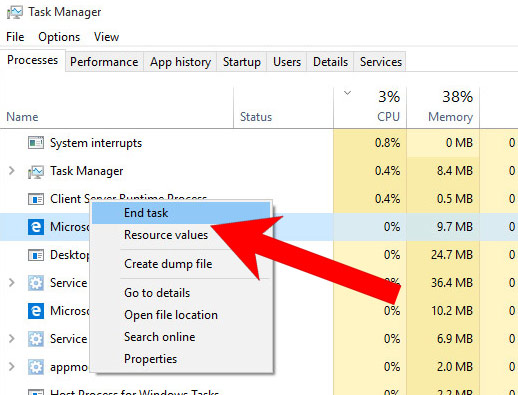
- Press Ctrl + Alt + Delete together.
- Choose Task Manager.
- In the Processes tab, find the Microsoft Edge process, right click on it, and press Go to details (or More details if Go to details is not available).
- Right-click on all Microsoft Edge processes, and choose End task.
(Method 2)
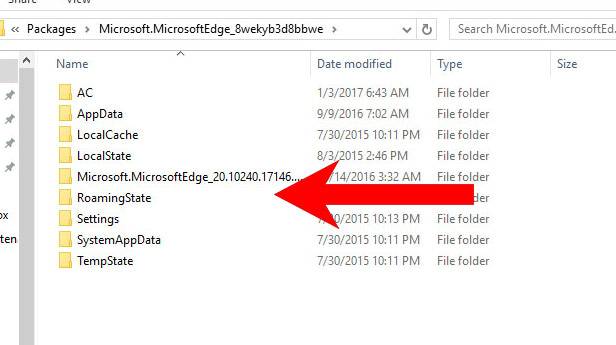
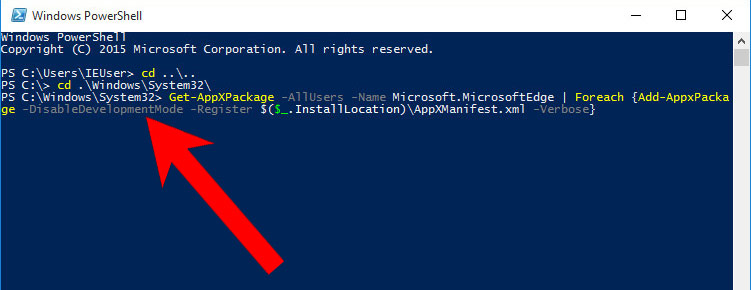
Before you proceed with this method, backup your data.- Go to C:\Users\%username%\AppData\Local\Packages\Microsoft.MicrosoftEdge_xxxxxxxxxx.
- Select all the folders, right-click on them and press Delete.
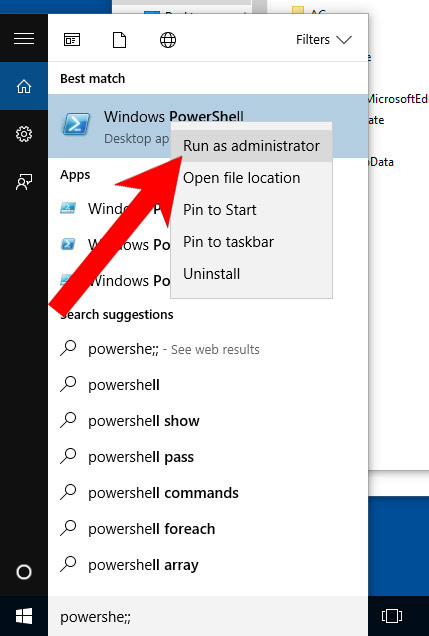
- Press the start button, and type in Windows PowerShell in the search box.
- Right-click on the result, and select Run as administrator.
- In Administrator: Windows PowerShell, paste
Get-AppXPackage -AllUsers -Name Microsoft.MicrosoftEdge | Foreach {Add-AppxPackage -DisableDevelopmentMode -Register $($_.InstallLocation)\AppXManifest.xml -Verbose}
under PS C:\WINDOWS\system32> and tap Enter.
- The issue should be gone now.
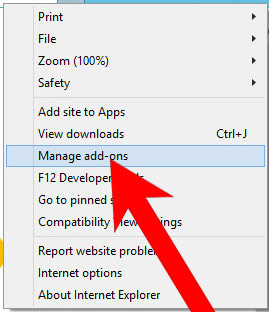
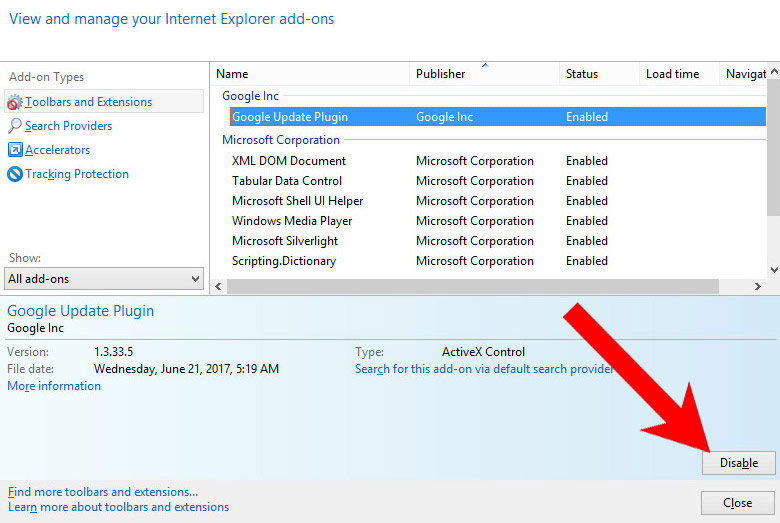
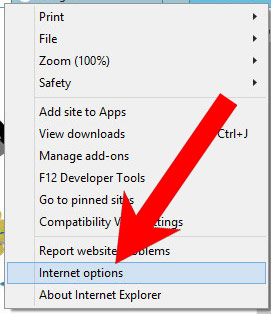
b) Remove SearchPartyd from Internet Explorer
- Open Internet Explorer and press on the Gear icon.
- Select Manage add-ons, and then Toolbars and Extensions.
- Find and disable all suspicious extensions.
- Close the window.
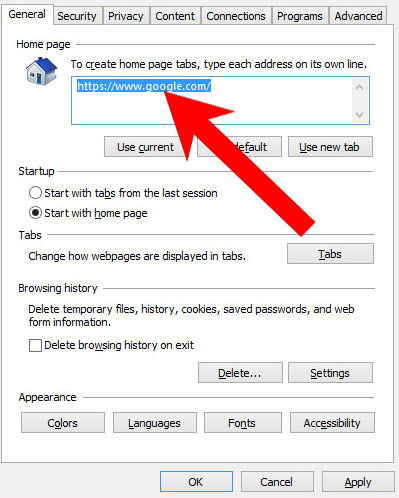
c) Restore your homepage on Internet Explorer
- Open Internet Explorer and press on the Gear icon.
- Internet Options → General tab. Delete the homepage URL and type in your preferred one.
- Press Apply.
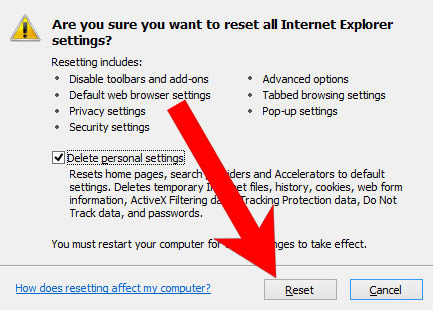
d) Reset Internet Explorer
- Open Internet Explorer and press on the Gear icon.
- Internet Options → Advanced tab.
- At the bottom, you will see a Reset button. Press that.
- In the window that appears, check the box that says Delete personal settings.
- Press Reset.
- Click OK to exit the window.
- Restart your browser.

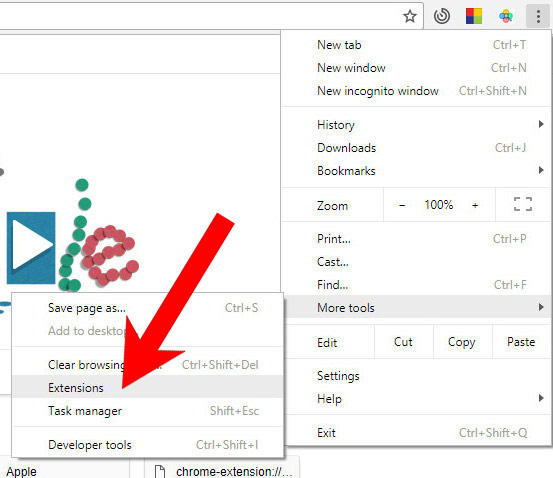
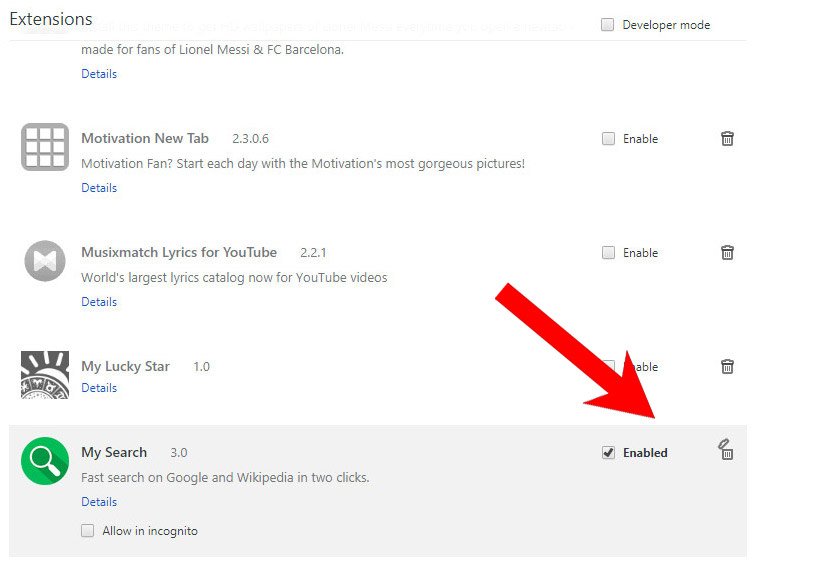
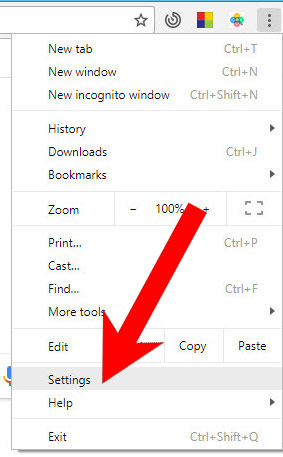
e) Remove SearchPartyd from Google Chrome
- Open Google Chrome and press the menu icon on the right, next to the URL field.
- Choose More tools and Extensions.
- Remove suspicious extensions by clicking the Trash icon next to them.
- If you are not certain about an extension, you can disable it by unchecking the box that says Enabled. If you later decide to keep it, simply check the box again.
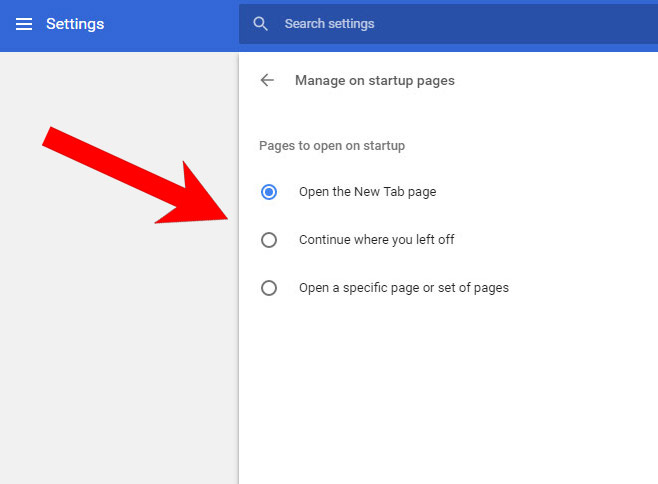
f) Restore your homepage on Google Chrome
- Open Google Chrome and press the menu icon on the right, next to the URL field.
- Choose Settings.
- In the window that appears, under On startup, there will be a Set pages option. Press on that.
- Remove the set website, and type in the one you prefer to be your homepage. Press OK.
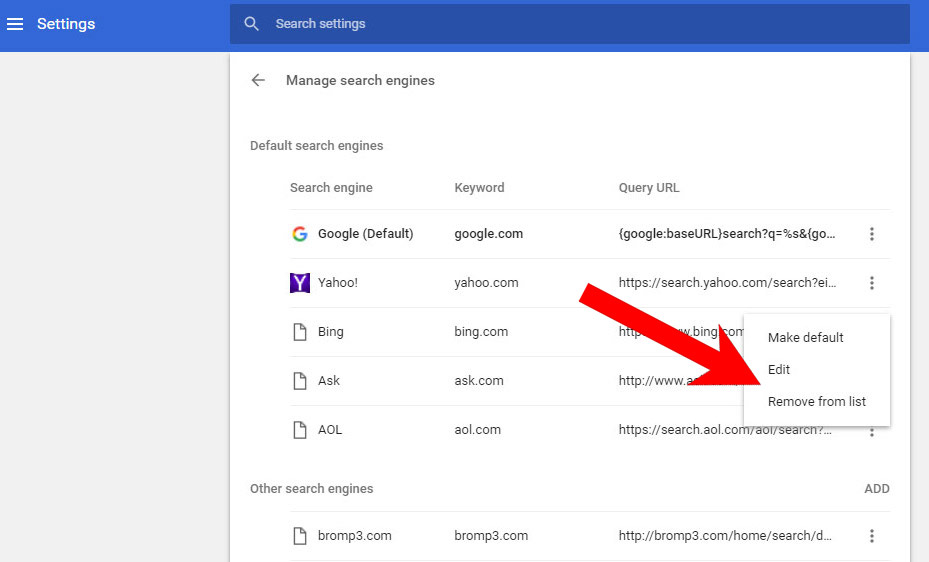
- In Settings, under Search, there is a Manage search engines option. Select that.
- Remove all search engines except the one you want to use. Click Done.
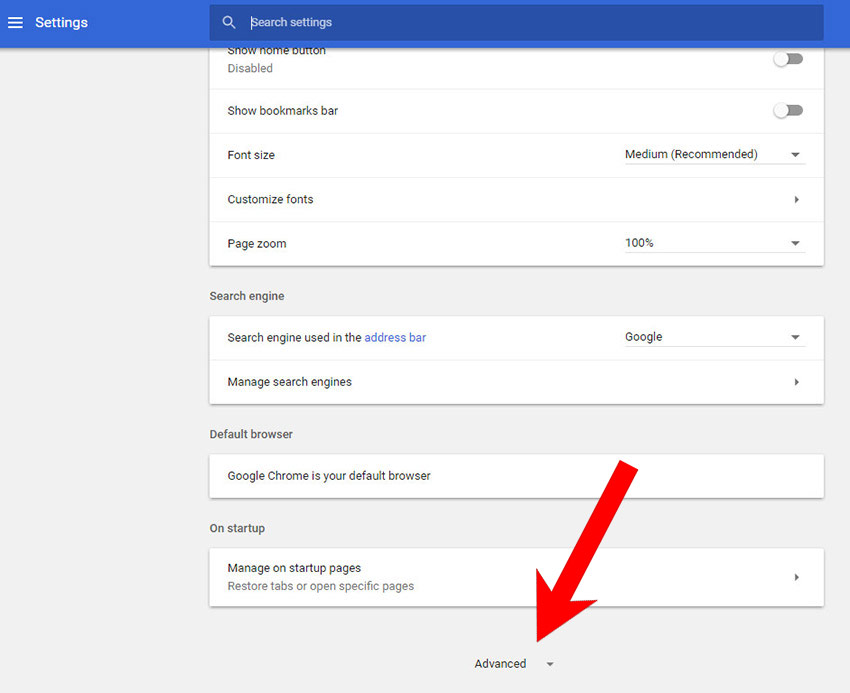
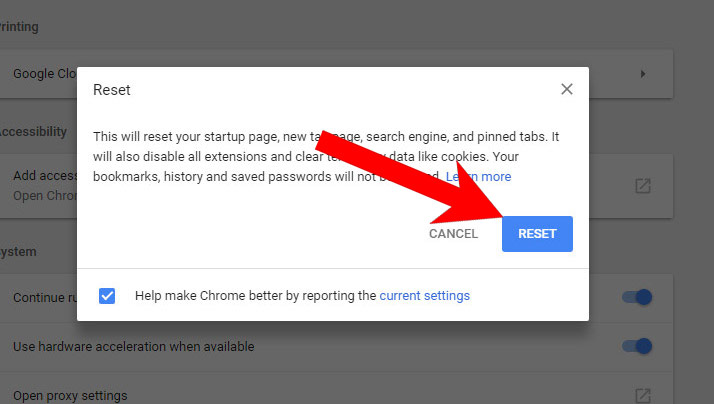
g) Reset Google Chrome
- Open Google Chrome and press the menu icon on the right, next to the URL field.
- Choose Settings.
- Scroll down and press on Show advanced settings.
- Find and press the Reset button.
- In the confirmation window that appears, press Reset.
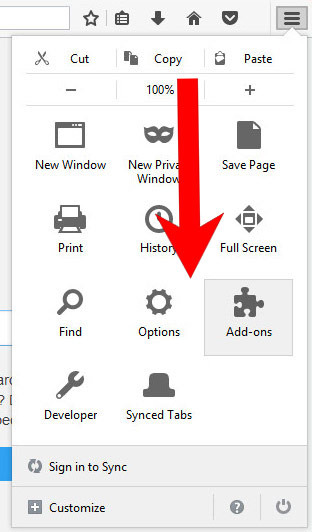
h) Remove SearchPartyd from Mozilla Firefox
- Open Mozilla Firefox and access the menu by clicking on the three bars on the right of the screen.
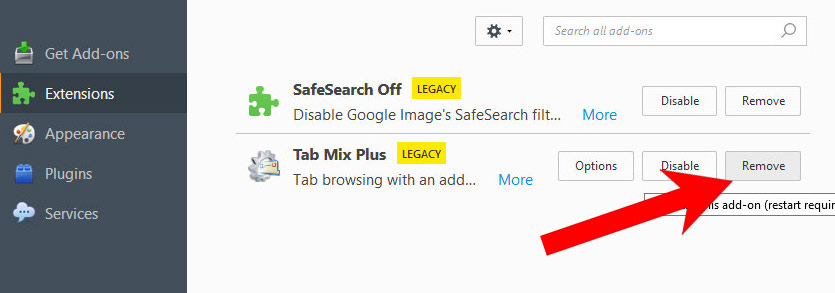
- Select Add-ons.
- Select the Extensions tab, and remove all questionable extensions.
- If you are not certain about an extension, you can disable it by clicking Disable. If you later decide to keep it, simply press Enable.
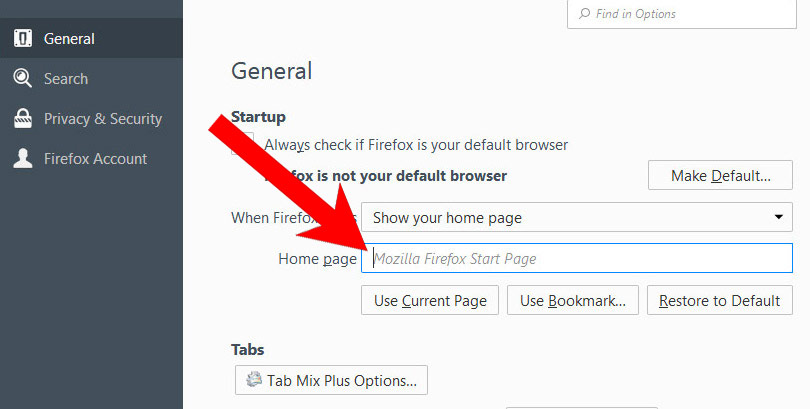
i) Restore your homepage on Mozilla Firefox
- Open Mozilla Firefox and access the menu by clicking on the three bars on the right side of the screen.
- Select Options.
- In General, click Restore to Default below the Home Page field.
j) Reset Mozilla Firefox
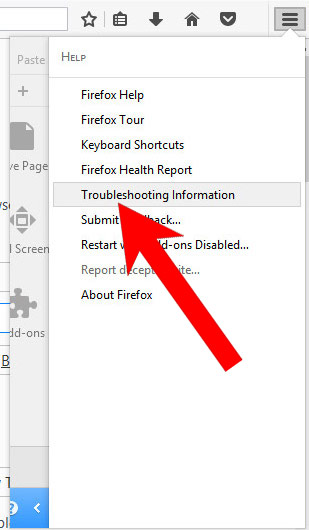
- Open Mozilla Firefox and access the menu by clicking on the three bars on the right of the screen.
- Press the question mark at the bottom of the menu.
- Select Troubleshooting Information.
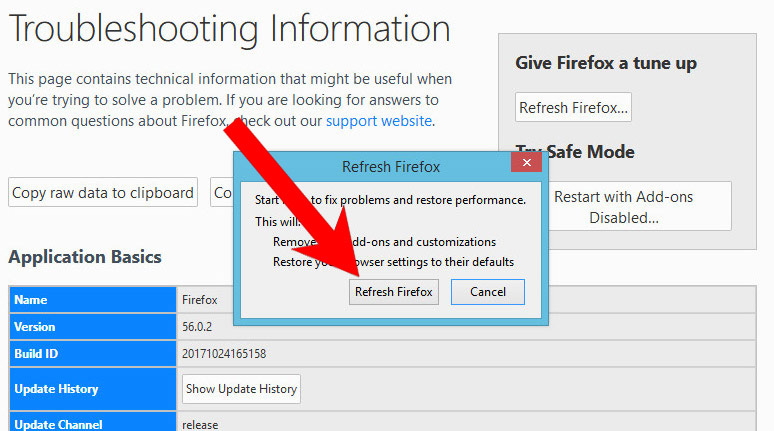
- Select the Refresh Firefox option.
k) Remove SearchPartyd from Safari (for Mac)
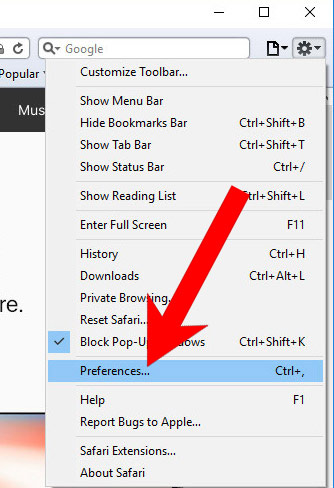
- Open Safari.
- Select Preferences (can be accesses by pressing on Safari at the top of your screen).
- Choose the Extensions tab.
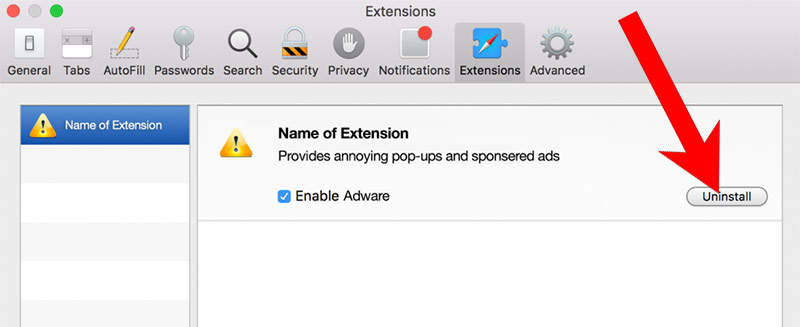
- Uninstall all questionable extensions.
- If you are not certain about an extension, you can disable it by unchecking the box that says Enabled. If you later decide to keep it, simply check the box again.
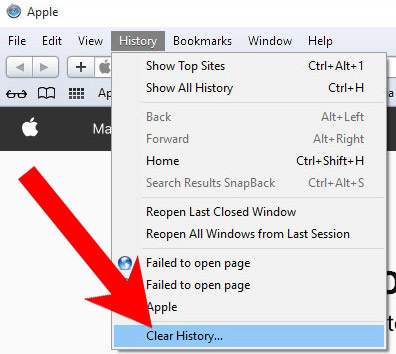
l) Reset Safari
If you are using the Yosemite, El Capitan or the Sierra versions, the option to reset Safari with one click is not available. Thus you will have to clear the history and empty the caches in separate steps.- Open Safari.
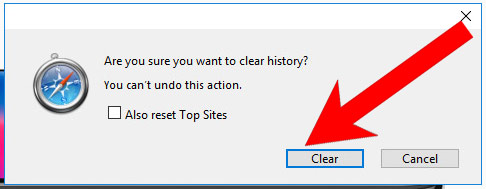
- Select Clear History (can be accesses by pressing on Safari at the top of your screen).
- Choose from what time you want the history deleted, and press Clear History.
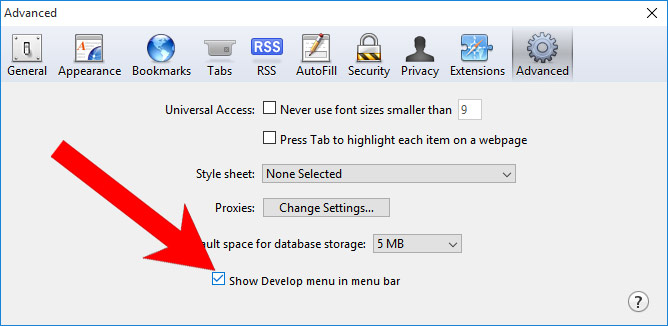
- Press on Safari at the top of the screen and select Preferences.
- Select the Advanced tab and check the box next to Show Develop menu in menu bar.
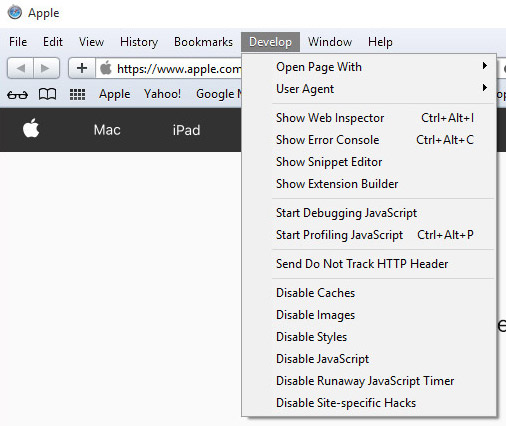
- Select Develop (from the menu bar at the top of the screen).
- Press Empty Caches.