Perhiptid
Perhiptid is a piece of software that modifies settings on your browser without the user’s permission. Or, at the highly least, the user isn’t exhibited appropriate warning earlier giving their permission. The term implemented to define this practice of producing prohibited modifies to the mode of a browser is “hijacking”, therefore in this report, Perhiptid shall be known as a hijacker.
There are plenty likely adjustments to your web browser that third-party applications such as Perhiptid.com can do. For example, Perhiptid.com may swap your set search engine to one that isn’t as well-known. It might also change your browser’s home web page, generating traffic to the domain you’re now greeted in packages with whenever you start you browser. The usual at the start response of the user is to attempt to repair the initial modes, but that won’t operate. When you reboot your browser, Perhiptid.com’s changes shall be reinstalled, and you won’t be capable of erasing or erase them until you identify and get rid of all aspects related to the nosy program from the device.
Download Removal Toolto remove Perhiptid.com
That’s why, if you’re determined to recover oversee of Chrome, Firefox, Edge, or your other browser, you’ll have to get rid of the browser hijacker by hand. Because this is generally a challenge targeted at users, we’ve crafted a termination guide to walk you via the procedure. It’s entirely free-of-charge to enforce and may be found straightaway underneath this post. Don’t avoid reading now, regardless, as this post has many incredible data that might arrive in use afterwards.
Learn how to remove Perhiptid.com from your computer
Step 1. Perhiptid.com Removal from Windows
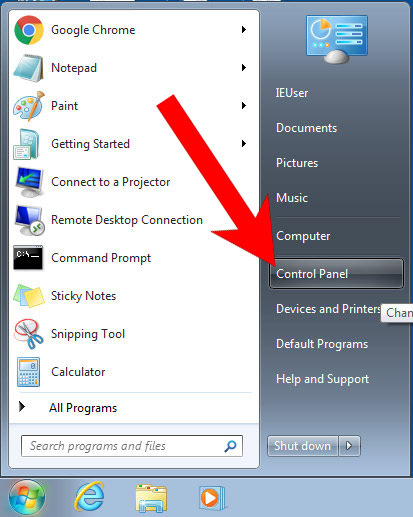
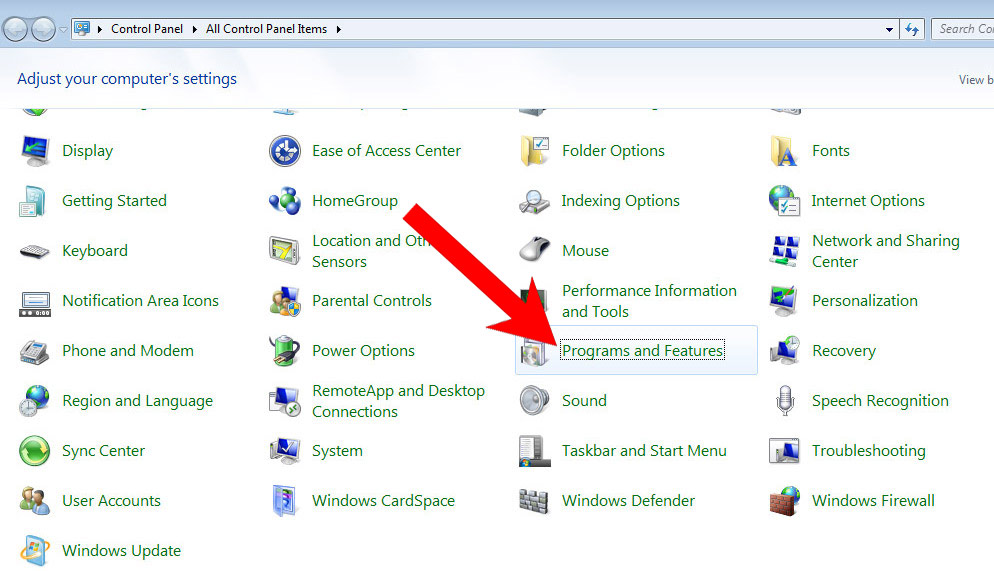
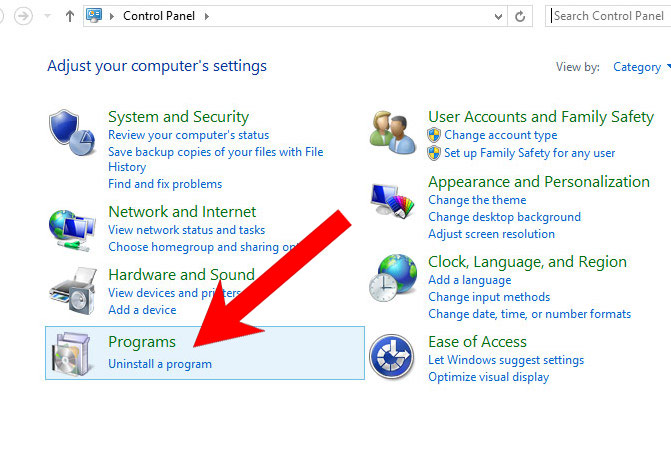
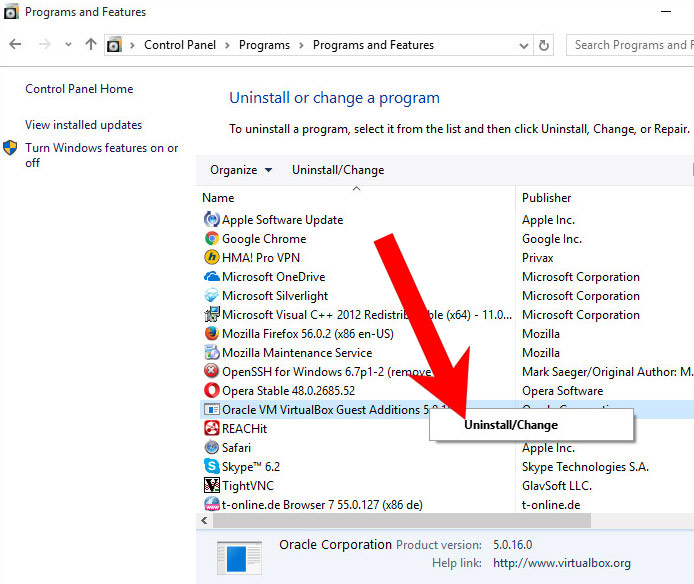
a) Windows 7/XP
- Press on the Start icon.

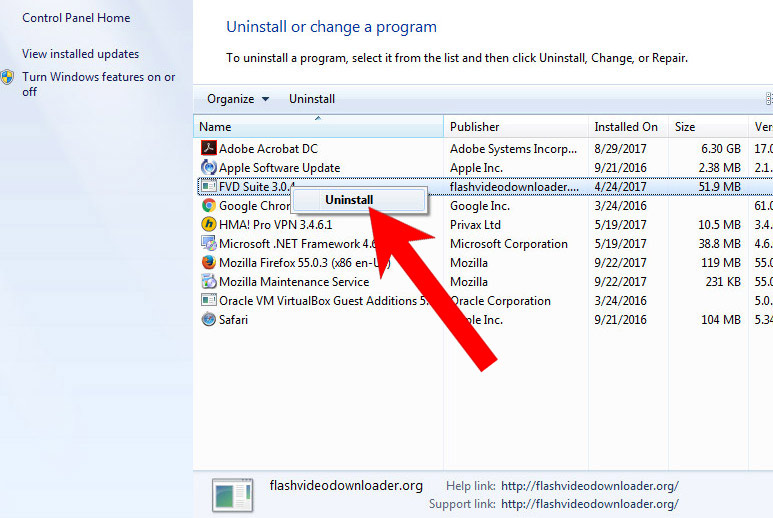
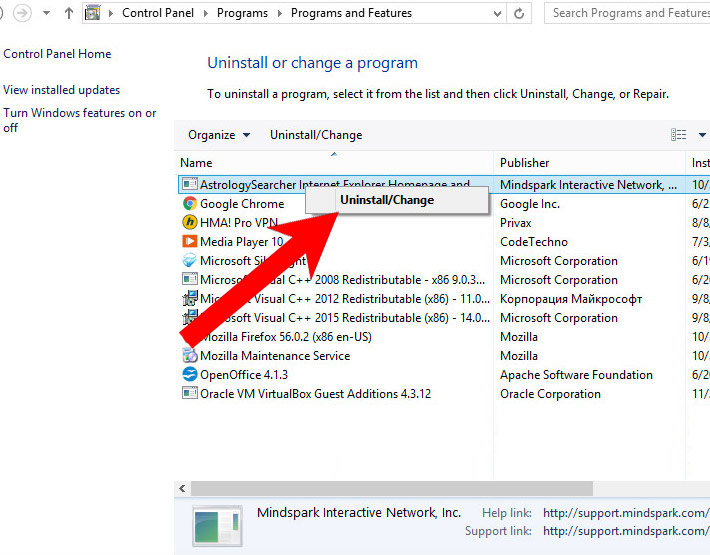
- Control Panel → Programs and Features.
- Find the program you want to delete and press Uninstall.
b) Windows 8
- Right-click on the start icon (lower left corner).
- Select Control Panel.
- Click Programs and Features.
- Find and remove all unwanted programs.
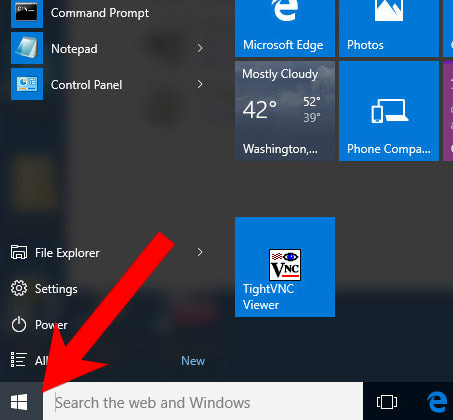

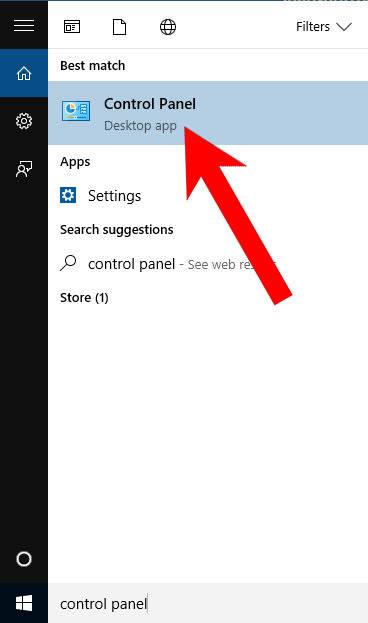
c) Windows 10
- Open Start menu and click on the magnifying glass (next to the shut down button).
- Type in Control Panel.
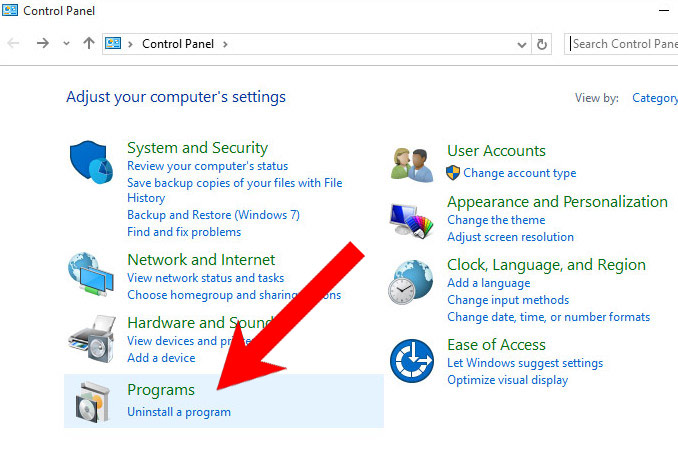
- Control Panel → Programs and Features.
- Find and remove all unwanted programs.
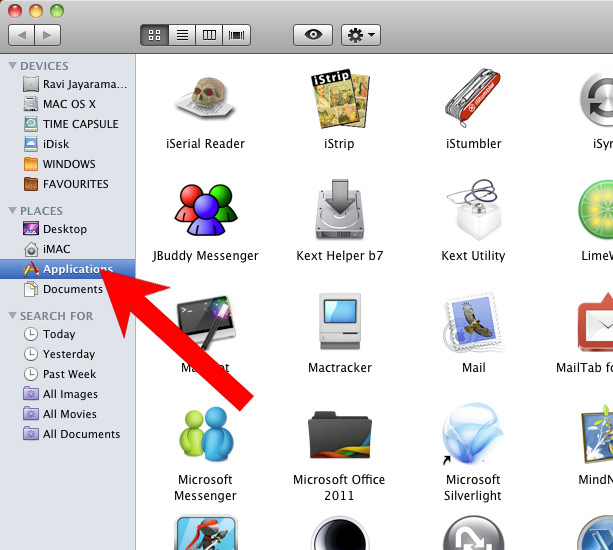
d) Mac OS X
- Open Finder and press Applications.
- Check all suspicious programs you want to get rid of.
- Drag them to the trash icon in your dock (Alternatively, right-click on the program and press Move to Trash).
- After you move all the unwanted programs, right-click on the trash icon and select Empty Trash.

Step 2. Delete Perhiptid.com from browsers
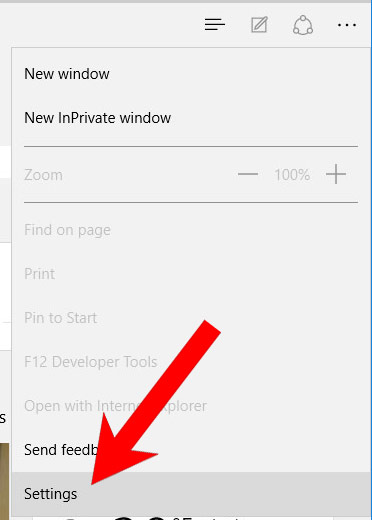
a) Remove Perhiptid.com from Microsoft Edge
Reset Microsoft Edge (Method 1)
- Open Microsoft Edge.
- Press More located at the top right corner of the screen (the three dots).
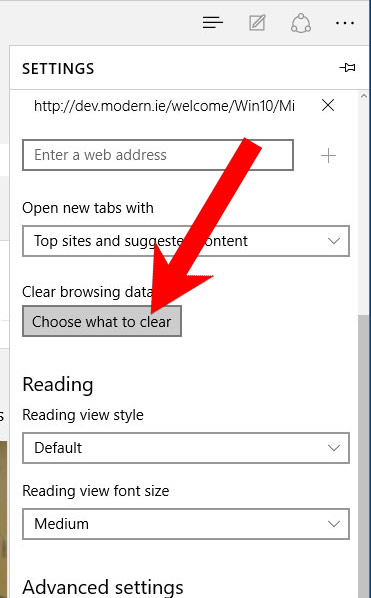
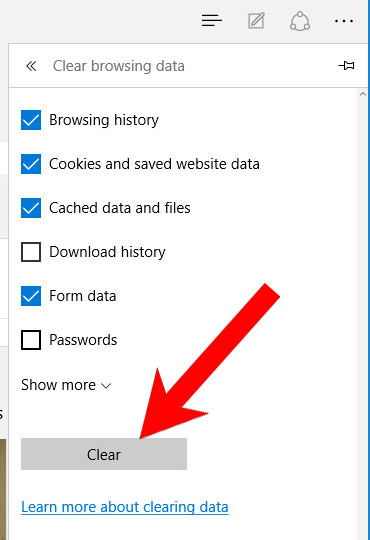
- Settings → Choose what to clear.
- Check the boxes of the items you want removed, and press Clear.
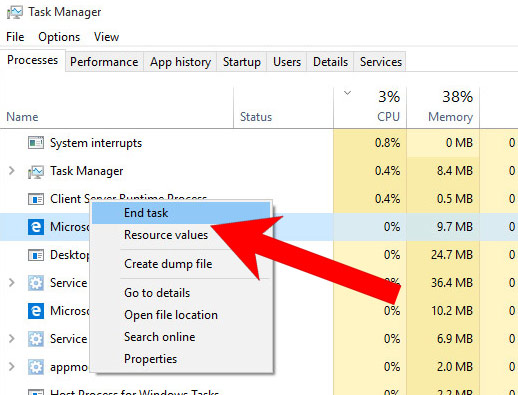
- Press Ctrl + Alt + Delete together.
- Choose Task Manager.
- In the Processes tab, find the Microsoft Edge process, right click on it, and press Go to details (or More details if Go to details is not available).
- Right-click on all Microsoft Edge processes, and choose End task.
(Method 2)
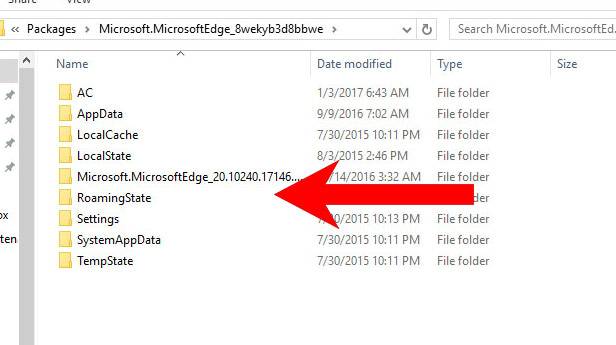
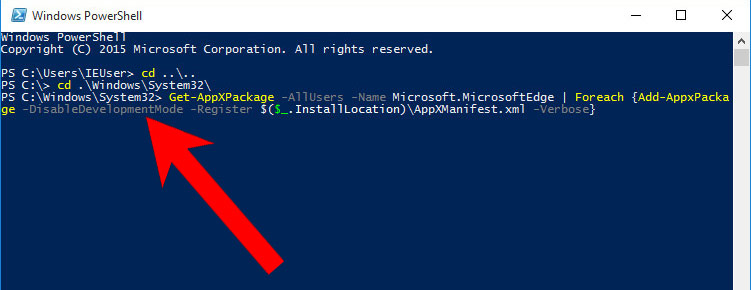
Before you proceed with this method, backup your data. Download Removal Toolto remove Perhiptid.com- Go to C:\Users\%username%\AppData\Local\Packages\Microsoft.MicrosoftEdge_xxxxxxxxxx.
- Select all the folders, right-click on them and press Delete.
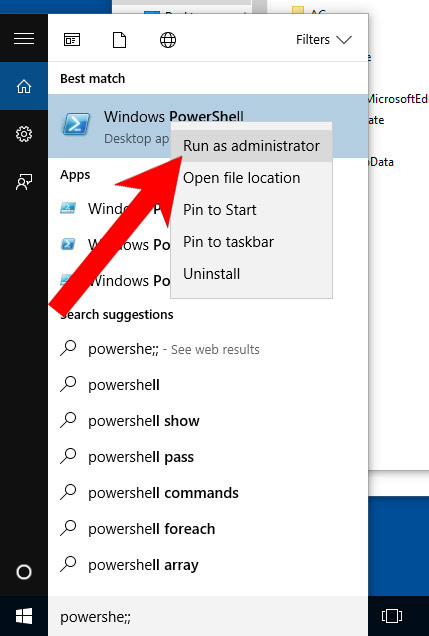
- Press the start button, and type in Windows PowerShell in the search box.
- Right-click on the result, and select Run as administrator.
- In Administrator: Windows PowerShell, paste
Get-AppXPackage -AllUsers -Name Microsoft.MicrosoftEdge | Foreach {Add-AppxPackage -DisableDevelopmentMode -Register $($_.InstallLocation)\AppXManifest.xml -Verbose}
under PS C:\WINDOWS\system32> and tap Enter.
- The issue should be gone now.
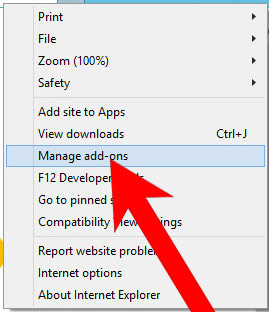
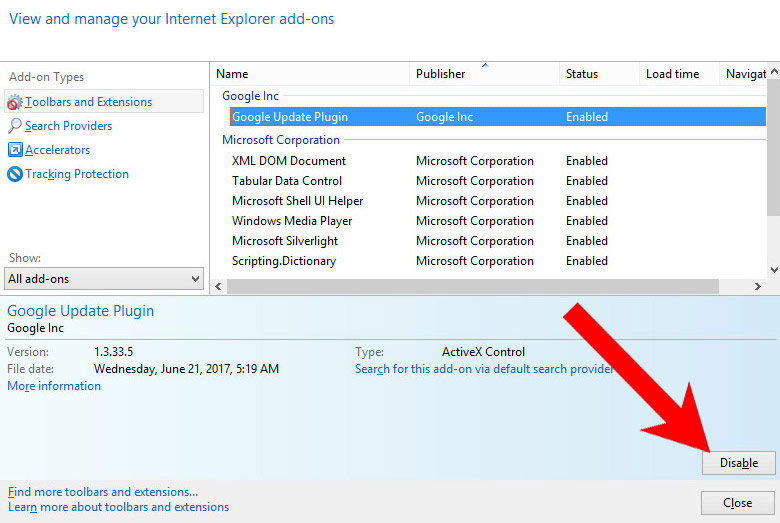
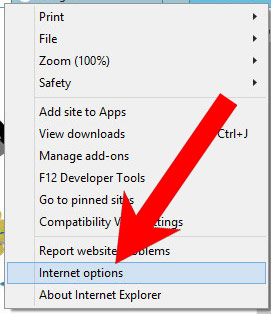
b) Remove Perhiptid.com from Internet Explorer
- Open Internet Explorer and press on the Gear icon.
- Select Manage add-ons, and then Toolbars and Extensions.
- Find and disable all suspicious extensions.
- Close the window.
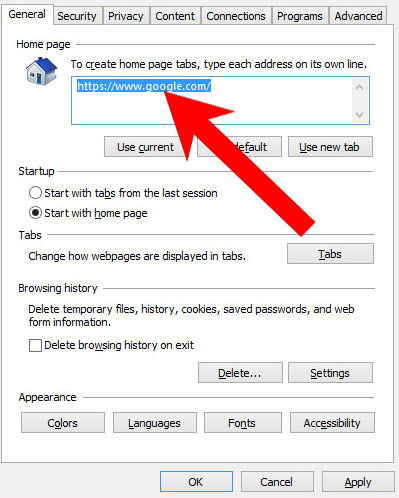
c) Restore your homepage on Internet Explorer
- Open Internet Explorer and press on the Gear icon.
- Internet Options → General tab. Delete the homepage URL and type in your preferred one.
- Press Apply.
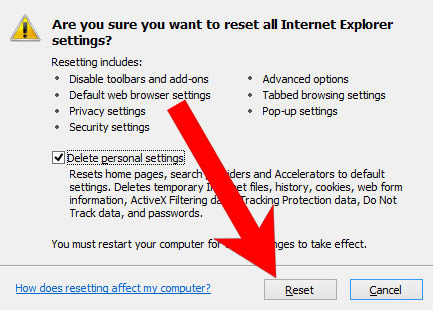
d) Reset Internet Explorer
- Open Internet Explorer and press on the Gear icon.
- Internet Options → Advanced tab.
- At the bottom, you will see a Reset button. Press that.
- In the window that appears, check the box that says Delete personal settings.
- Press Reset.
- Click OK to exit the window.
- Restart your browser.

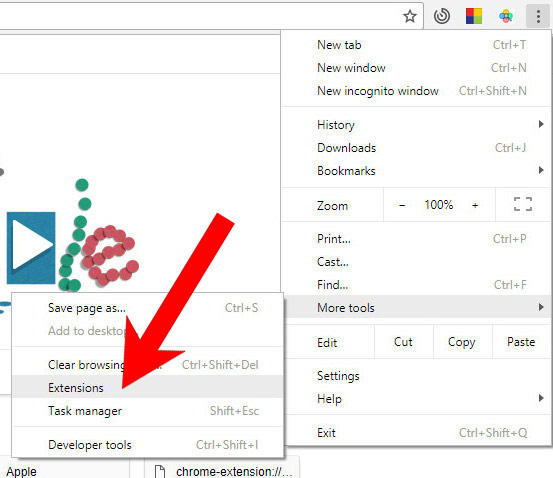
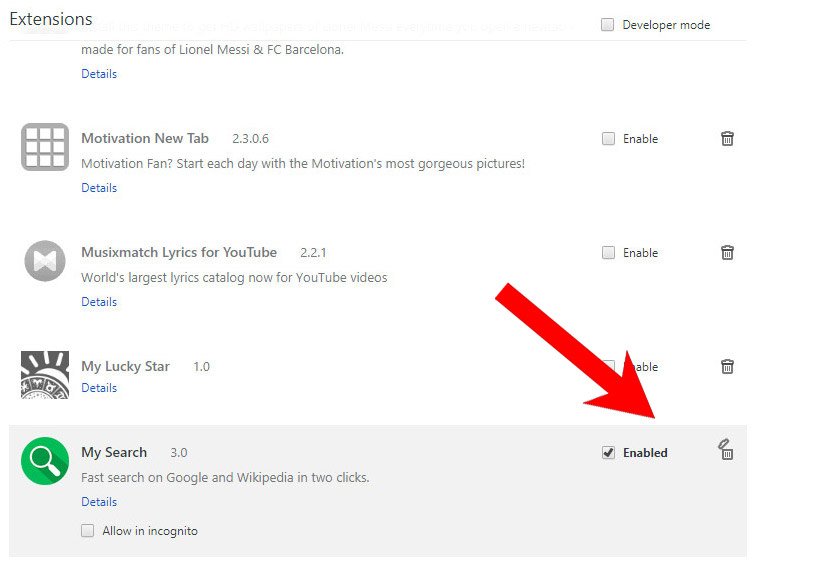
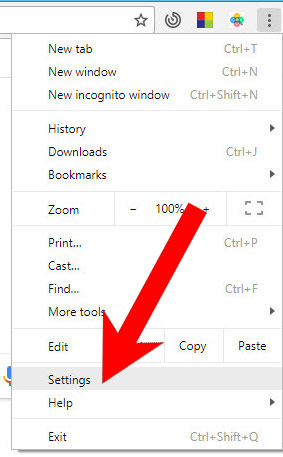
e) Remove Perhiptid.com from Google Chrome
- Open Google Chrome and press the menu icon on the right, next to the URL field.
- Choose More tools and Extensions.
- Remove suspicious extensions by clicking the Trash icon next to them.
- If you are not certain about an extension, you can disable it by unchecking the box that says Enabled. If you later decide to keep it, simply check the box again.
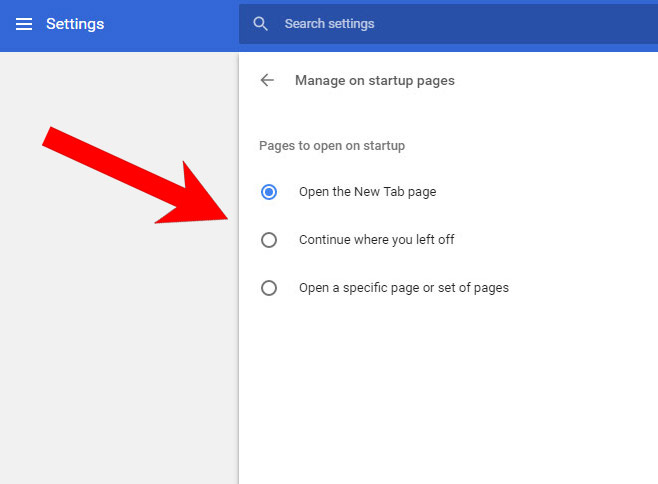
f) Restore your homepage on Google Chrome
- Open Google Chrome and press the menu icon on the right, next to the URL field.
- Choose Settings.
- In the window that appears, under On startup, there will be a Set pages option. Press on that.
- Remove the set website, and type in the one you prefer to be your homepage. Press OK.
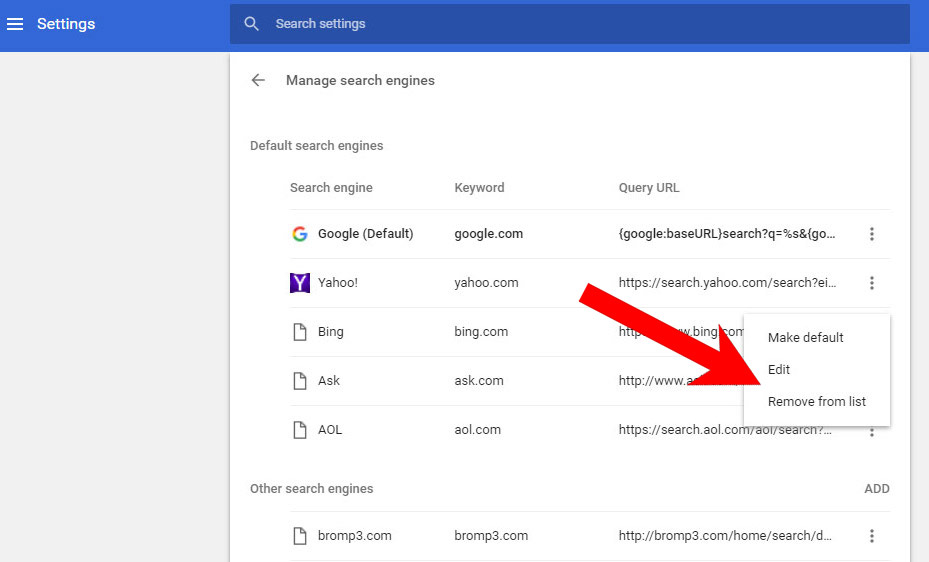
- In Settings, under Search, there is a Manage search engines option. Select that.
- Remove all search engines except the one you want to use. Click Done.
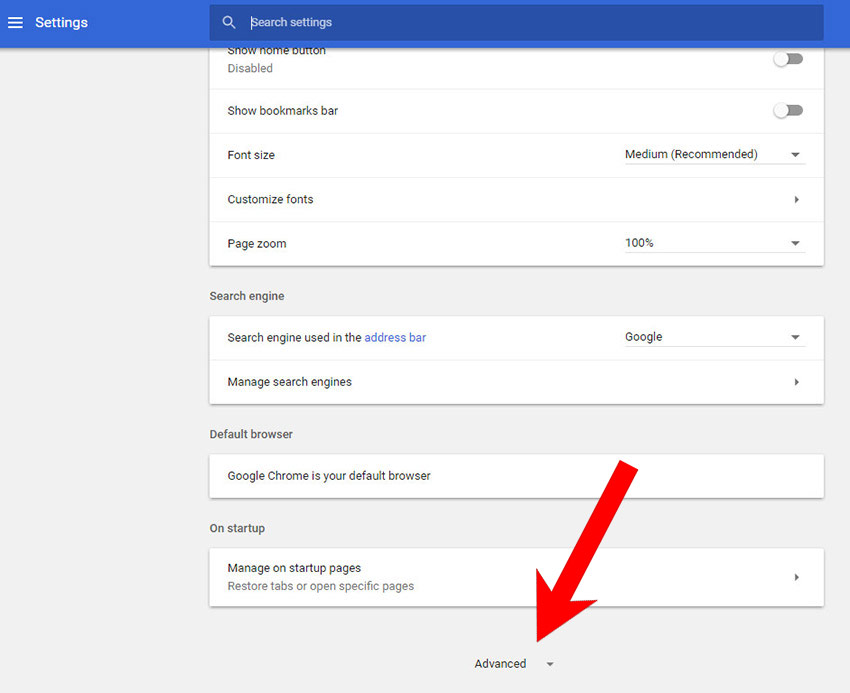
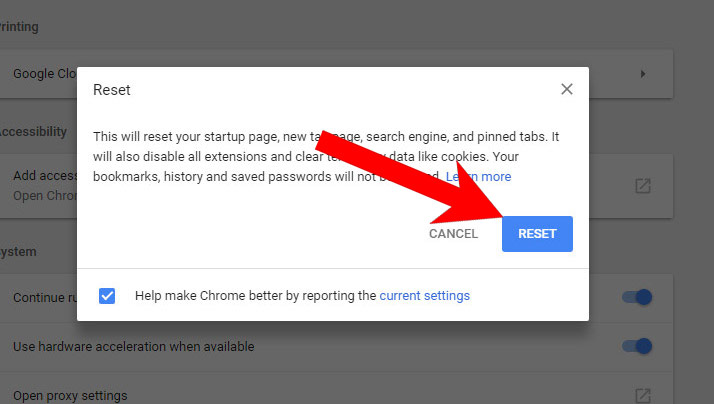
g) Reset Google Chrome
- Open Google Chrome and press the menu icon on the right, next to the URL field.
- Choose Settings.
- Scroll down and press on Show advanced settings.
- Find and press the Reset button.
- In the confirmation window that appears, press Reset.
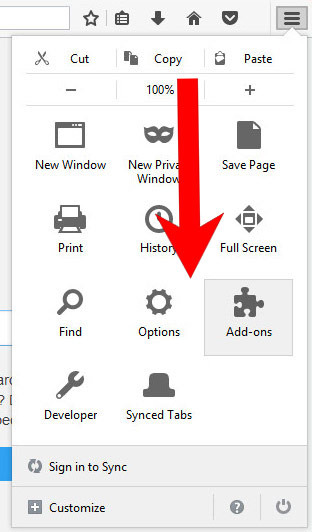
h) Remove Perhiptid.com from Mozilla Firefox
- Open Mozilla Firefox and access the menu by clicking on the three bars on the right of the screen.
- Select Add-ons.
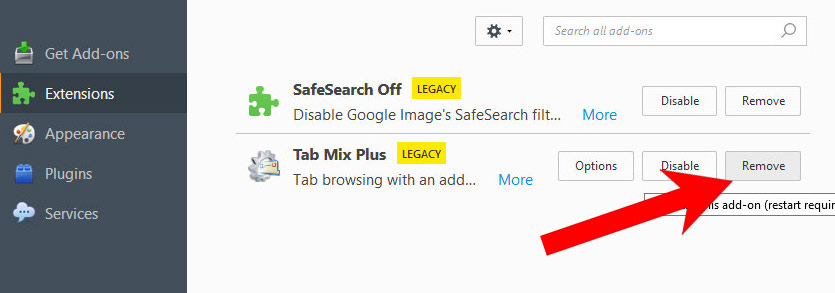
- Select the Extensions tab, and remove all questionable extensions.
- If you are not certain about an extension, you can disable it by clicking Disable. If you later decide to keep it, simply press Enable.
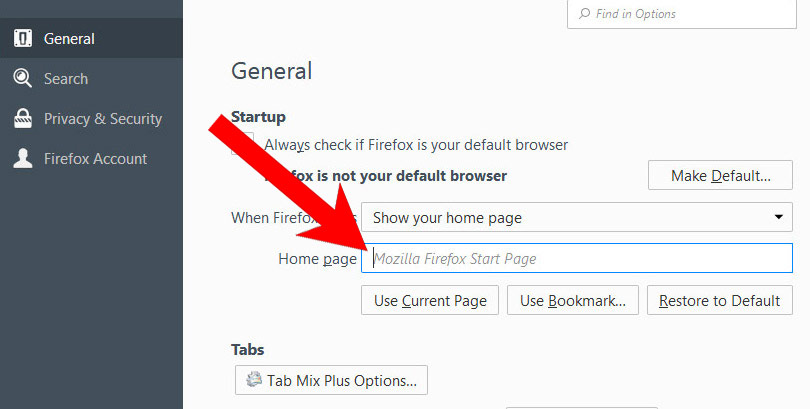
i) Restore your homepage on Mozilla Firefox
- Open Mozilla Firefox and access the menu by clicking on the three bars on the right side of the screen.
- Select Options.
- In General, click Restore to Default below the Home Page field.
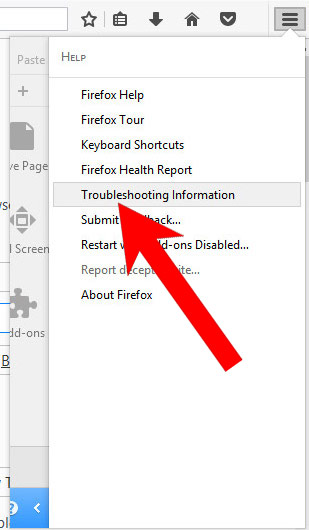
j) Reset Mozilla Firefox
- Open Mozilla Firefox and access the menu by clicking on the three bars on the right of the screen.
- Press the question mark at the bottom of the menu.
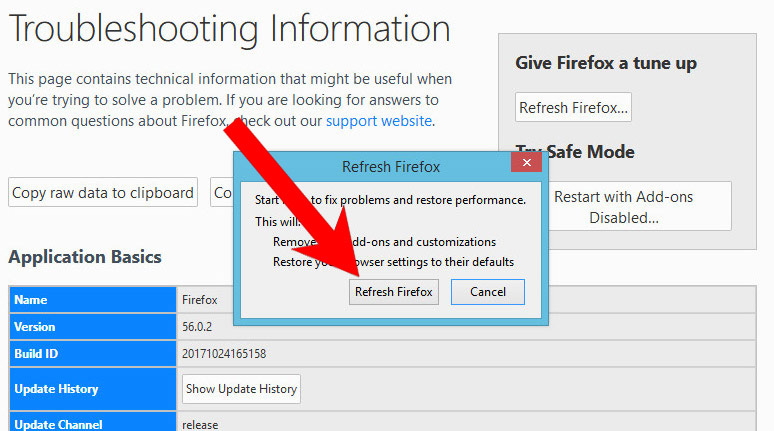
- Select Troubleshooting Information.
- Select the Refresh Firefox option.
k) Remove Perhiptid.com from Safari (for Mac)
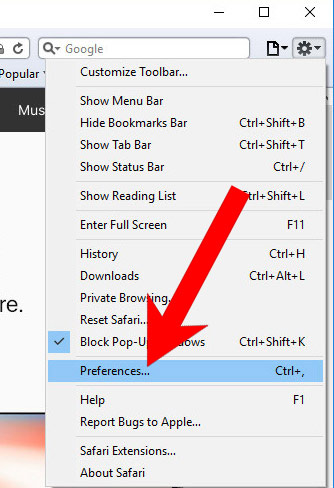
- Open Safari.
- Select Preferences (can be accesses by pressing on Safari at the top of your screen).
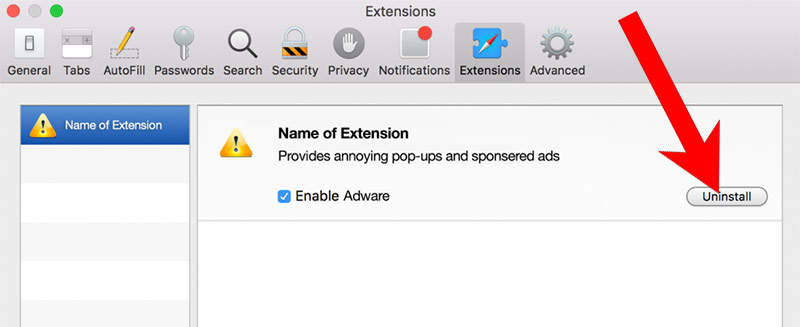
- Choose the Extensions tab.
- Uninstall all questionable extensions.
- If you are not certain about an extension, you can disable it by unchecking the box that says Enabled. If you later decide to keep it, simply check the box again.
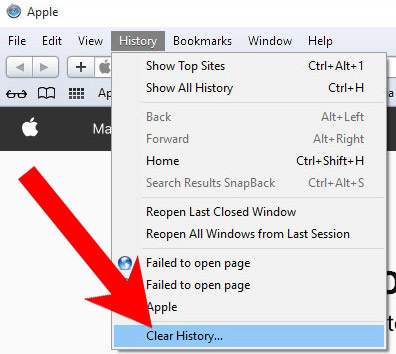
l) Reset Safari
If you are using the Yosemite, El Capitan or the Sierra versions, the option to reset Safari with one click is not available. Thus you will have to clear the history and empty the caches in separate steps.- Open Safari.
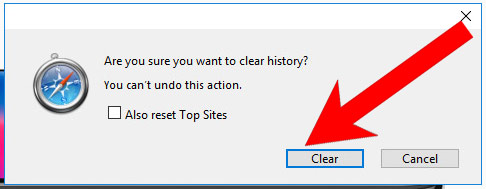
- Select Clear History (can be accesses by pressing on Safari at the top of your screen).
- Choose from what time you want the history deleted, and press Clear History.
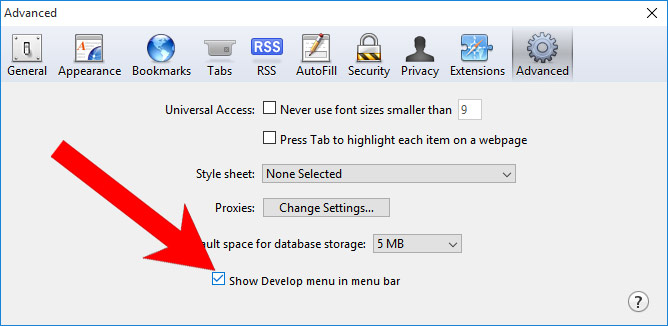
- Press on Safari at the top of the screen and select Preferences.
- Select the Advanced tab and check the box next to Show Develop menu in menu bar.
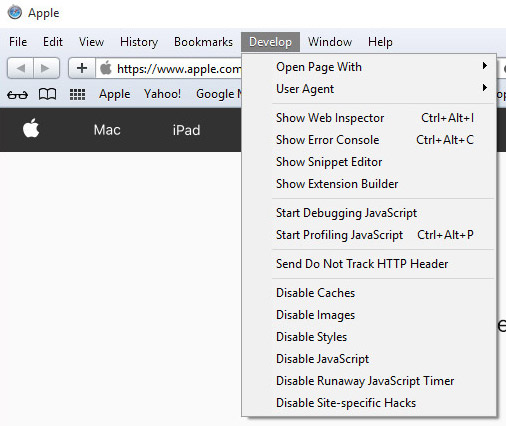
- Select Develop (from the menu bar at the top of the screen).
- Press Empty Caches.