You’ve arrived into the right site if you are eager to find, and successfully uninstall the origin of the frustrating ads, and site-leads you’ve been earning bugged by newly. Our “How to Remove” page is flooded with useful solutions to assist you efficiently erase unwanted applications, as well as nasty dangers. This time, we’re going to fact your attention to a usual browser invader called Hdvideosnet. This application is possible to annoy you in spite of the fact that bombarding the screen of your Firefox, Chrome, Safari (or a different browser) in bundles with its ads, pop-ups, banner adverts, and automatic portal-reroutes to diverse promoted portals. Fortunately, there’s a fast and efficient remedy to terminate it. If you act in accordance with the guide in the uninstallation guidelines beneath, you may terminate Hdvideosnet wholly and salvage on your own from its redundant reroutes and browser modifies in the home web page and the search page forever.
Download Removal Toolto remove Hdvideosnet
What can Hdvideosnet do to your pc?
You’ve likely realized that Hdvideosnet looks at once on the URL bar of your Chrome, Firefox or Explorer browser, the very second you open the surfing application. Not merely that, but might also sight alterations in your home page, or in the default search generator, both of which are now powered by Hdvideosnet. These kinds of modifies may lead to a heavy flood of adverts, and reroutes to sponsored websites each time you try to look for something on the net. You could be frequently earning obstructed by banner ads, pop-up boxes, unites, new tabs, and advertising materials.
This is literally what a classic browser intruder may do in spite of the fact that on your machine. Such a tool may even gather some information related to your web analyzes, and attempt to suit them in packages with significant choices and pay-per-tap ads. In some situations, it can be profitable to detect commercial advertisements that suit your interests and analyzes, notably if you can obtain a trustworthy deal. However, a lot of people generally label this process as tormenting, because it may truthfully lower the quality of their internet sustain. There is in addition to that a particular jeopardize of encountering some on the internet dangers (e.g Trojans or Ransomware) if you receive taken to unsecure webpages by cheating adverts or web links.
How can you set up a hijacker on your device?
In the majority instances, such applications as Hdvideosnet and CaptchaVerifier get set up by default, with some other, etc. good application. They don’t slither in the device like malicious software, Trojans or Ransomware, and can not harm your pc, tail you, scam your credentials, shared malicious software, or encipher your files, and blackmail you. In truth, you could right away prohibit them from becoming segment of your pc by picking the valid installation mode in the installation process parcel inside which they have been loaded. The thing is the biggest number of users don’t be really vigilant to these mode. They for the most part carry on in addition to a standard/quick installation, and avoid the bundle’s advanced/custom choices. And this is indeed where you should better press if you intend to block potentially undesirable programs from collecting set up by default. Just check out the customizable installation mode in any exhibited applications set uper, and erase the checkboxes from the applications you don’t wish to install. But because you ended up in packages with Hdvideosnet, you likely have rushed the advanced mode, and shall now have to act in accordance with the stages of removal in a manual way guidelines provided below to remove it.
Download Removal Toolto remove HdvideosnetLearn how to remove Hdvideosnet from your computer
Step 1. Hdvideosnet Removal from Windows
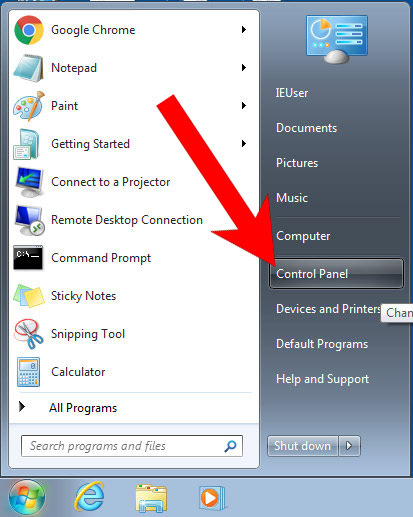
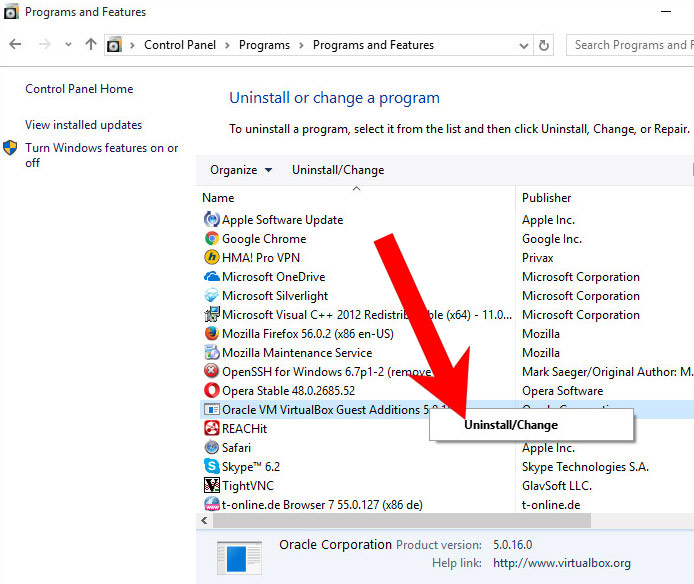
a) Windows 7/XP
- Press on the Start icon.

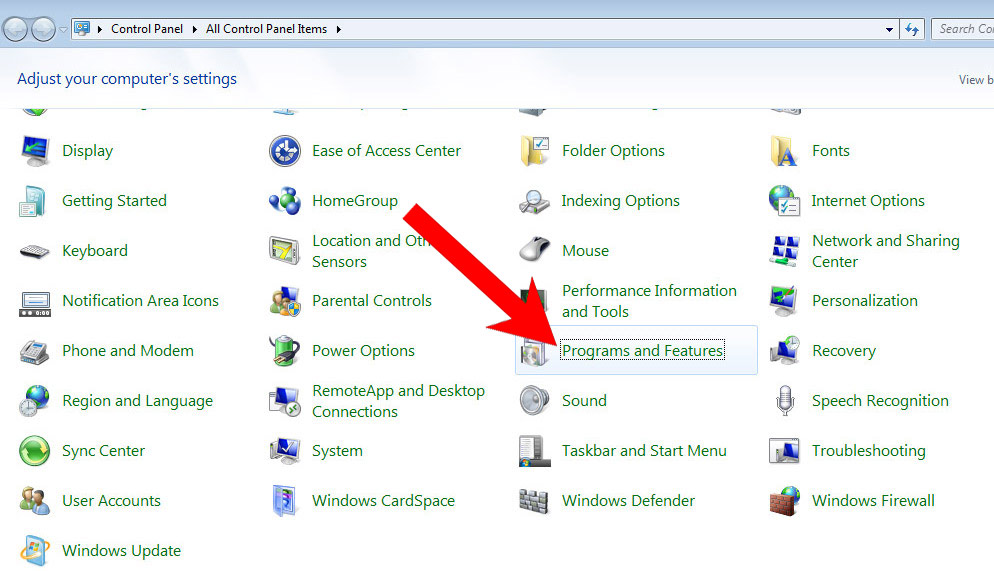
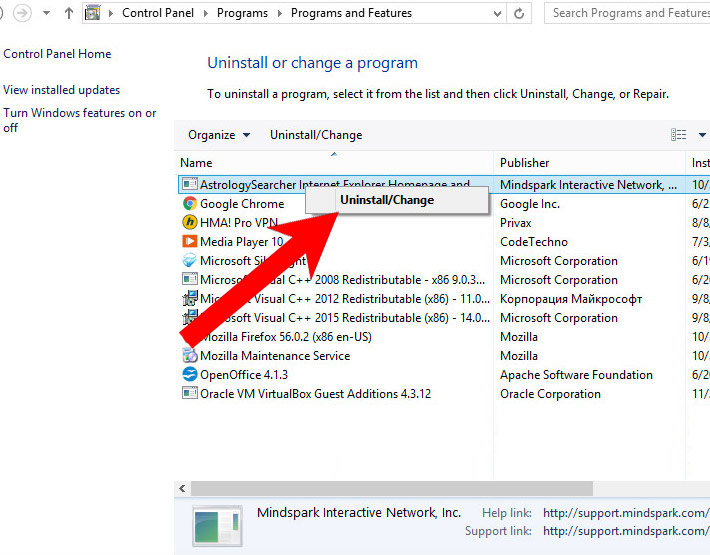
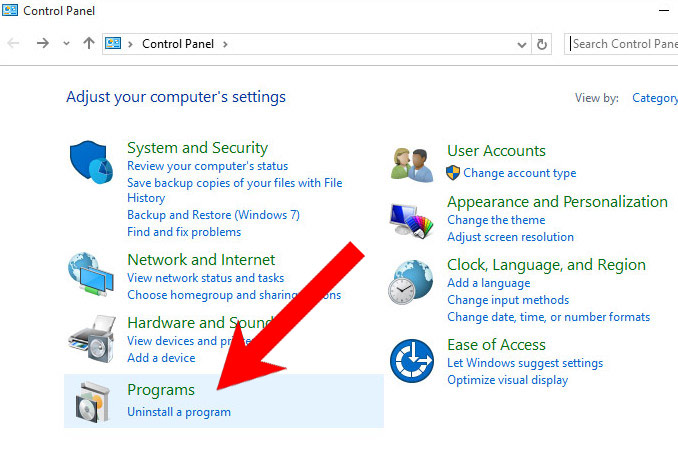
- Control Panel → Programs and Features.
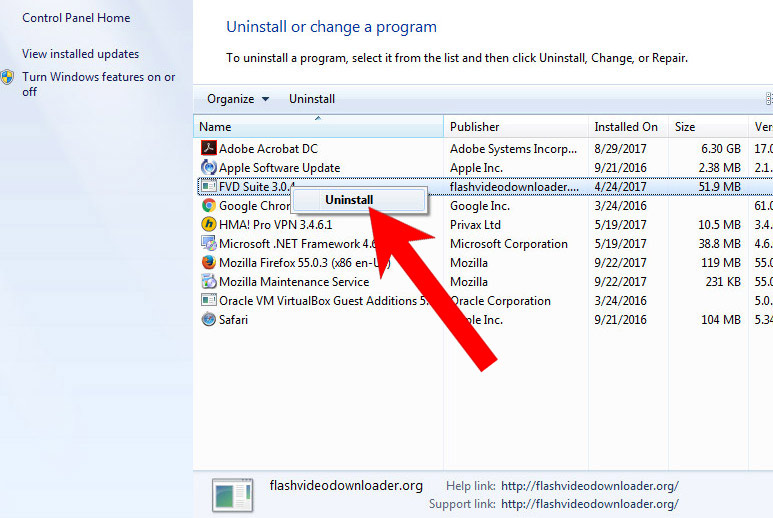
- Find the program you want to delete and press Uninstall.
b) Windows 8
- Right-click on the start icon (lower left corner).
- Select Control Panel.
- Click Programs and Features.
- Find and remove all unwanted programs.
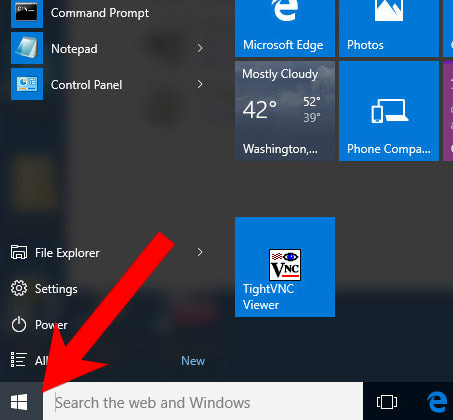

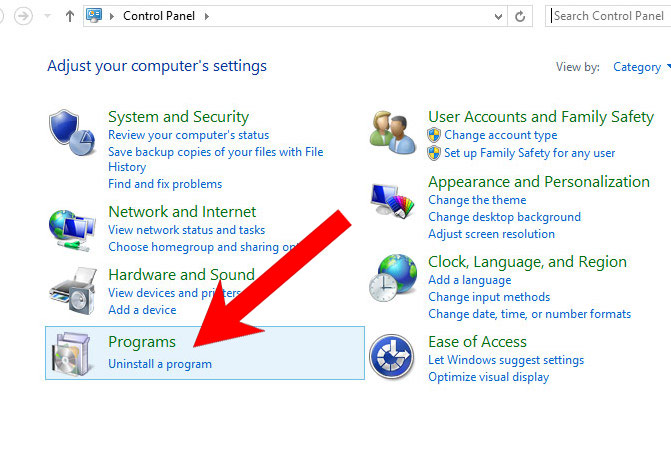
c) Windows 10
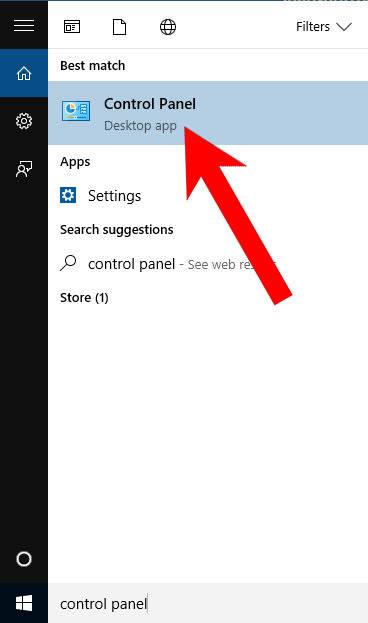
- Open Start menu and click on the magnifying glass (next to the shut down button).
- Type in Control Panel.
- Control Panel → Programs and Features.
- Find and remove all unwanted programs.
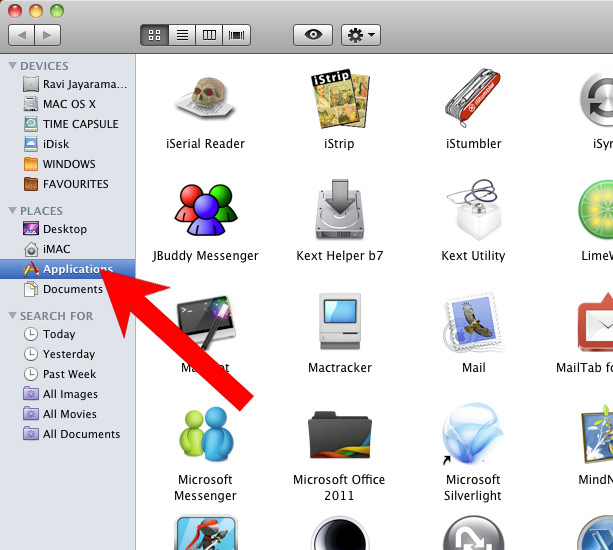
d) Mac OS X
- Open Finder and press Applications.
- Check all suspicious programs you want to get rid of.
- Drag them to the trash icon in your dock (Alternatively, right-click on the program and press Move to Trash).
- After you move all the unwanted programs, right-click on the trash icon and select Empty Trash.

Step 2. Delete Hdvideosnet from browsers
a) Remove Hdvideosnet from Microsoft Edge
Reset Microsoft Edge (Method 1)
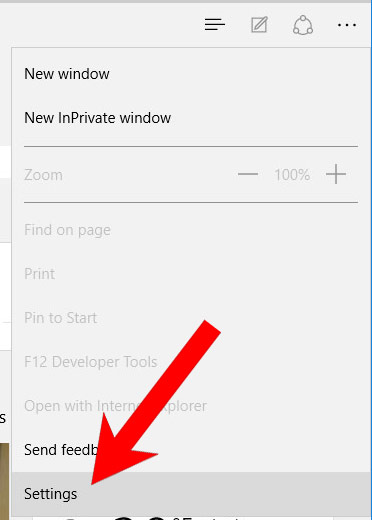
- Open Microsoft Edge.
- Press More located at the top right corner of the screen (the three dots).
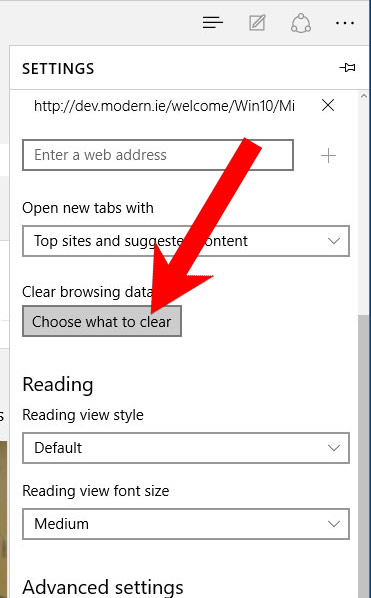
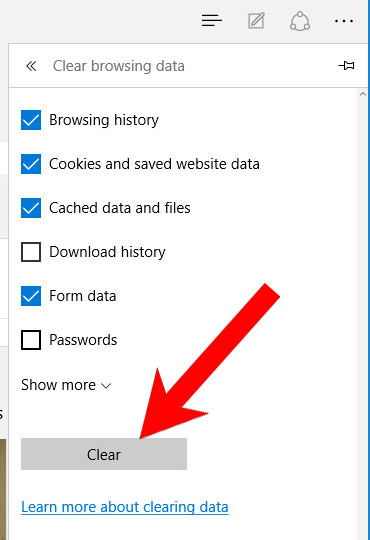
- Settings → Choose what to clear.
- Check the boxes of the items you want removed, and press Clear.
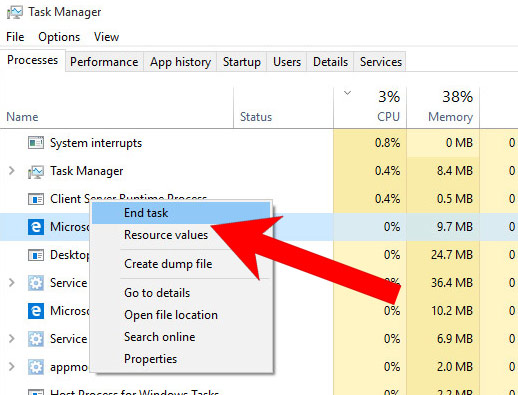
- Press Ctrl + Alt + Delete together.
- Choose Task Manager.
- In the Processes tab, find the Microsoft Edge process, right click on it, and press Go to details (or More details if Go to details is not available).
- Right-click on all Microsoft Edge processes, and choose End task.
(Method 2)
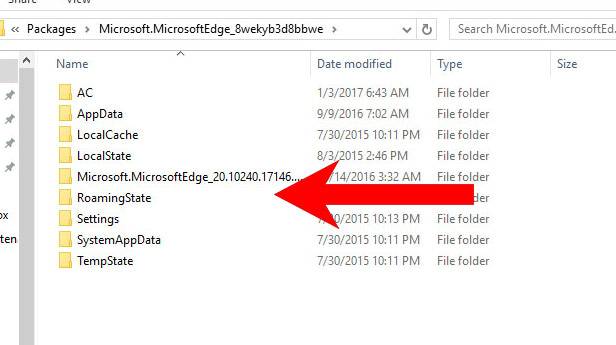
Before you proceed with this method, backup your data.- Go to C:\Users\%username%\AppData\Local\Packages\Microsoft.MicrosoftEdge_xxxxxxxxxx.
- Select all the folders, right-click on them and press Delete.
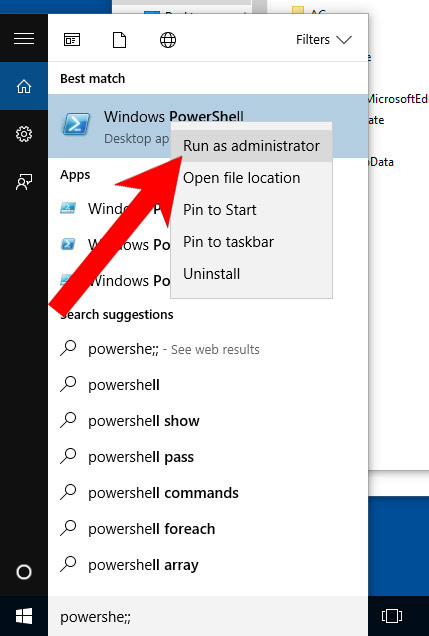
- Press the start button, and type in Windows PowerShell in the search box.
- Right-click on the result, and select Run as administrator.
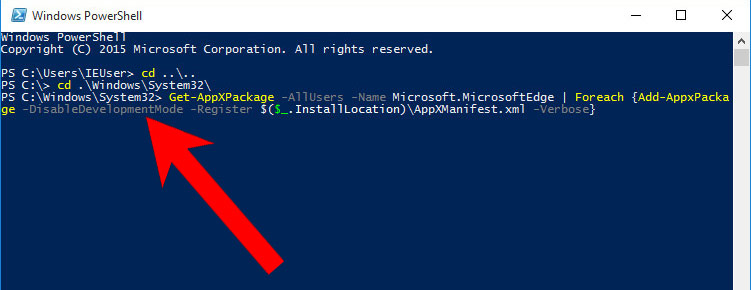
- In Administrator: Windows PowerShell, paste
Get-AppXPackage -AllUsers -Name Microsoft.MicrosoftEdge | Foreach {Add-AppxPackage -DisableDevelopmentMode -Register $($_.InstallLocation)\AppXManifest.xml -Verbose}
under PS C:\WINDOWS\system32> and tap Enter.
- The issue should be gone now.
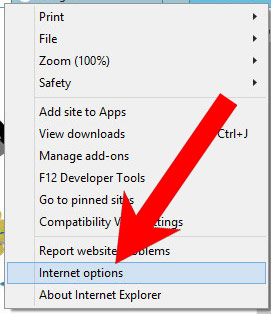
b) Remove Hdvideosnet from Internet Explorer
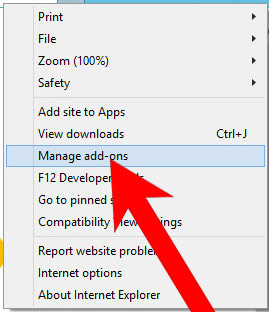
- Open Internet Explorer and press on the Gear icon.
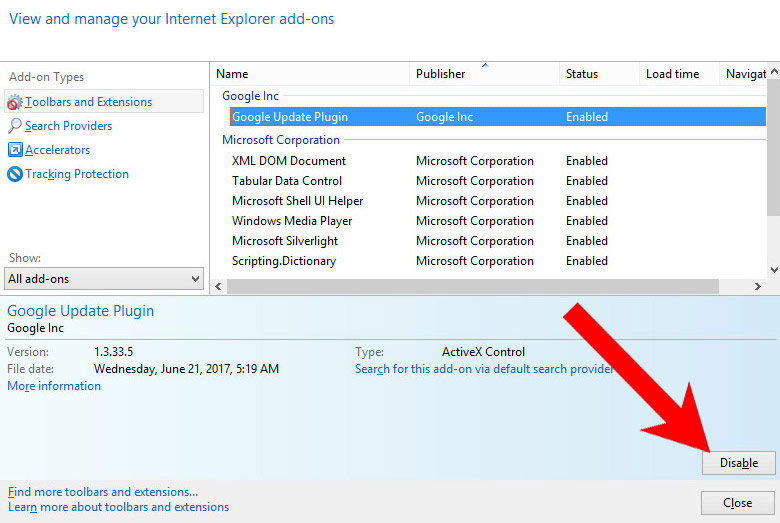
- Select Manage add-ons, and then Toolbars and Extensions.
- Find and disable all suspicious extensions.
- Close the window.
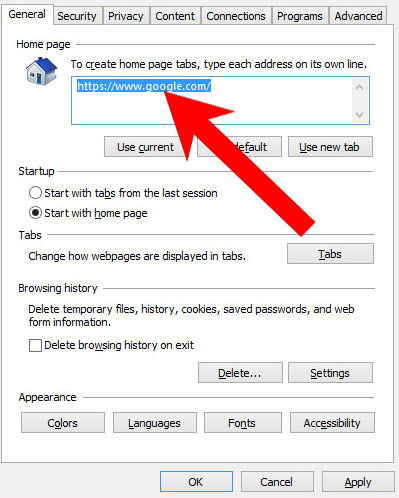
c) Restore your homepage on Internet Explorer
- Open Internet Explorer and press on the Gear icon.
- Internet Options → General tab. Delete the homepage URL and type in your preferred one.
- Press Apply.
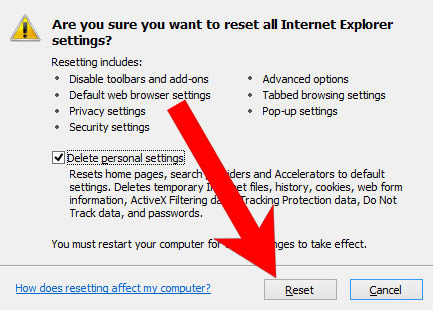
d) Reset Internet Explorer
- Open Internet Explorer and press on the Gear icon.
- Internet Options → Advanced tab.
- At the bottom, you will see a Reset button. Press that.
- In the window that appears, check the box that says Delete personal settings.
- Press Reset.
- Click OK to exit the window.
- Restart your browser.

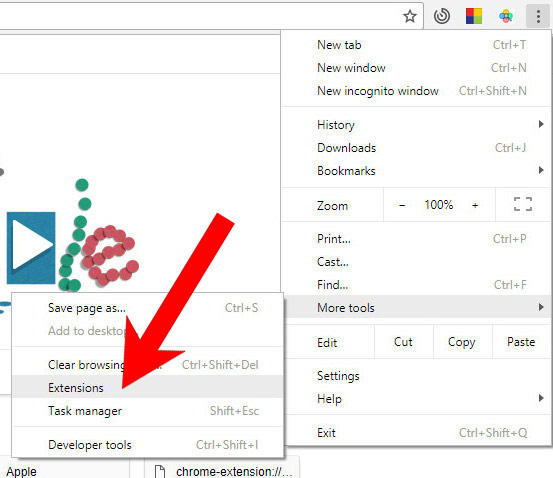
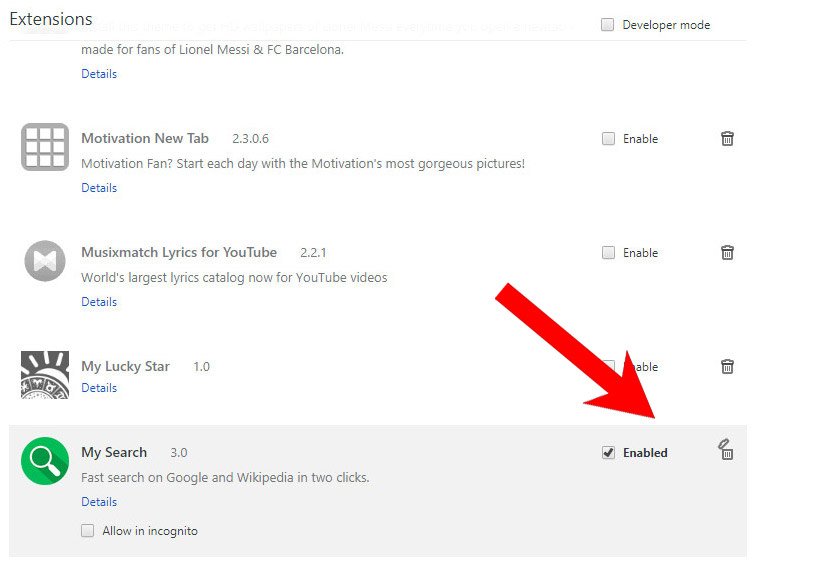
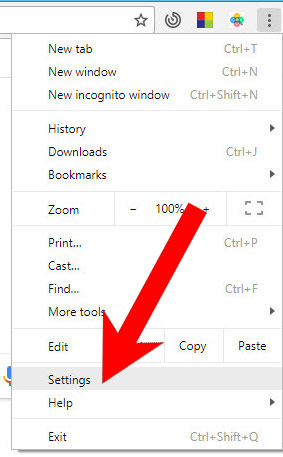
e) Remove Hdvideosnet from Google Chrome
- Open Google Chrome and press the menu icon on the right, next to the URL field.
- Choose More tools and Extensions.
- Remove suspicious extensions by clicking the Trash icon next to them.
- If you are not certain about an extension, you can disable it by unchecking the box that says Enabled. If you later decide to keep it, simply check the box again.
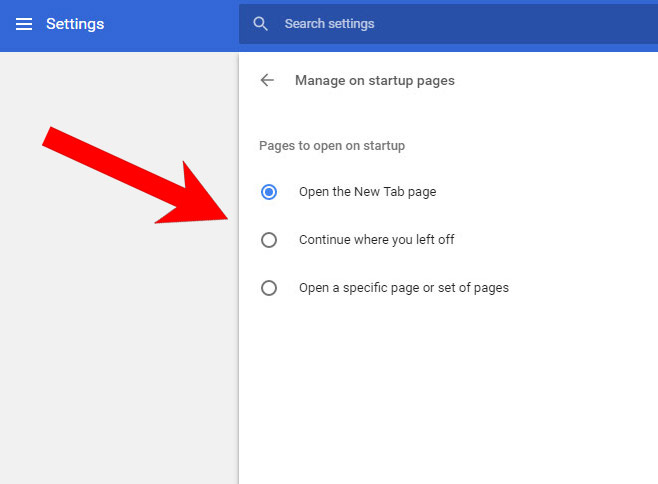
f) Restore your homepage on Google Chrome
- Open Google Chrome and press the menu icon on the right, next to the URL field.
- Choose Settings.
- In the window that appears, under On startup, there will be a Set pages option. Press on that.
- Remove the set website, and type in the one you prefer to be your homepage. Press OK.
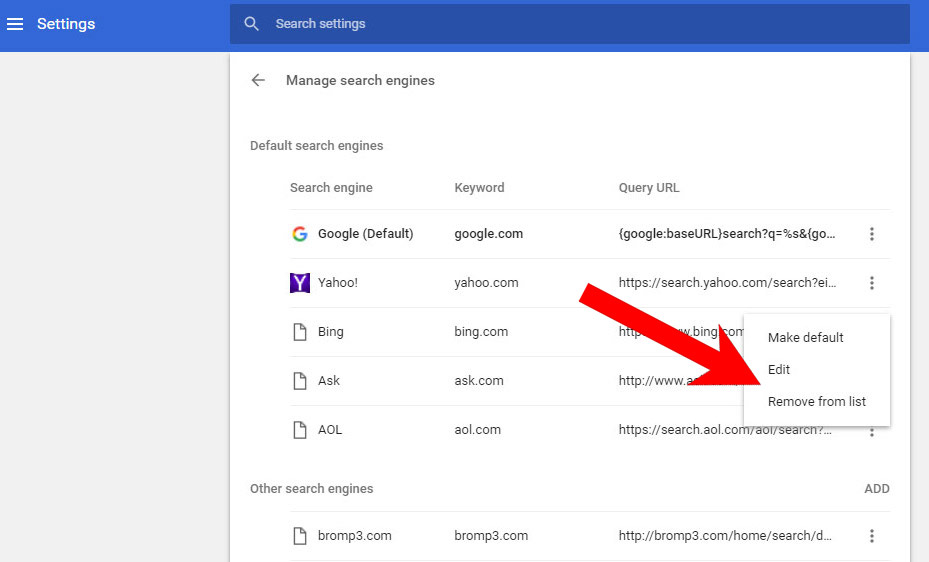
- In Settings, under Search, there is a Manage search engines option. Select that.
- Remove all search engines except the one you want to use. Click Done.
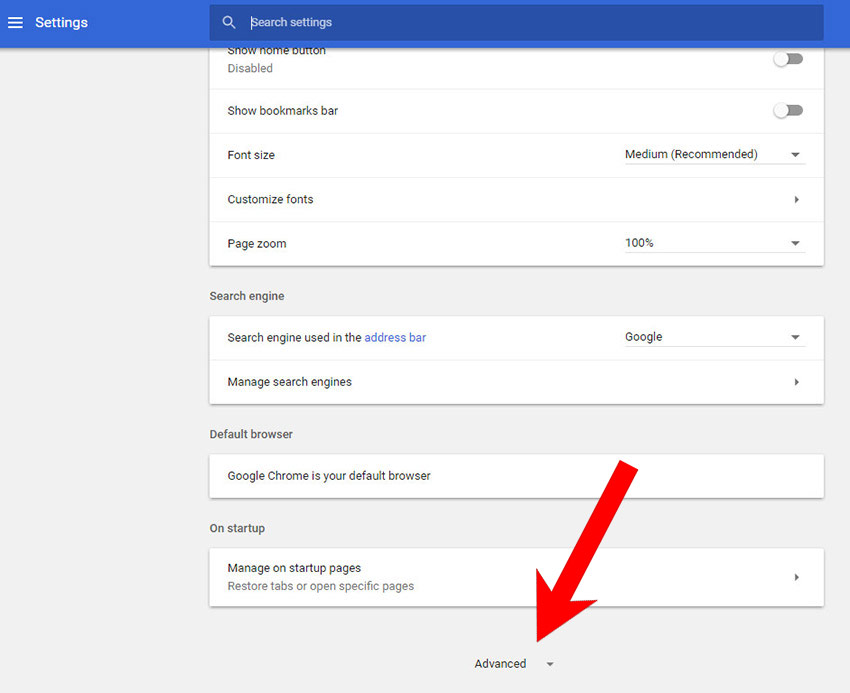
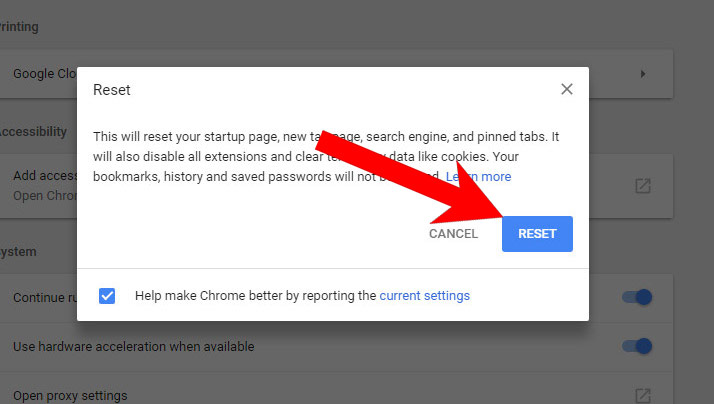
g) Reset Google Chrome
- Open Google Chrome and press the menu icon on the right, next to the URL field.
- Choose Settings.
- Scroll down and press on Show advanced settings.
- Find and press the Reset button.
- In the confirmation window that appears, press Reset.
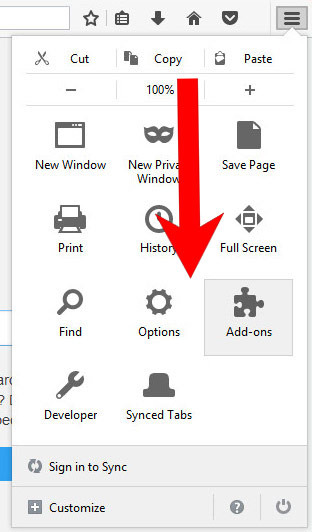
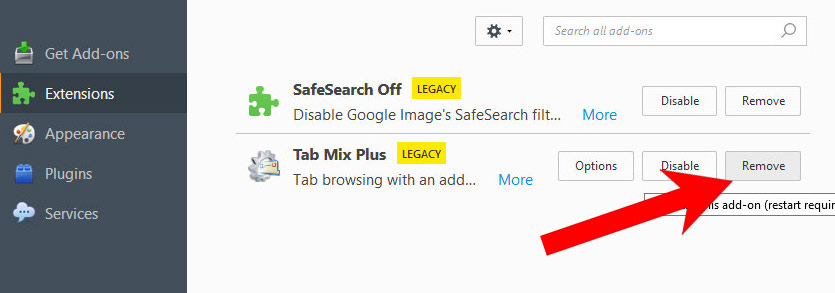
h) Remove Hdvideosnet from Mozilla Firefox
- Open Mozilla Firefox and access the menu by clicking on the three bars on the right of the screen.
- Select Add-ons.
- Select the Extensions tab, and remove all questionable extensions.
- If you are not certain about an extension, you can disable it by clicking Disable. If you later decide to keep it, simply press Enable.
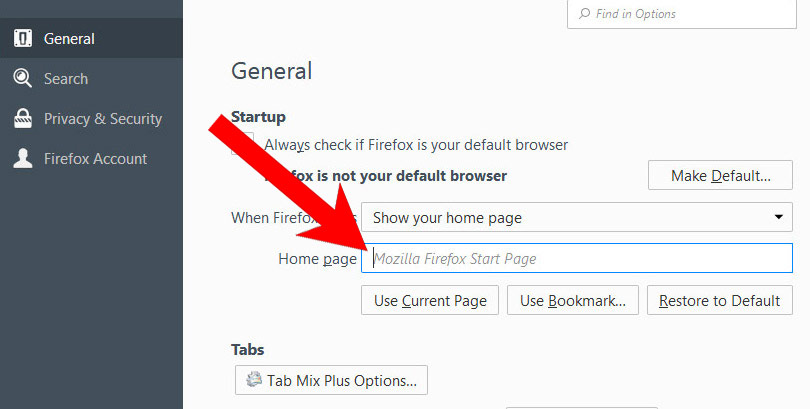
i) Restore your homepage on Mozilla Firefox
- Open Mozilla Firefox and access the menu by clicking on the three bars on the right side of the screen.
- Select Options.
- In General, click Restore to Default below the Home Page field.
j) Reset Mozilla Firefox
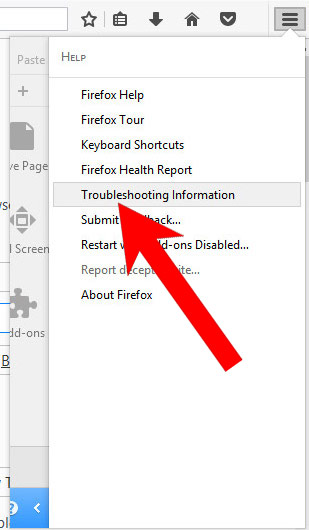
- Open Mozilla Firefox and access the menu by clicking on the three bars on the right of the screen.
- Press the question mark at the bottom of the menu.
- Select Troubleshooting Information.
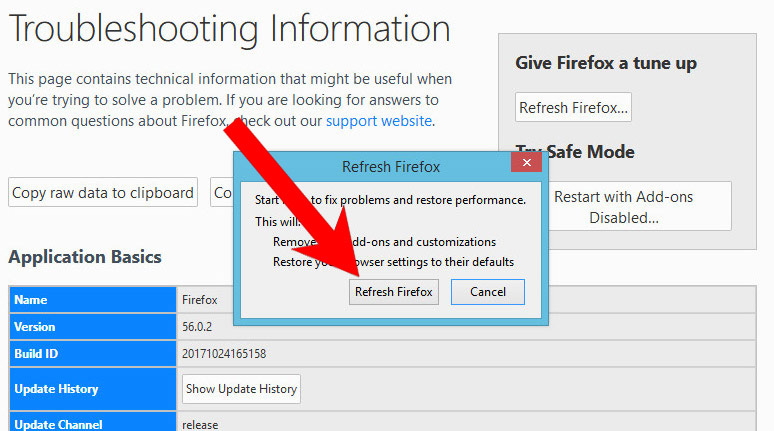
- Select the Refresh Firefox option.
k) Remove Hdvideosnet from Safari (for Mac)
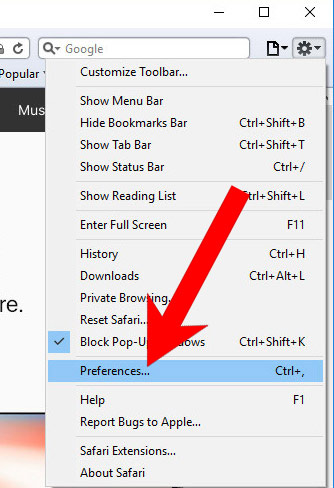
- Open Safari.
- Select Preferences (can be accesses by pressing on Safari at the top of your screen).
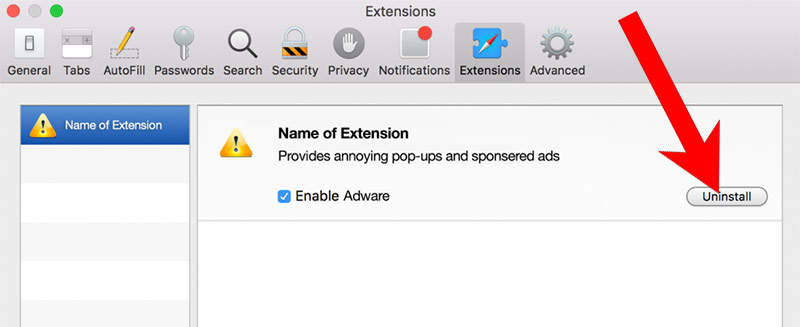
- Choose the Extensions tab.
- Uninstall all questionable extensions.
- If you are not certain about an extension, you can disable it by unchecking the box that says Enabled. If you later decide to keep it, simply check the box again.
l) Reset Safari
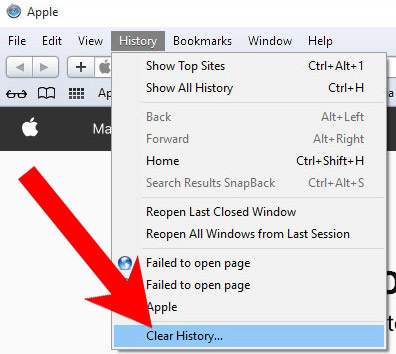
If you are using the Yosemite, El Capitan or the Sierra versions, the option to reset Safari with one click is not available. Thus you will have to clear the history and empty the caches in separate steps.- Open Safari.
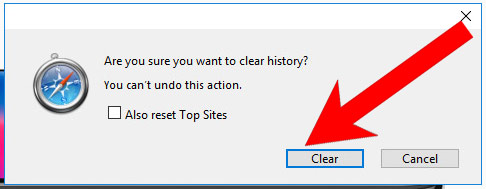
- Select Clear History (can be accesses by pressing on Safari at the top of your screen).
- Choose from what time you want the history deleted, and press Clear History.
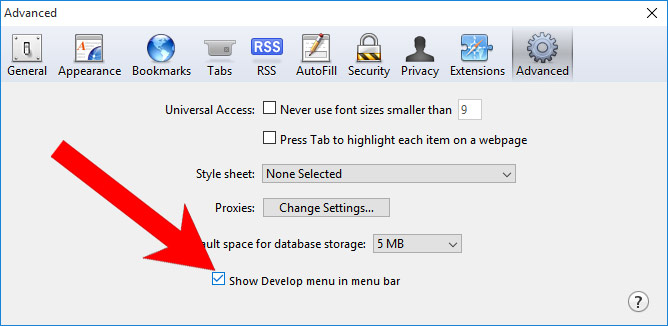
- Press on Safari at the top of the screen and select Preferences.
- Select the Advanced tab and check the box next to Show Develop menu in menu bar.
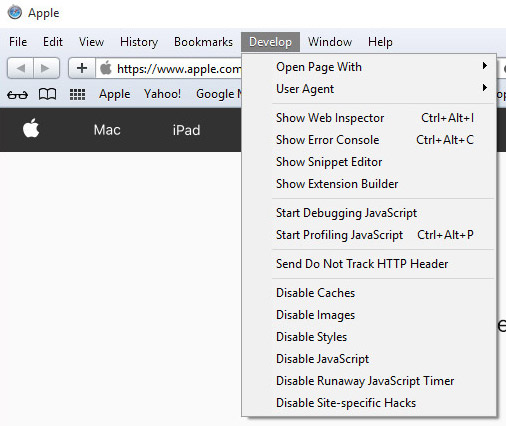
- Select Develop (from the menu bar at the top of the screen).
- Press Empty Caches.