For example, DiscoveryUniversefld could modify the browser home page and may set its own search tool because your new default one. That way it could ensure that these sites get etc. traffic, for one. And for another, you’ll notice that you obtain lots etc. promoted search results when you inquire about something internet. And then obviously the most irritating thing that applications of this category has a tendency to implement is provoke site routes. Just as you’re surfing the web, the web page may lead you to some unintentional web whereabouts.
The sole way you shall have an opportunity to rid on your own of all these kinds of extremely irksome effects is by deleting DiscoveryUniversefld from your computer. This can be done by following the stages we’ve added to the removal guidelines below.
DiscoveryUniversefld for Mac
DiscoveryUniversefld for Mac can become part of almost any browser out there, such as Chrome, Safari, Firefox and others. The second integrated, DiscoveryUniversefld for Mac shall set up an advert-generating piece in your browser producing it act as an internet ad-supported tool.The reasoning behind this is that an application like DiscoveryUniversefld is invented for the most part for the objectives of raising revenue for its makers. And generally this revenue comes from the clicks on all the paid advertisements and other promoted content promoted by the hijacker in question. Remuneration machines for instance Pay Per press and Pay Per angle are what generate this potential, and what mostly describe the details of this program’s behavior.
Download Removal Toolto remove DiscoveryUniversefldWhat is DiscoveryUniversefld?
DiscoveryUniversefld is a hijacker utility that is hugely generally falsely known as a malware. Fortunately, DiscoveryUniversefld is not malicious and doesn’t endanger to endanger your Mac in any way.Nevertheless, security specialists warn people who’ve had these types of programs installed on their operating systems. It could occur that as an outcome of their processes, your computer is vulnerable to actual parasite for instance ransomware and Trojan horses. Therefore, we also suggest that you attempt to escape engaging with one of the content that DiscoveryUniversefld attempts to prompt on you.
The DiscoveryUniversefld app
The DiscoveryUniversefld app is commonly included in the installers or free games or system optimization software. This is mainly what develops the ways of distributions of the DiscoveryUniversefld app feasible. However, complicated schemes of this class can quickly be circumvented if you be extra attentive to the setup procedure of any lately collected programs and you tailor the setup mode on your own.
Other perils of this family:
Cucullate,Sighful,Ryderd,Remcore,Pipidae,ConnectionCachefld,standardboostd , cleanparameterd , skilledobjectd , RecordMapperd , manageranalogd , InitialProgramd , ProtocolPort , ActivityInputd , initialskilld , dominantpartitiond , OriginalModuled , OperativeMachined , unithandlerd , protocolstatus , elementarytyped , standartproductd , configtyped , Analyzerwindowd , ExtendedSprintd , LauncherSetup , TrustedAnalogd
Learn how to remove DiscoveryUniversefld from your computer
Step 1. DiscoveryUniversefld Removal from Windows
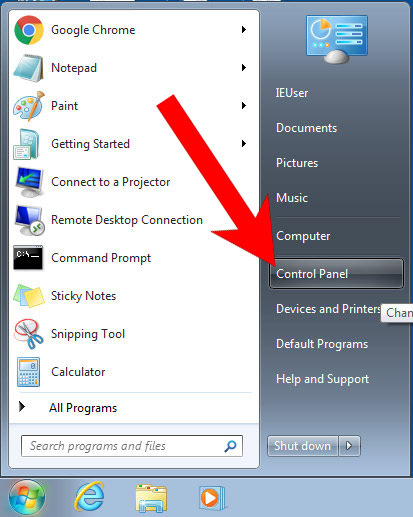
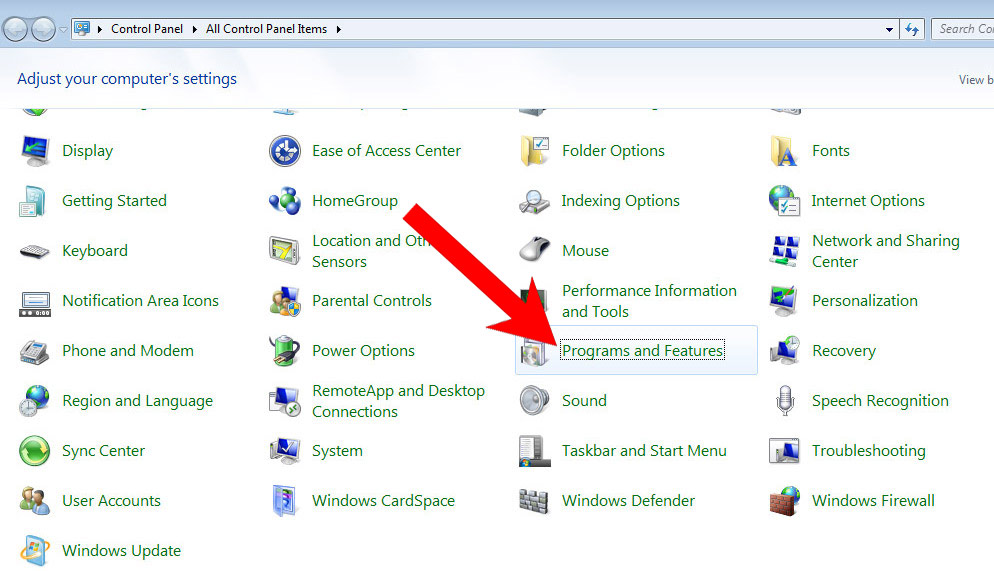
a) Windows 7/XP
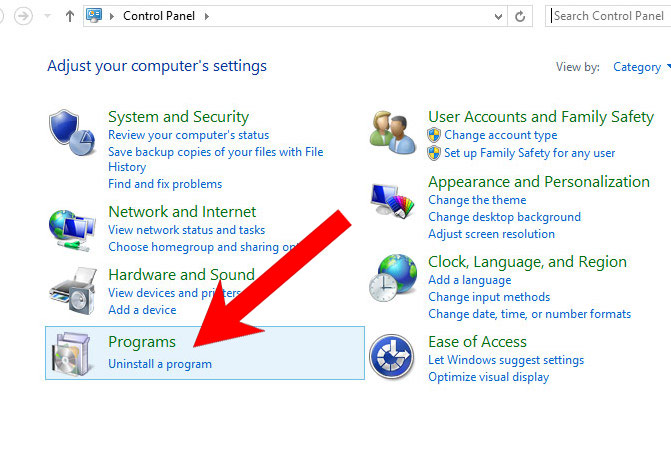
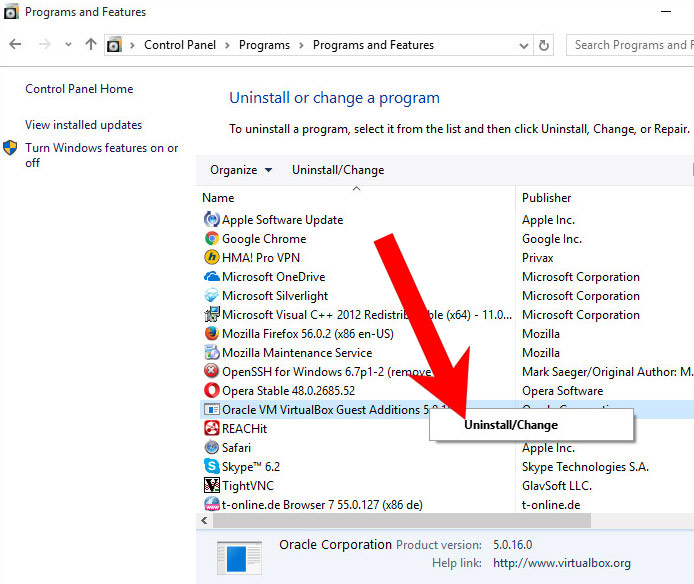
- Press on the Start icon.

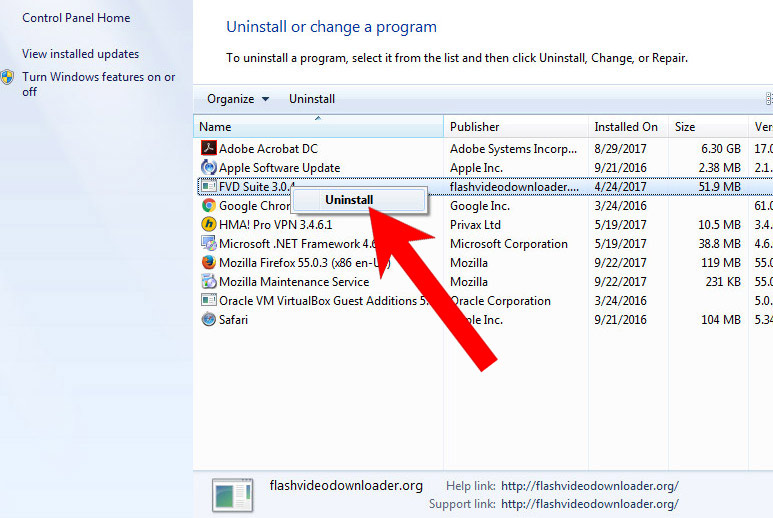
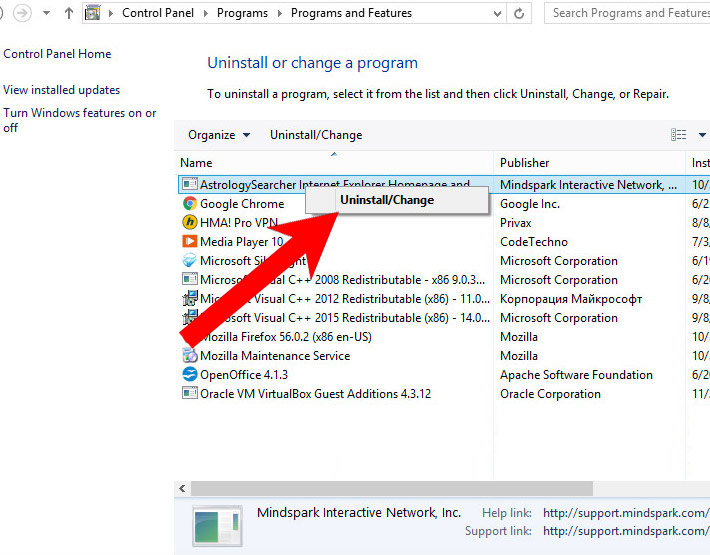
- Control Panel → Programs and Features.
- Find the program you want to delete and press Uninstall.
b) Windows 8
- Right-click on the start icon (lower left corner).
- Select Control Panel.
- Click Programs and Features.
- Find and remove all unwanted programs.
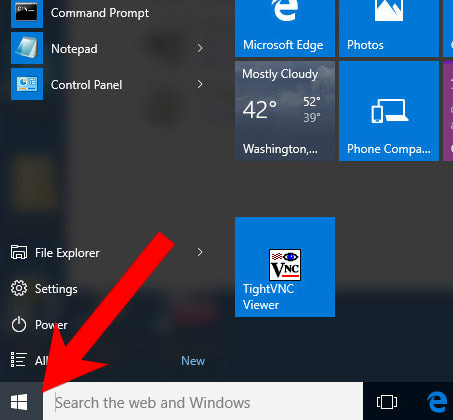

c) Windows 10
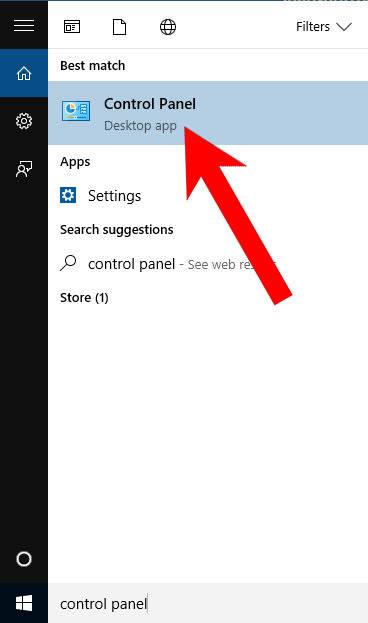
- Open Start menu and click on the magnifying glass (next to the shut down button).
- Type in Control Panel.
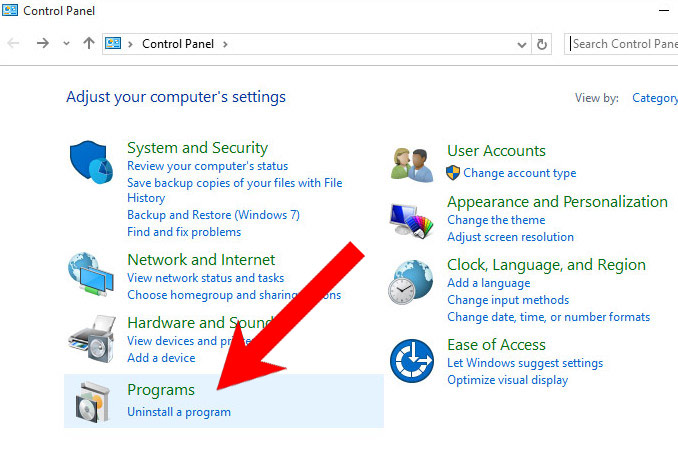
- Control Panel → Programs and Features.
- Find and remove all unwanted programs.
d) Mac OS X
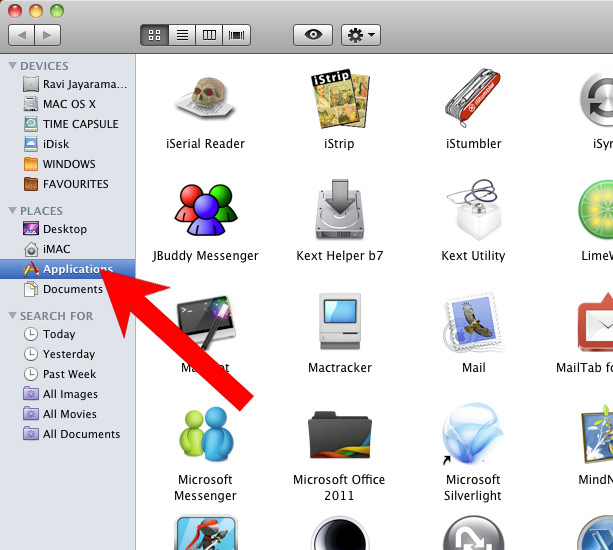
- Open Finder and press Applications.
- Check all suspicious programs you want to get rid of.
- Drag them to the trash icon in your dock (Alternatively, right-click on the program and press Move to Trash).
- After you move all the unwanted programs, right-click on the trash icon and select Empty Trash.

Step 2. Delete DiscoveryUniversefld from browsers
a) Remove DiscoveryUniversefld from Microsoft Edge
Reset Microsoft Edge (Method 1)
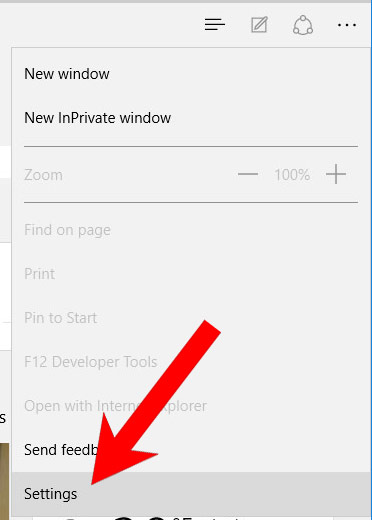
- Open Microsoft Edge.
- Press More located at the top right corner of the screen (the three dots).
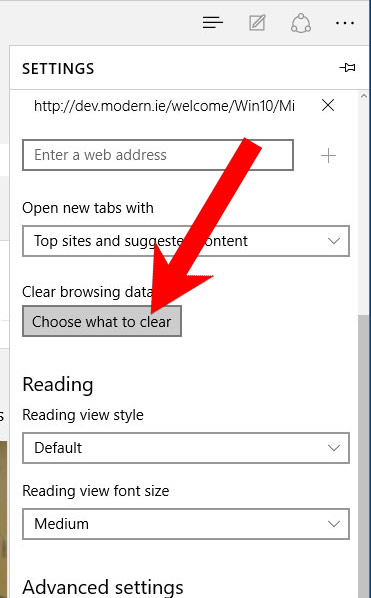
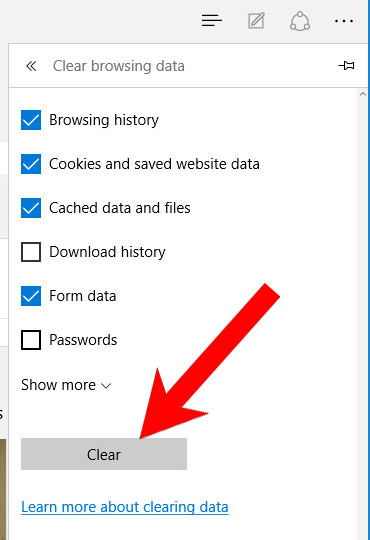
- Settings → Choose what to clear.
- Check the boxes of the items you want removed, and press Clear.
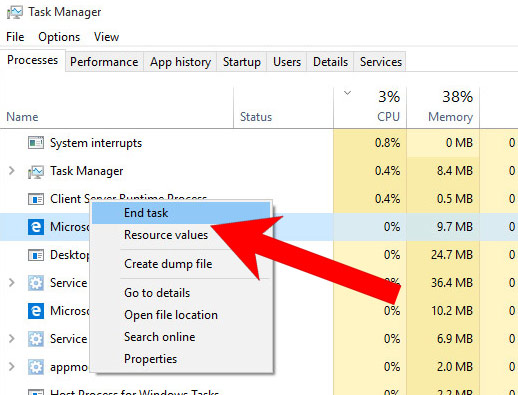
- Press Ctrl + Alt + Delete together.
- Choose Task Manager.
- In the Processes tab, find the Microsoft Edge process, right click on it, and press Go to details (or More details if Go to details is not available).
- Right-click on all Microsoft Edge processes, and choose End task.
(Method 2)
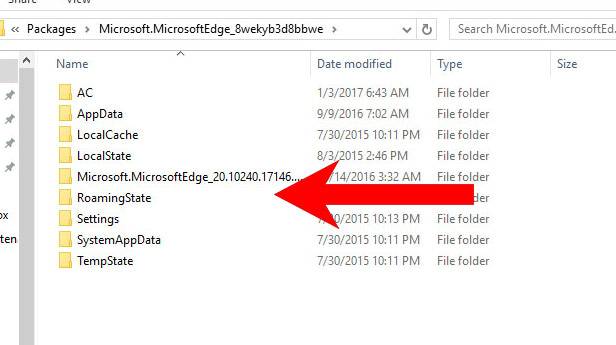
Before you proceed with this method, backup your data.- Go to C:\Users\%username%\AppData\Local\Packages\Microsoft.MicrosoftEdge_xxxxxxxxxx.
- Select all the folders, right-click on them and press Delete.
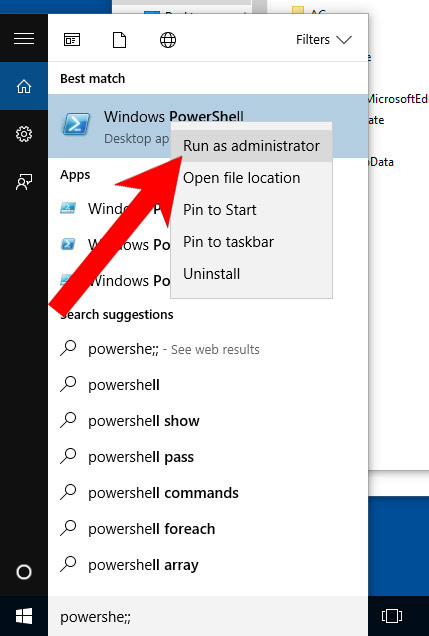
- Press the start button, and type in Windows PowerShell in the search box.
- Right-click on the result, and select Run as administrator.
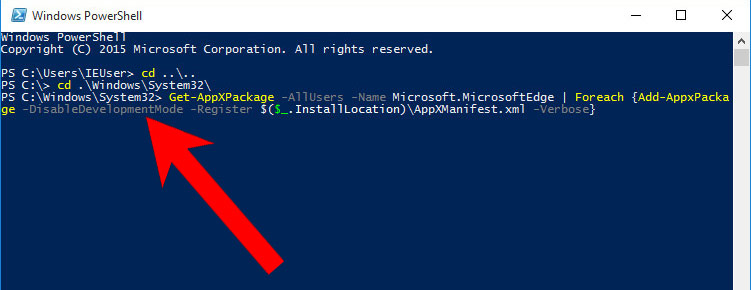
- In Administrator: Windows PowerShell, paste
Get-AppXPackage -AllUsers -Name Microsoft.MicrosoftEdge | Foreach {Add-AppxPackage -DisableDevelopmentMode -Register $($_.InstallLocation)\AppXManifest.xml -Verbose}
under PS C:\WINDOWS\system32> and tap Enter.
- The issue should be gone now.
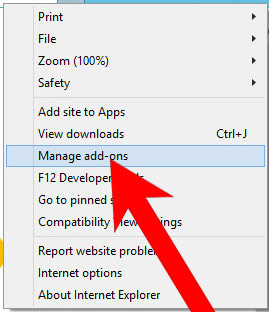
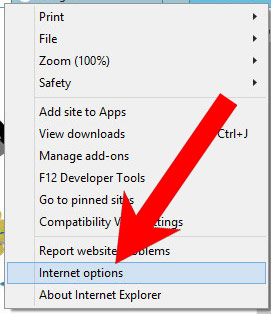
b) Remove DiscoveryUniversefld from Internet Explorer
- Open Internet Explorer and press on the Gear icon.
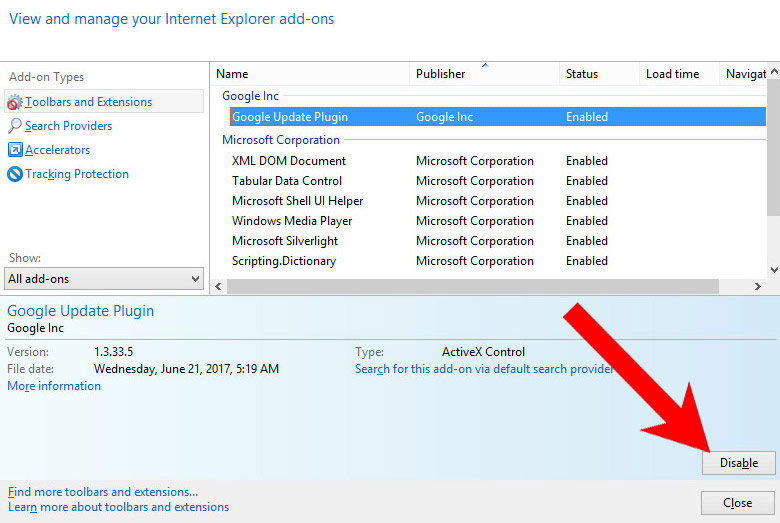
- Select Manage add-ons, and then Toolbars and Extensions.
- Find and disable all suspicious extensions.
- Close the window.
c) Restore your homepage on Internet Explorer
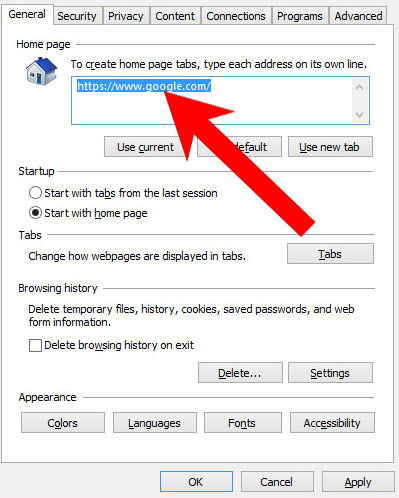
- Open Internet Explorer and press on the Gear icon.
- Internet Options → General tab. Delete the homepage URL and type in your preferred one.
- Press Apply.
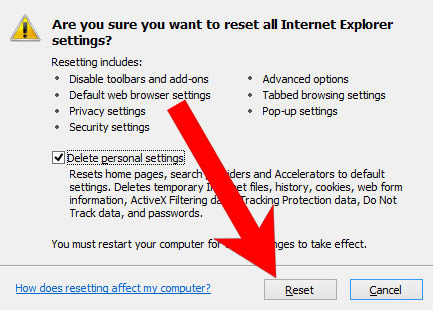
d) Reset Internet Explorer
- Open Internet Explorer and press on the Gear icon.
- Internet Options → Advanced tab.
- At the bottom, you will see a Reset button. Press that.
- In the window that appears, check the box that says Delete personal settings.
- Press Reset.
- Click OK to exit the window.
- Restart your browser.

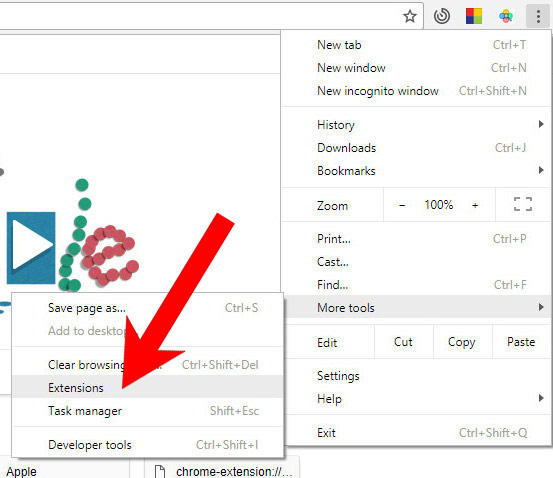
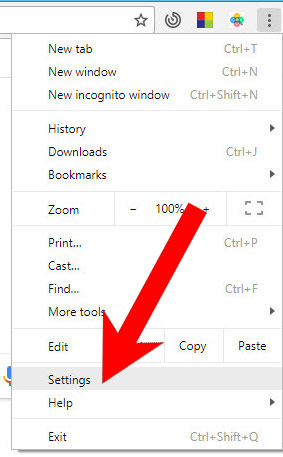
e) Remove DiscoveryUniversefld from Google Chrome
- Open Google Chrome and press the menu icon on the right, next to the URL field.
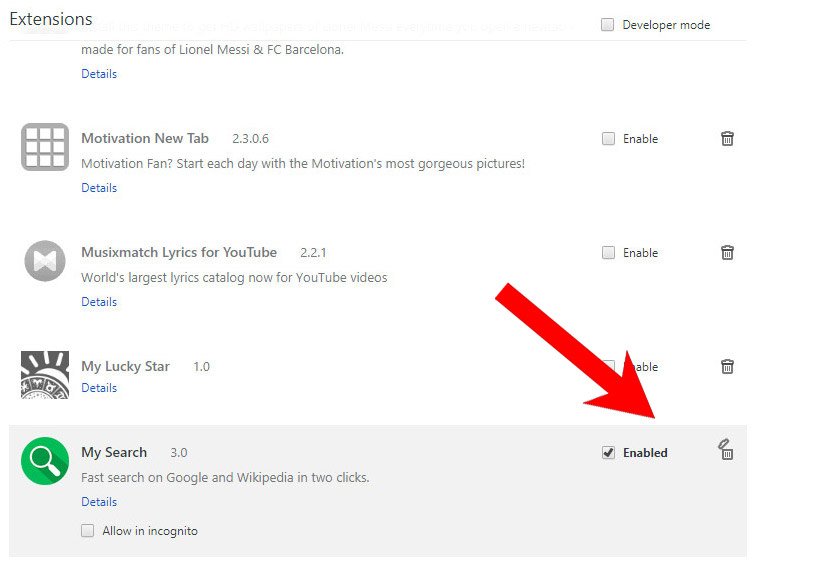
- Choose More tools and Extensions.
- Remove suspicious extensions by clicking the Trash icon next to them.
- If you are not certain about an extension, you can disable it by unchecking the box that says Enabled. If you later decide to keep it, simply check the box again.
f) Restore your homepage on Google Chrome
- Open Google Chrome and press the menu icon on the right, next to the URL field.
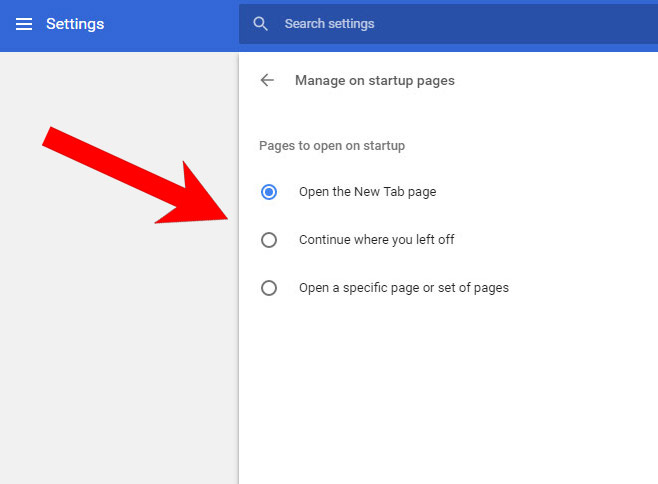
- Choose Settings.
- In the window that appears, under On startup, there will be a Set pages option. Press on that.
- Remove the set website, and type in the one you prefer to be your homepage. Press OK.
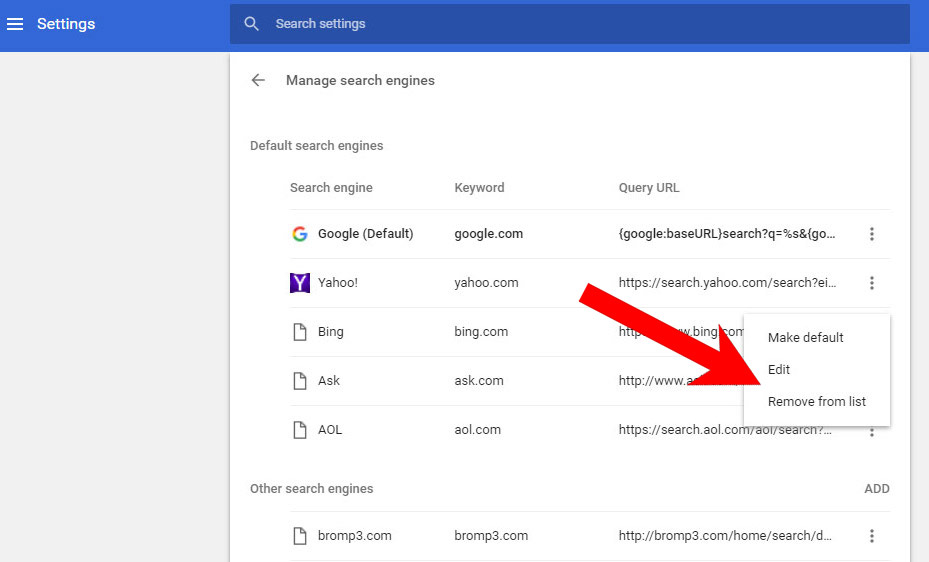
- In Settings, under Search, there is a Manage search engines option. Select that.
- Remove all search engines except the one you want to use. Click Done.
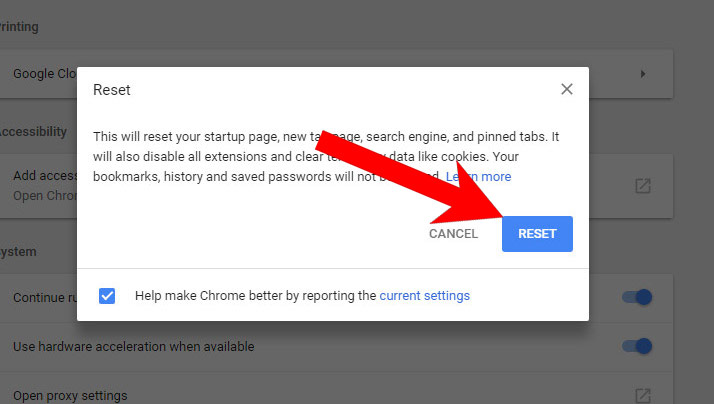
g) Reset Google Chrome
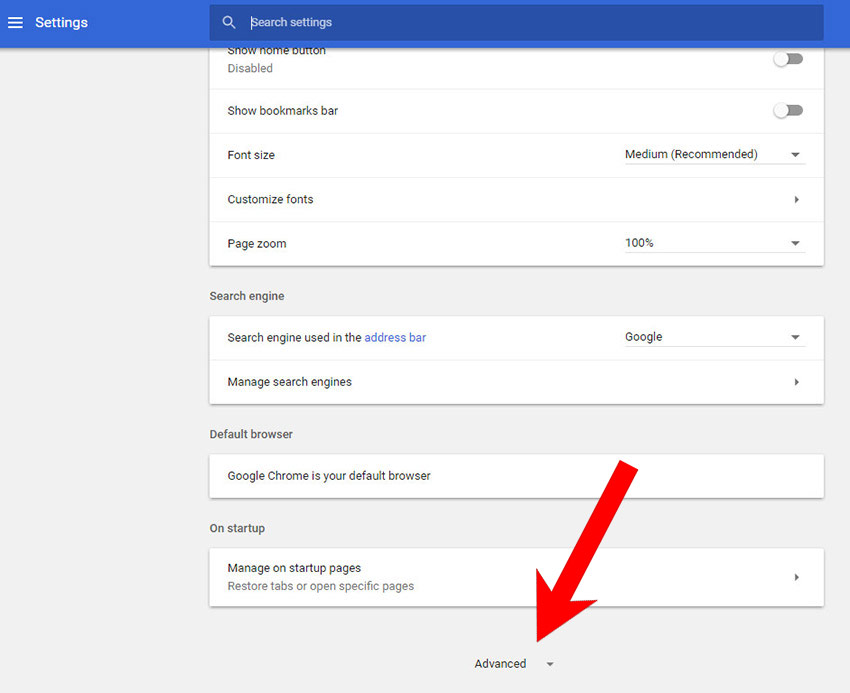
- Open Google Chrome and press the menu icon on the right, next to the URL field.
- Choose Settings.
- Scroll down and press on Show advanced settings.
- Find and press the Reset button.
- In the confirmation window that appears, press Reset.
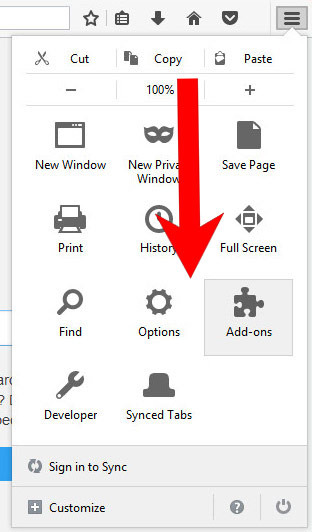
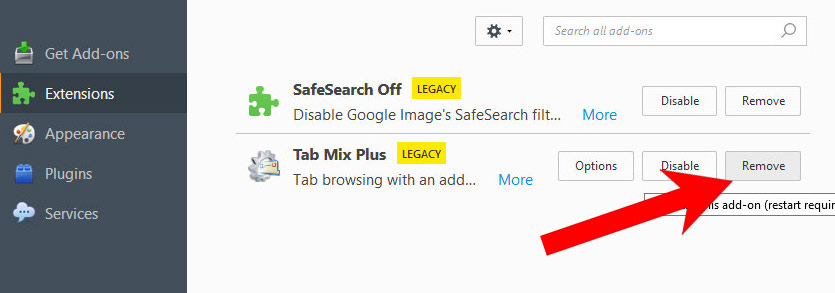
h) Remove DiscoveryUniversefld from Mozilla Firefox
- Open Mozilla Firefox and access the menu by clicking on the three bars on the right of the screen.
- Select Add-ons.
- Select the Extensions tab, and remove all questionable extensions.
- If you are not certain about an extension, you can disable it by clicking Disable. If you later decide to keep it, simply press Enable.
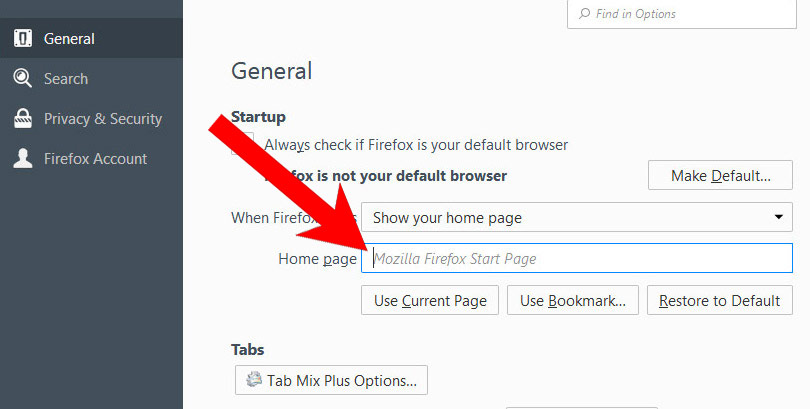
i) Restore your homepage on Mozilla Firefox
- Open Mozilla Firefox and access the menu by clicking on the three bars on the right side of the screen.
- Select Options.
- In General, click Restore to Default below the Home Page field.
j) Reset Mozilla Firefox
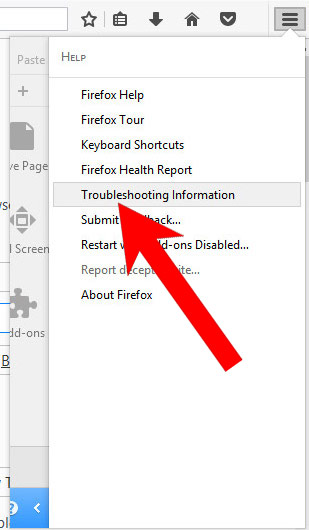
- Open Mozilla Firefox and access the menu by clicking on the three bars on the right of the screen.
- Press the question mark at the bottom of the menu.
- Select Troubleshooting Information.
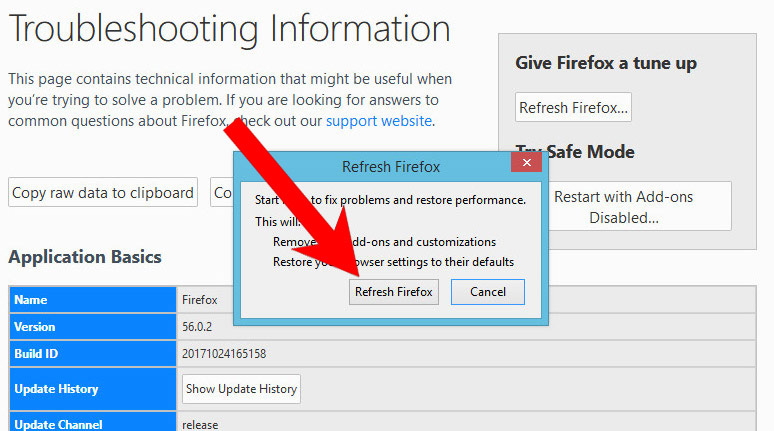
- Select the Refresh Firefox option.
k) Remove DiscoveryUniversefld from Safari (for Mac)
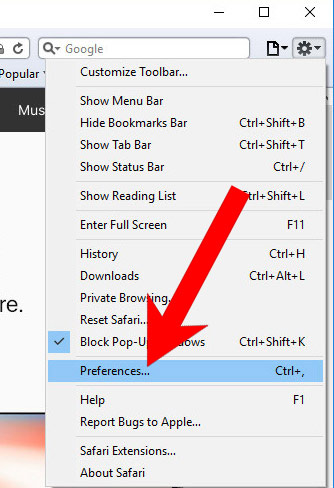
- Open Safari.
- Select Preferences (can be accesses by pressing on Safari at the top of your screen).
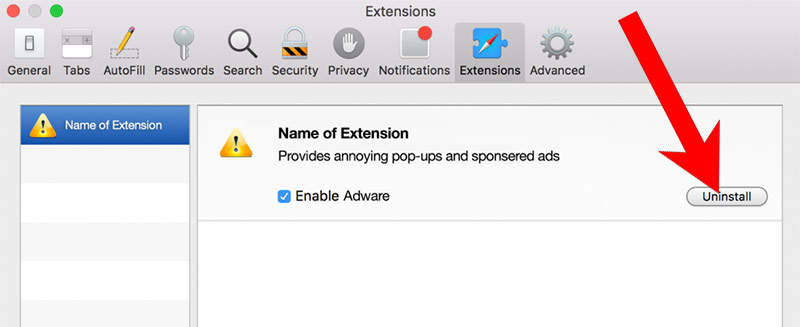
- Choose the Extensions tab.
- Uninstall all questionable extensions.
- If you are not certain about an extension, you can disable it by unchecking the box that says Enabled. If you later decide to keep it, simply check the box again.
l) Reset Safari
If you are using the Yosemite, El Capitan or the Sierra versions, the option to reset Safari with one click is not available. Thus you will have to clear the history and empty the caches in separate steps.- Open Safari.
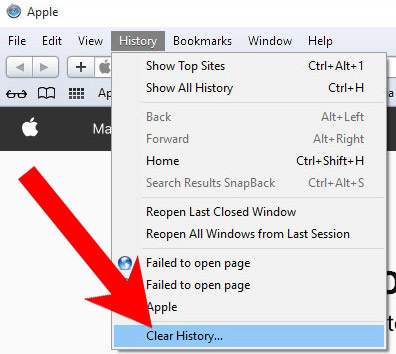
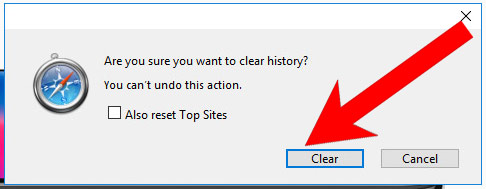
- Select Clear History (can be accesses by pressing on Safari at the top of your screen).
- Choose from what time you want the history deleted, and press Clear History.
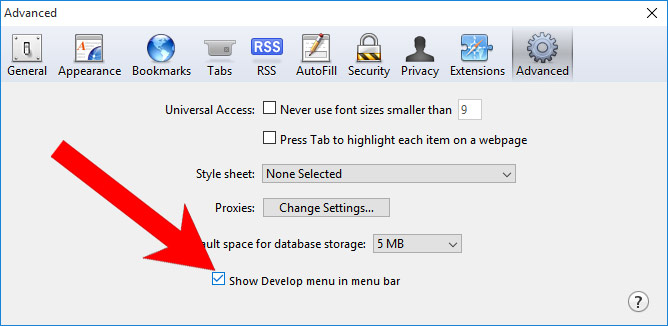
- Press on Safari at the top of the screen and select Preferences.
- Select the Advanced tab and check the box next to Show Develop menu in menu bar.
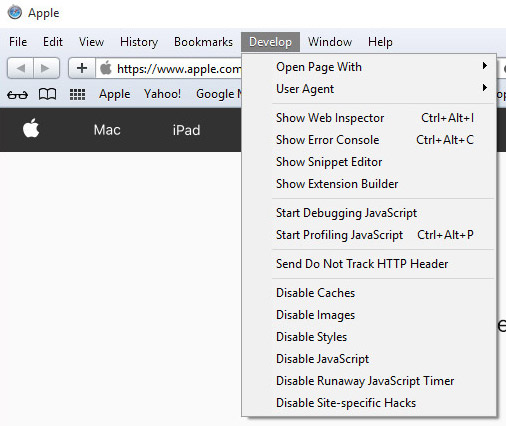
- Select Develop (from the menu bar at the top of the screen).
- Press Empty Caches.