It isn’t complex to get aggravated if a bothersome intruder app latches into the major browser in your device. This software is actually very bothersome and though they could generally get promoted as beneficial, their actual capabilities and actions are likely to be precisely quite the opposite of that. Some examples of what a browser hijacker might do are, it may put advertisements on your screen, web page-direct your browsing activity to websites with debatable contents as well as acquire modifies in the browser in addition toout requiring the user’s agreement. Usually, the people complain from a substitute of the search website application in their browser but a hijacker might also bring in tandem a new home web page address as well as some new toolbar buttons that as usual serve to further enhance the quantity of web page-directs you get subjected to. Even the most safe of web browsers, ones like Firefox and Chrome and even Safari, might get a intruder app set up within of them. And if you believe that installing a new browser or re-installing the most recent one shall aid with the problem, you need to understand that this is generally not an efficient course of movement and wouldn’t rid you of the intruder. Still, there are ways to erase such a program from the system and exhibiting you how you could accomplish this is ingrediant of the reasoning why we are writing this post.
Download Removal Toolto remove 320YTMp3
Is 320YTMp3.com sheltered?
The potential excuse for you visiting this web page is a invader titled 320YTMp3.com in other words at the current moment within of your pc, spamming your browser with commercial advertisements. If you are yet another aggravated user who calls for to dismiss 320YTMp3.com so to put an end to the flood of advertisements on their screen, know that a easy elimination is not a choice here.
Though the intruder representatives like 320YTMp3 and Captcha practical are hugely varying from Trojan Horse malicious software, malicious software malware and damaging Ransomware record-encryptors, they are regardless pretty difficult to eliminate and commonly absence built-in deletion mode that would acquire their termination simpler. So to productively dismiss 320YTMp3, you would ought to thoroughly tail all the stages provided in the guidelines that are available on this website. Alternatively, the use of a trustworthy program for eliminating unnecessary and alarming software could also be of assistance and such an application must also be detected related in this portal. We suggest that you implement both the recommended software and the guide’s by hand stages as that would offer you the safest possibilities of successfully deleting everything connected to 320YTMp3.
Why it’s important that the browser intruder is done promptly
Aside from the utter frustration that these kinds of programs bring, there is in fact a another, etc. troublesome aspect associated with them and in other words the raised probable for leakage to Ransomware, Rootkits, Trojans and other parts of malware threats. Though 320YTMp3 itself isn’t programmed to induce harm to your device, the advertisements it indicates may have concealed and not safe sources and you could never know when some of them would as a matter of fact hyperlink you to some threat-spreading page. This is another desirable logic why instantly removing the browser hijacker is the safest thing you can do at once.
Download Removal Toolto remove 320YTMp3Learn how to remove 320YTMp3 from your computer
Step 1. 320YTMp3 Removal from Windows
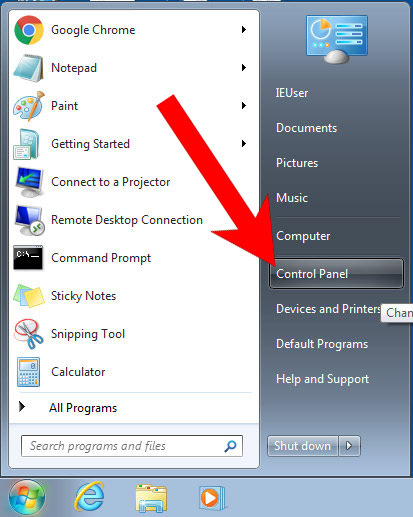
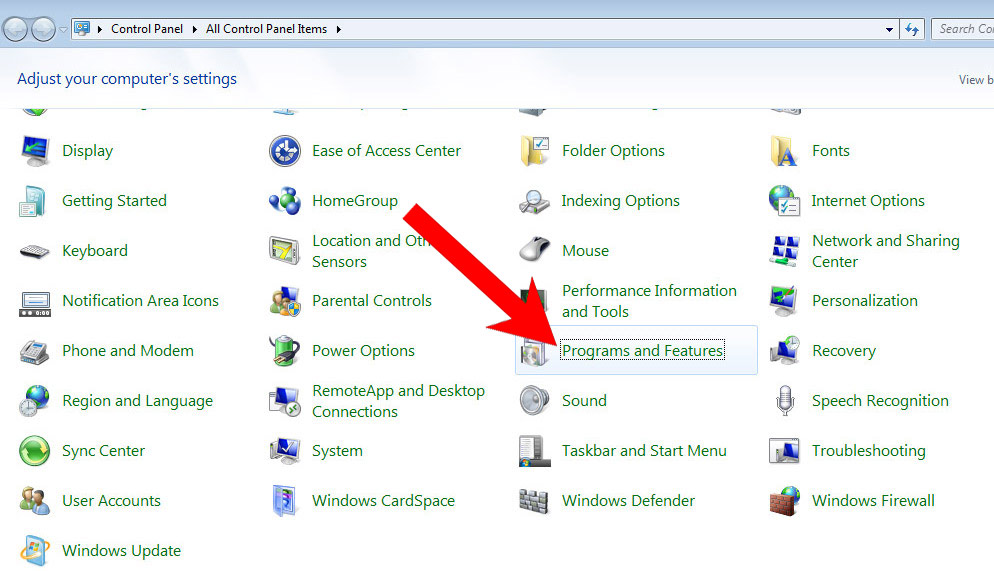
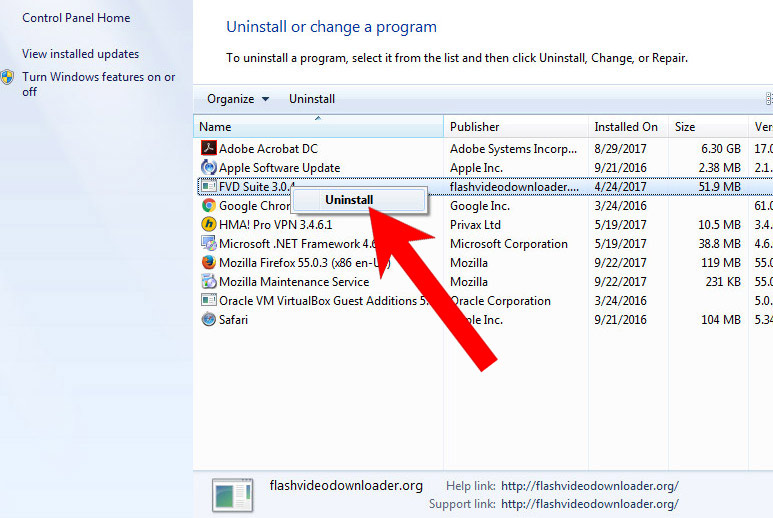
a) Windows 7/XP
- Press on the Start icon.

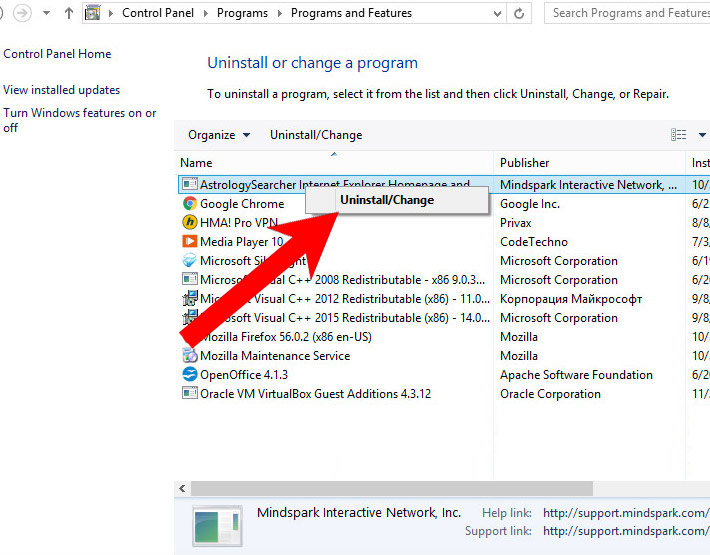
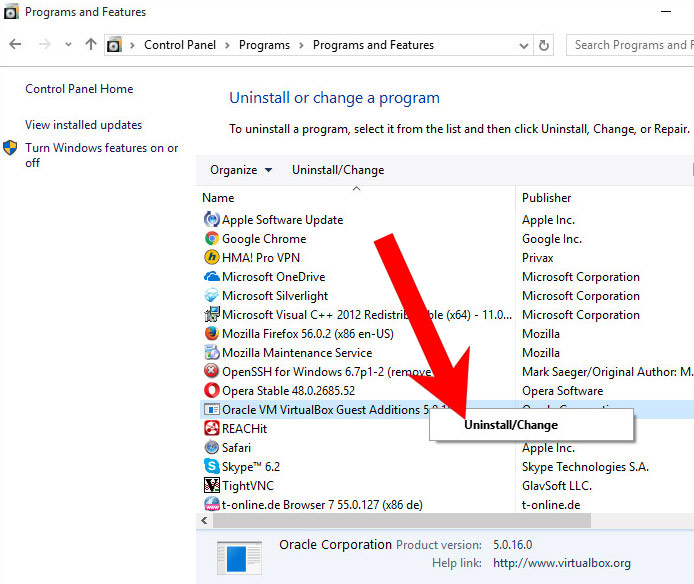
- Control Panel → Programs and Features.
- Find the program you want to delete and press Uninstall.
b) Windows 8
- Right-click on the start icon (lower left corner).
- Select Control Panel.
- Click Programs and Features.
- Find and remove all unwanted programs.
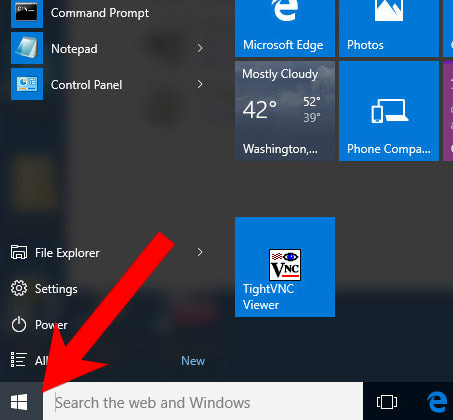

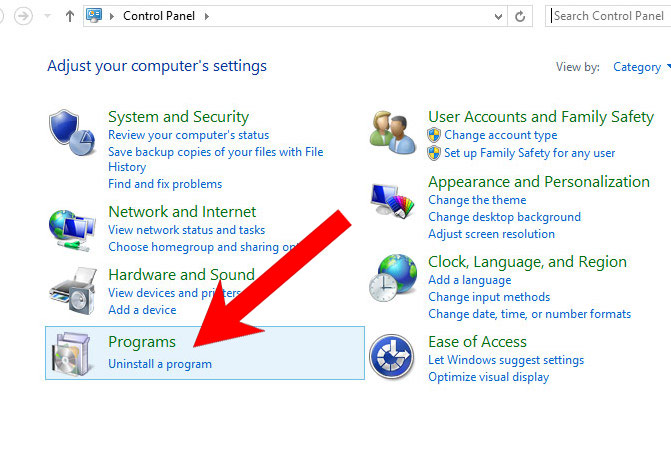
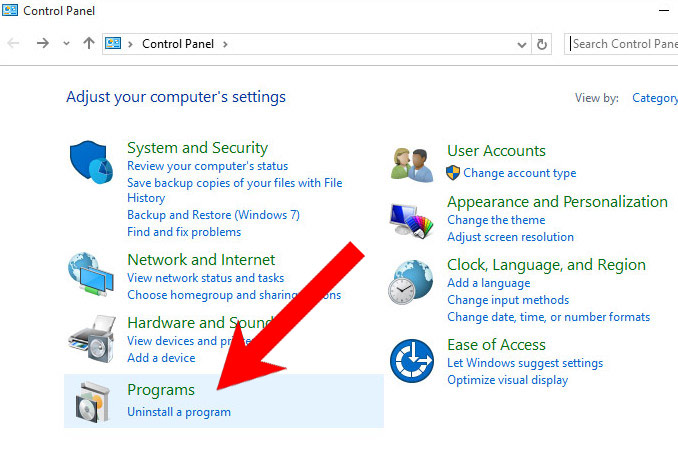
c) Windows 10
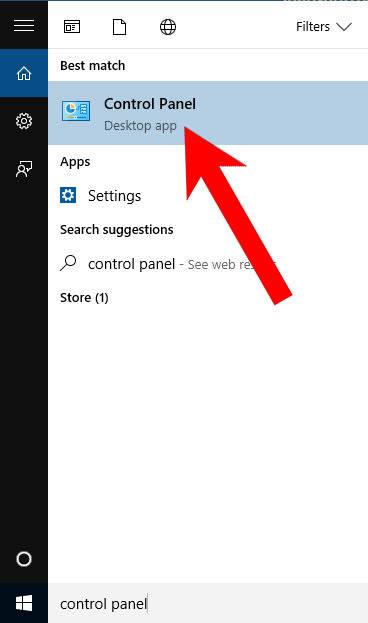
- Open Start menu and click on the magnifying glass (next to the shut down button).
- Type in Control Panel.
- Control Panel → Programs and Features.
- Find and remove all unwanted programs.
d) Mac OS X
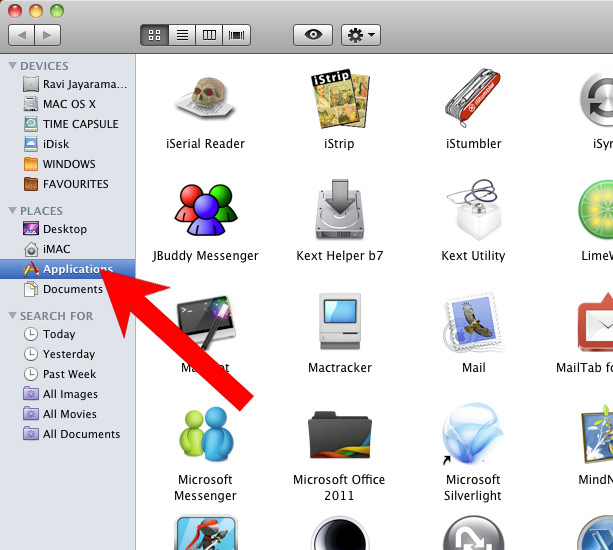
- Open Finder and press Applications.
- Check all suspicious programs you want to get rid of.
- Drag them to the trash icon in your dock (Alternatively, right-click on the program and press Move to Trash).
- After you move all the unwanted programs, right-click on the trash icon and select Empty Trash.

Step 2. Delete 320YTMp3 from browsers
a) Remove 320YTMp3 from Microsoft Edge
Reset Microsoft Edge (Method 1)
- Open Microsoft Edge.
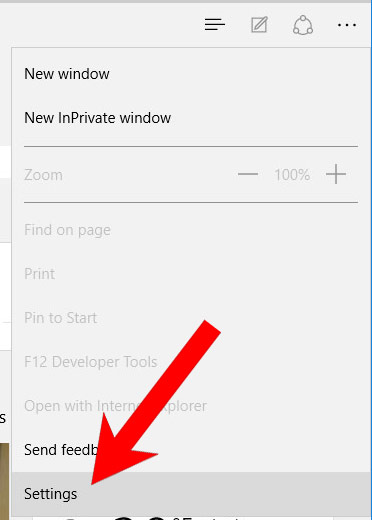
- Press More located at the top right corner of the screen (the three dots).
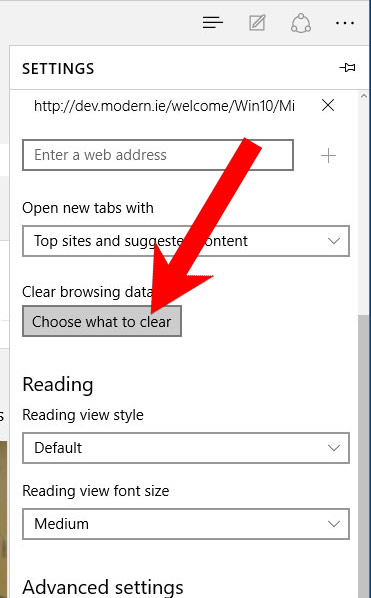
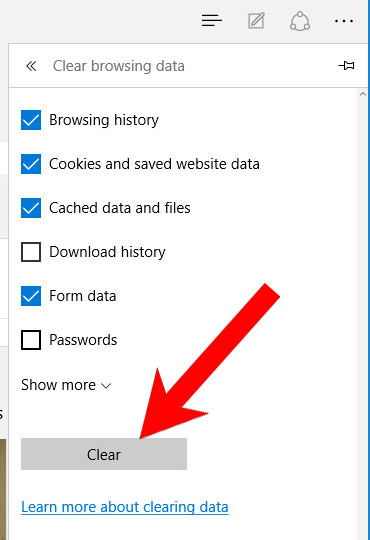
- Settings → Choose what to clear.
- Check the boxes of the items you want removed, and press Clear.
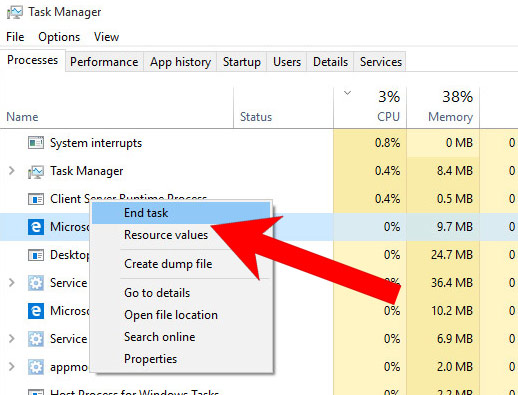
- Press Ctrl + Alt + Delete together.
- Choose Task Manager.
- In the Processes tab, find the Microsoft Edge process, right click on it, and press Go to details (or More details if Go to details is not available).
- Right-click on all Microsoft Edge processes, and choose End task.
(Method 2)
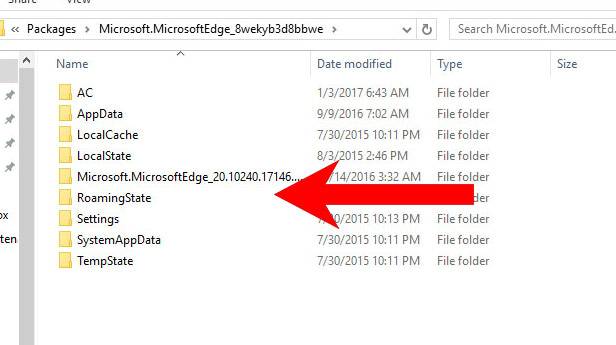
Before you proceed with this method, backup your data.- Go to C:\Users\%username%\AppData\Local\Packages\Microsoft.MicrosoftEdge_xxxxxxxxxx.
- Select all the folders, right-click on them and press Delete.
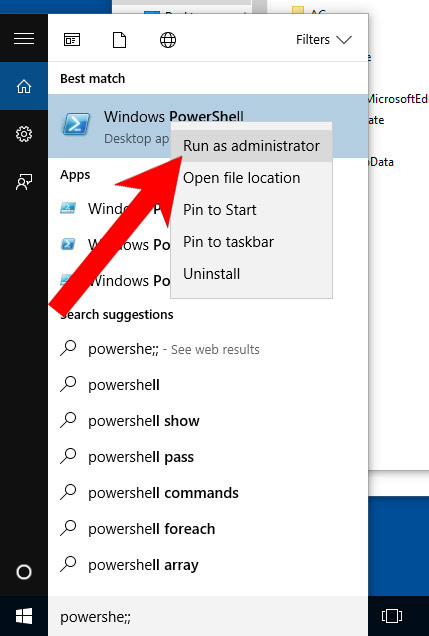
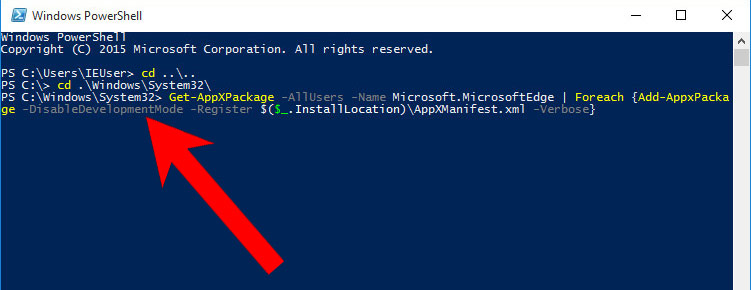
- Press the start button, and type in Windows PowerShell in the search box.
- Right-click on the result, and select Run as administrator.
- In Administrator: Windows PowerShell, paste
Get-AppXPackage -AllUsers -Name Microsoft.MicrosoftEdge | Foreach {Add-AppxPackage -DisableDevelopmentMode -Register $($_.InstallLocation)\AppXManifest.xml -Verbose}
under PS C:\WINDOWS\system32> and tap Enter.
- The issue should be gone now.
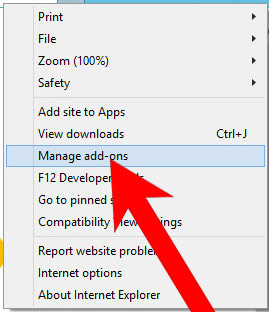
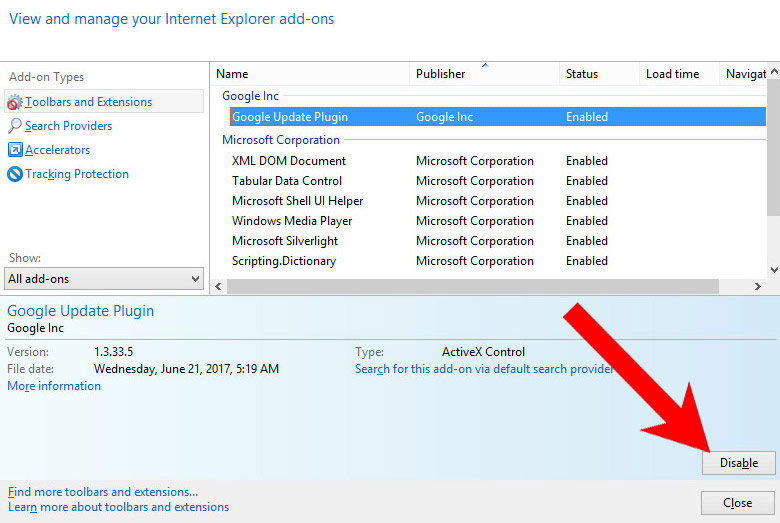
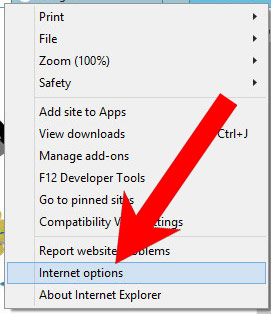
b) Remove 320YTMp3 from Internet Explorer
- Open Internet Explorer and press on the Gear icon.
- Select Manage add-ons, and then Toolbars and Extensions.
- Find and disable all suspicious extensions.
- Close the window.
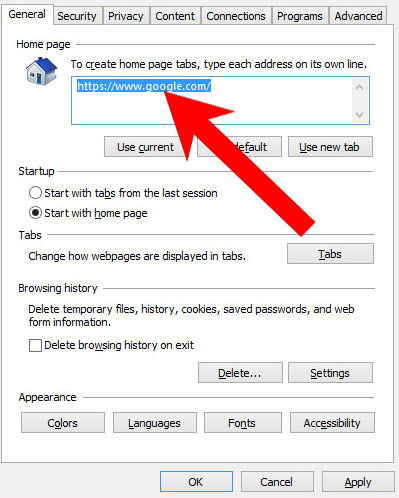
c) Restore your homepage on Internet Explorer
- Open Internet Explorer and press on the Gear icon.
- Internet Options → General tab. Delete the homepage URL and type in your preferred one.
- Press Apply.
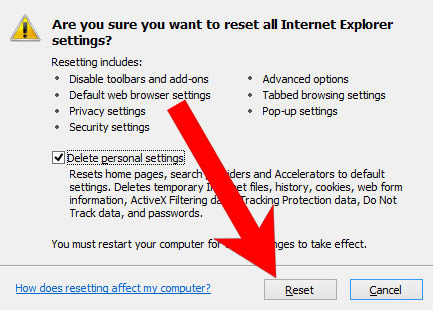
d) Reset Internet Explorer
- Open Internet Explorer and press on the Gear icon.
- Internet Options → Advanced tab.
- At the bottom, you will see a Reset button. Press that.
- In the window that appears, check the box that says Delete personal settings.
- Press Reset.
- Click OK to exit the window.
- Restart your browser.

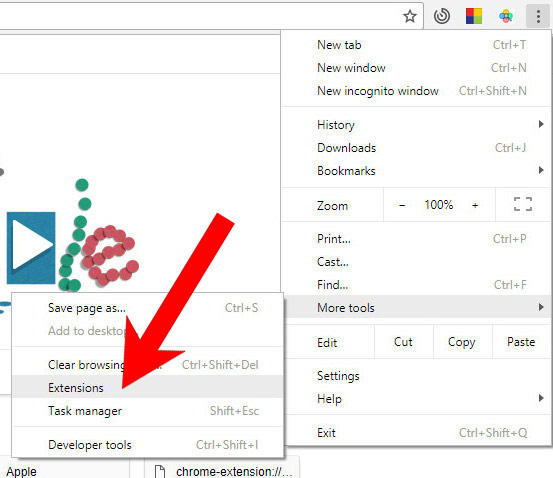
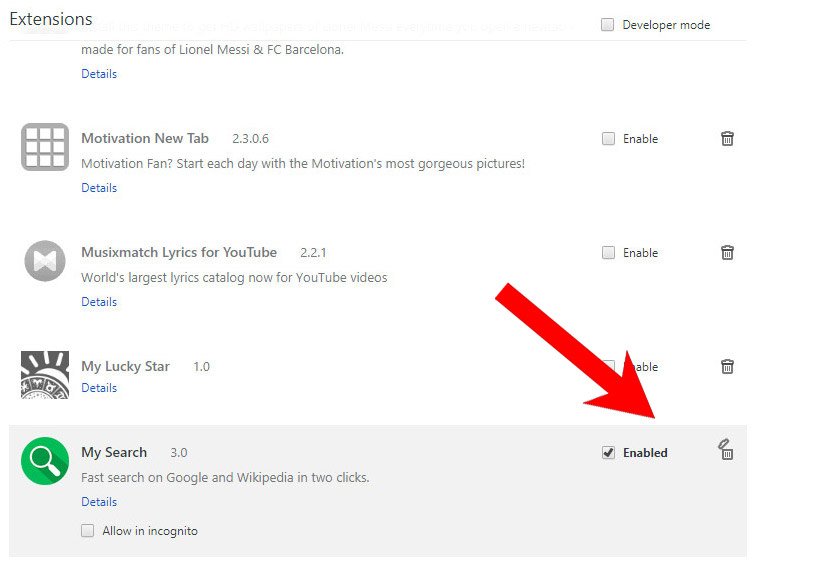
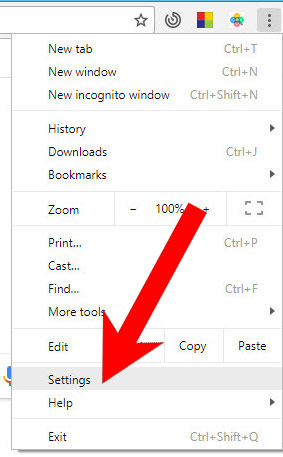
e) Remove 320YTMp3 from Google Chrome
- Open Google Chrome and press the menu icon on the right, next to the URL field.
- Choose More tools and Extensions.
- Remove suspicious extensions by clicking the Trash icon next to them.
- If you are not certain about an extension, you can disable it by unchecking the box that says Enabled. If you later decide to keep it, simply check the box again.
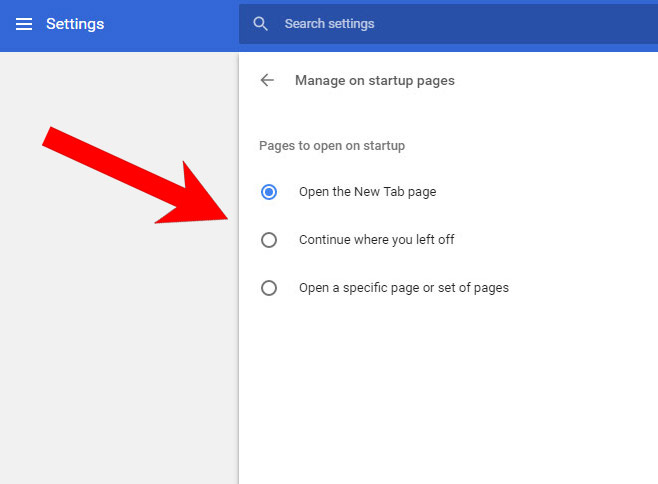
f) Restore your homepage on Google Chrome
- Open Google Chrome and press the menu icon on the right, next to the URL field.
- Choose Settings.
- In the window that appears, under On startup, there will be a Set pages option. Press on that.
- Remove the set website, and type in the one you prefer to be your homepage. Press OK.
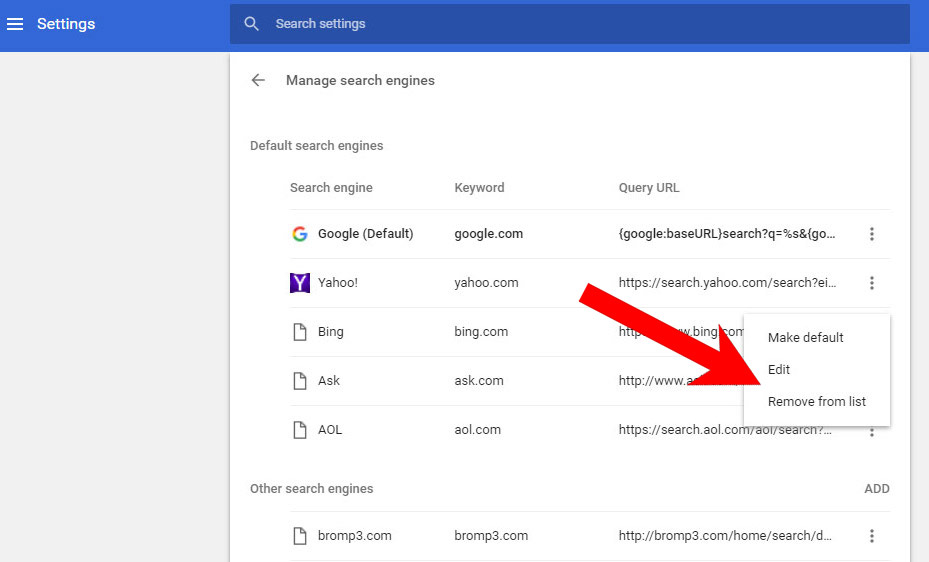
- In Settings, under Search, there is a Manage search engines option. Select that.
- Remove all search engines except the one you want to use. Click Done.
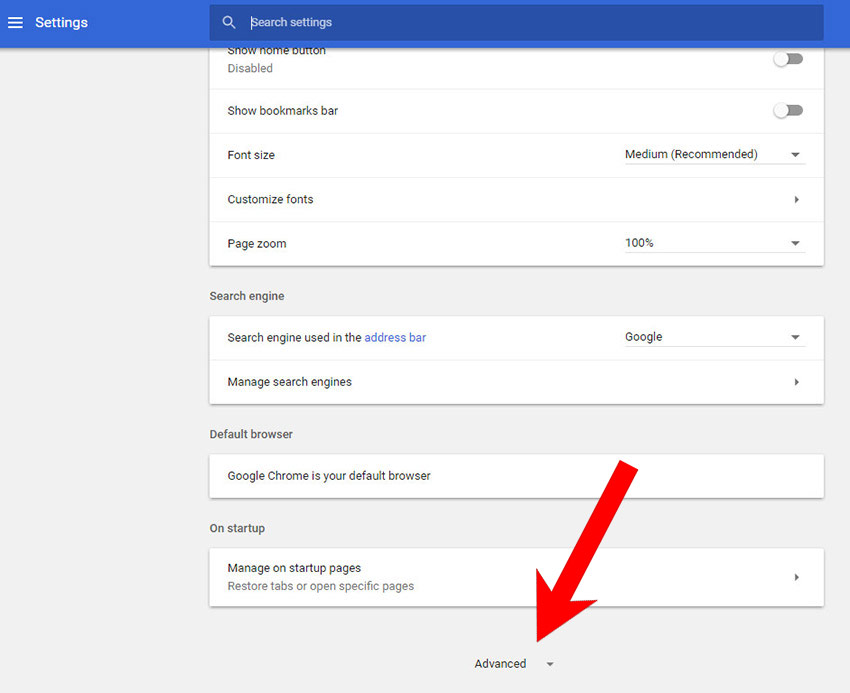
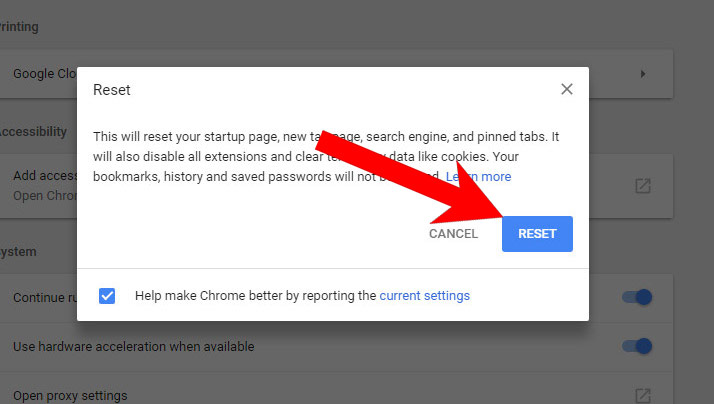
g) Reset Google Chrome
- Open Google Chrome and press the menu icon on the right, next to the URL field.
- Choose Settings.
- Scroll down and press on Show advanced settings.
- Find and press the Reset button.
- In the confirmation window that appears, press Reset.
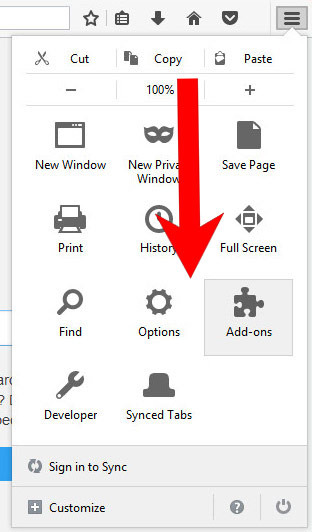
h) Remove 320YTMp3 from Mozilla Firefox
- Open Mozilla Firefox and access the menu by clicking on the three bars on the right of the screen.
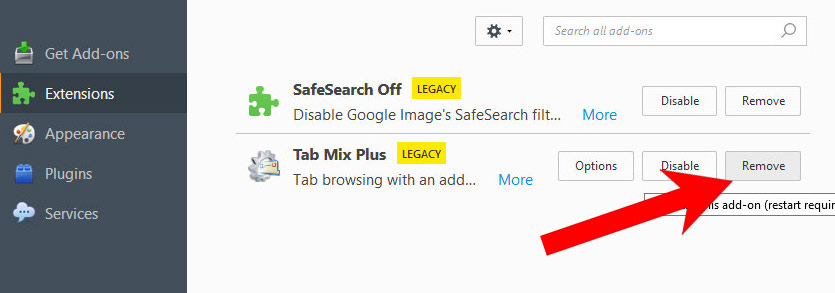
- Select Add-ons.
- Select the Extensions tab, and remove all questionable extensions.
- If you are not certain about an extension, you can disable it by clicking Disable. If you later decide to keep it, simply press Enable.
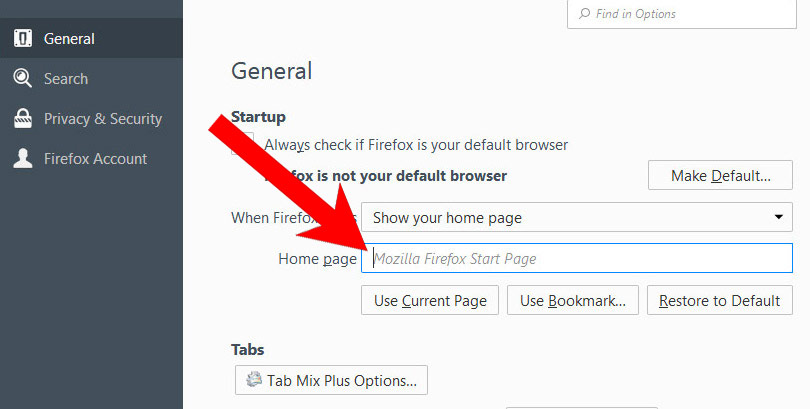
i) Restore your homepage on Mozilla Firefox
- Open Mozilla Firefox and access the menu by clicking on the three bars on the right side of the screen.
- Select Options.
- In General, click Restore to Default below the Home Page field.
j) Reset Mozilla Firefox
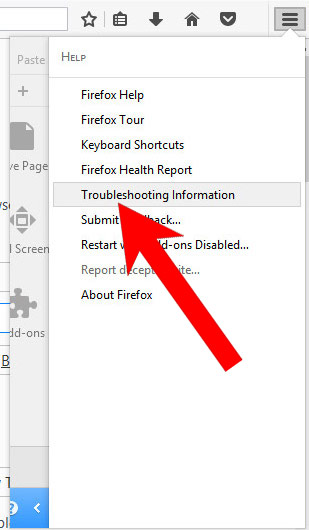
- Open Mozilla Firefox and access the menu by clicking on the three bars on the right of the screen.
- Press the question mark at the bottom of the menu.
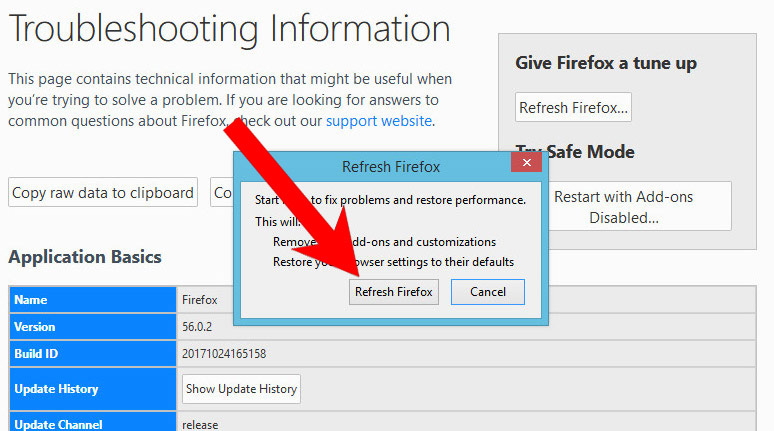
- Select Troubleshooting Information.
- Select the Refresh Firefox option.
k) Remove 320YTMp3 from Safari (for Mac)
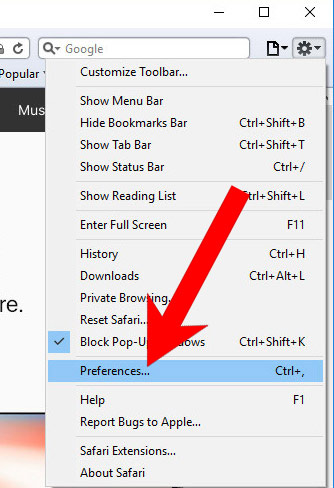
- Open Safari.
- Select Preferences (can be accesses by pressing on Safari at the top of your screen).
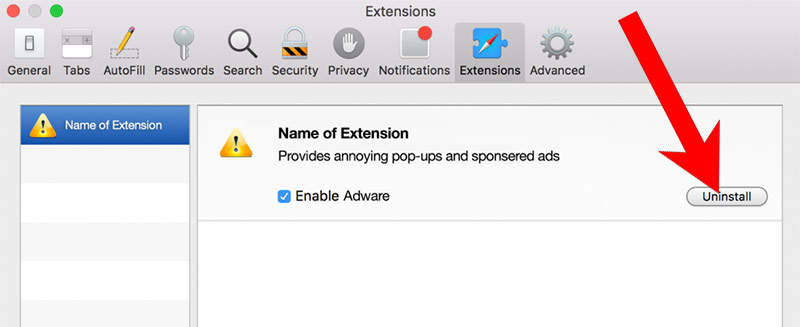
- Choose the Extensions tab.
- Uninstall all questionable extensions.
- If you are not certain about an extension, you can disable it by unchecking the box that says Enabled. If you later decide to keep it, simply check the box again.
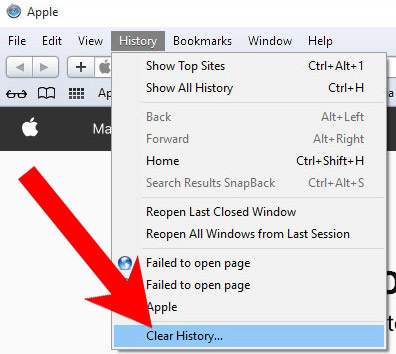
l) Reset Safari
If you are using the Yosemite, El Capitan or the Sierra versions, the option to reset Safari with one click is not available. Thus you will have to clear the history and empty the caches in separate steps.- Open Safari.
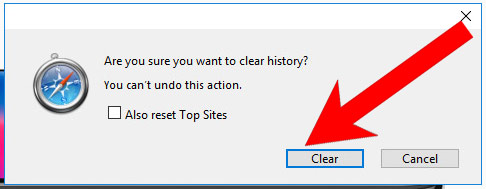
- Select Clear History (can be accesses by pressing on Safari at the top of your screen).
- Choose from what time you want the history deleted, and press Clear History.
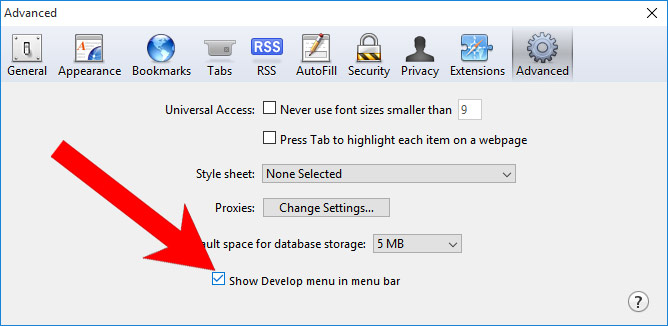
- Press on Safari at the top of the screen and select Preferences.
- Select the Advanced tab and check the box next to Show Develop menu in menu bar.
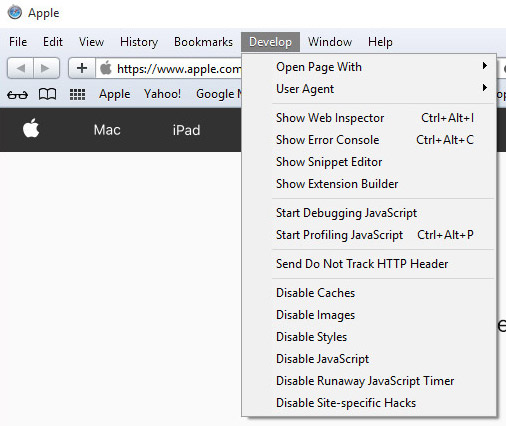
- Select Develop (from the menu bar at the top of the screen).
- Press Empty Caches.